Validate content in a data model
Validate content to prevent cases where deleting a column or element causes errors in documents that rely on the data model. Instead of manually replacing and updating columns and elements in affected documents, you can validate content in the data model and prevent these errors.
Breaking changes prevented by validating content
When certain breaking changes are made to a data model, the Publish option indicates that the model contains changes that break the structure of the model in the time since it was last published. When you click Publish, you are prompted to validate the content of your data model.
When comparing the changes made to a data model with the latest published version, the following changes might require validating content:
- Delete an element.
- Delete a column, including the following cases:
- Delete a column and add it back from the Source columns list.
- Delete a calculated column and remake it, even if you use the same name.
- Delete a metric.
- In some cases, changing the source of the data model or an element.
- Deleting or modifying a relationship between elements
- Deleting a column that is available in a relationship
Other changes that you make to your data model do not require performing content validation. For example, renaming a column or disabling an element as a source. In those cases, the data remains available to any elements using it downstream.
If a column is unavailable and not repaired through content validation, you might see errors such as “Invalid Query: Column…”, “Unknown Column [Element name/ABCdefGH1i]”, or “Column “[Element name/ABCdefGH1i]” does not exist”.
Breaking changes not repaired by validating content
Changes made in your data platform cannot be fixed by performing content validation. For example:
- Performing a CREATE OR REPLACE operation on a table or view.
- Deleting a column in a table or view.
Content validation is not performed within the data model. If you use relationships, metrics, or child elements in your data model, validating content does not fix broken configurations within the data model.
Requirements
- You must be assigned an account type with the Create, edit, and publish data models permissions enabled.
- You must be the data model owner or be granted Can edit access to the data model.
To ensure that documents that depend on the data model do not break, content validation can make changes to documents that the user publishing the data model cannot access.
Considerations when validating content
When you validate the content in your data model, consider the following:
- Content validation jobs can take some time to run. If you perform content validation when other jobs are running in your organization, such as a large volume of scheduled exports, the job can be slower. Review the progress at any time in the job history. See Review content validation job results for a data model.
- Content validation does not make changes within a data model. If you delete a column from an element that is used by child elements in the same data model, you must map the column for each affected element. If you map the column for only the parent element, other elements in the data model remain broken.
- Content validation does not update related columns. If you remove a column that is used in a relationship in your data model, even if you validate content, the related column will be unavailable downstream after publishing changes.
- The list of documents that use the elements with breaking changes as a source are shown even if the documents do not use any deleted columns.
Some documents are not updated by content validation:
- Explorations are not updated by content validation. Instead, a user is prompted to update sources the next time they open the exploration for editing.
- An unpublished draft of a workbook that uses the data model is not updated by content validation if the published version of a workbook does not use the data model. Instead, a user in the draft is prompted to update sources the next time they open the draft.
- An unpublished draft of an embedded workbook is not updated by content validation. As a result, users that edit embedded workbooks that depend on a data model that required validating content might experience invalid columns or elements with errors.
Validate the content in your data model
If you make breaking changes in your data model, validate the content to reduce the likelihood that your changes will cause errors in workbooks and data models that use the data model elements downstream. When your data model contains breaking changes, the Publish button displays a warning icon (![]() ).
).
-
When editing a data model with breaking changes, select Publish to start validating content.
You can also click the down arrow (
 ) next to Publish and select Validate content at any time.
 -
In the Content validation modal, review all elements in the data model and identify specific broken elements and elements with broken columns, metrics, or relationships listed with a warning (
 ). Select a broken element to review what is broken:
-
(Optional) If you want to have Sigma attempt to map possible replacements for the deleted content based on name, click Auto fix.
-
(Optional) To review the list of documents that use the affected elements as a source, click Downstream lineage. Reviewing affected documents can help you assess the impact of failing to validate content.
-
Depending on what content has breaking changes in your data model, take the relevant action:
- Broken element: Validate content after deleting an element
- Broken column: Validate content after making breaking changes to a column
- Broken metric: Validate content after making breaking changes to a metric
- Broken relationship: Validate content after making breaking changes to a relationship
Validate content after deleting an element
To fix a broken element, after selecting an element with breaking changes in the Content validation modal, do the following:
-
In the Element section, review the name of the deleted element to confirm which element you are mapping to a replacement. By default, the element is mapped to “None”, indicating that the element will not be replaced in downstream documents.
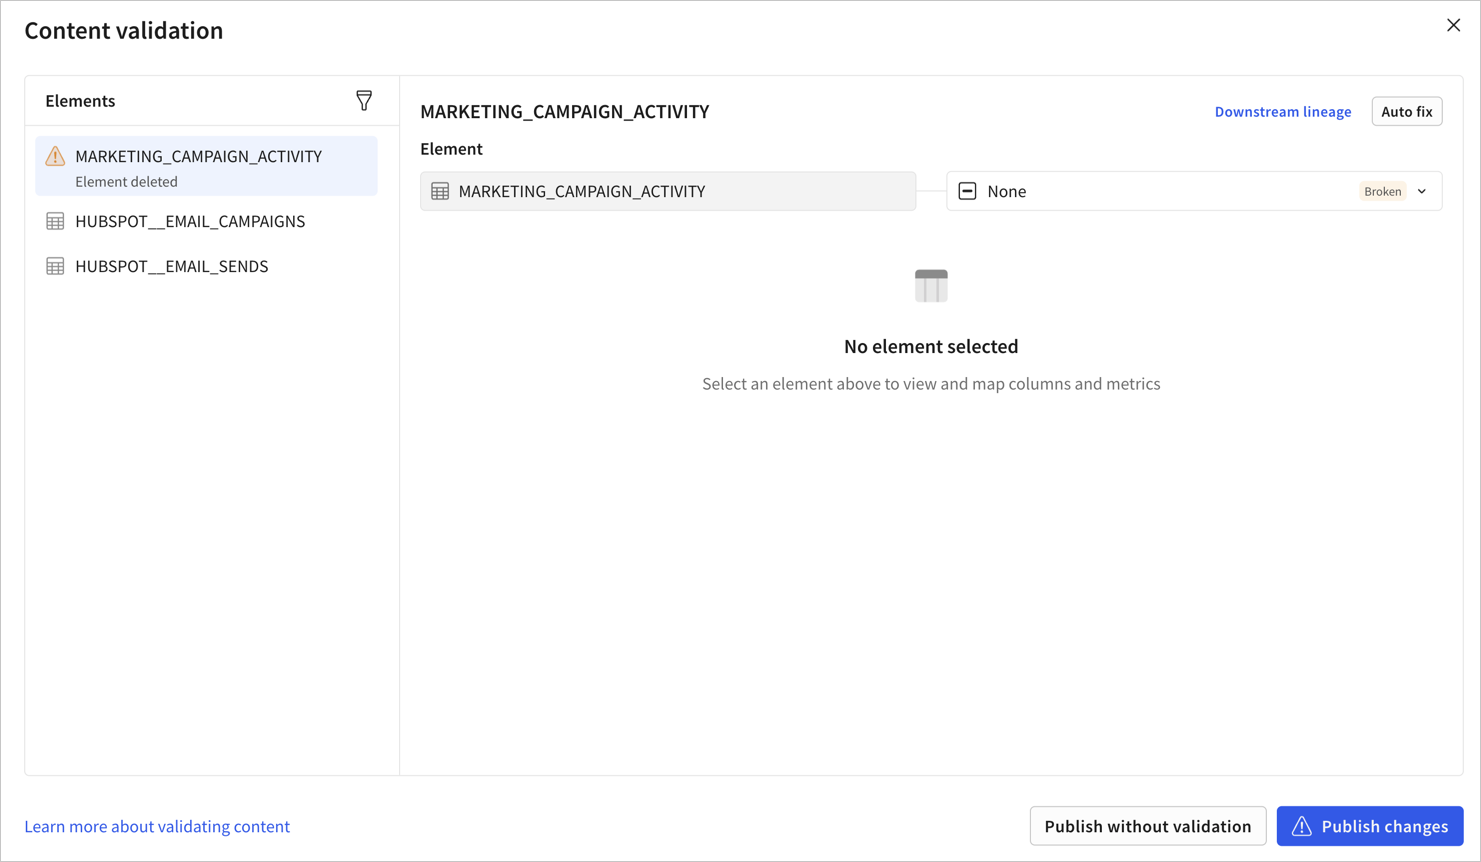
-
Select None to review a dropdown list of other elements in the data model.
-
If a relevant replacement element exists, select it.
Otherwise, leave the default None. If you do not replace the deleted element in content validation, any elements that use the deleted element as a source display an error after the data model is published.
-
After selecting a replacement element, review the columns, metrics, and relationships for the element and make updates as needed:
- Broken column: Validate content after making breaking changes to a column
- Broken metric: Validate content after making breaking changes to a metric
- Broken relationship: Validate content after making breaking changes to a relationship
-
If no updates are needed, finish validating content.
Validate content after making breaking changes to a column
To fix a broken column:
-
After selecting an element with breaking changes in the Content validation modal, select the Columns tab.
-
In the list of columns, review the broken columns. Select Broken to show only the columns that need to be mapped and that will break in downstream documents.
-
For each broken column, select the dropdown menu and review the column list for a replacement column of the same data type.
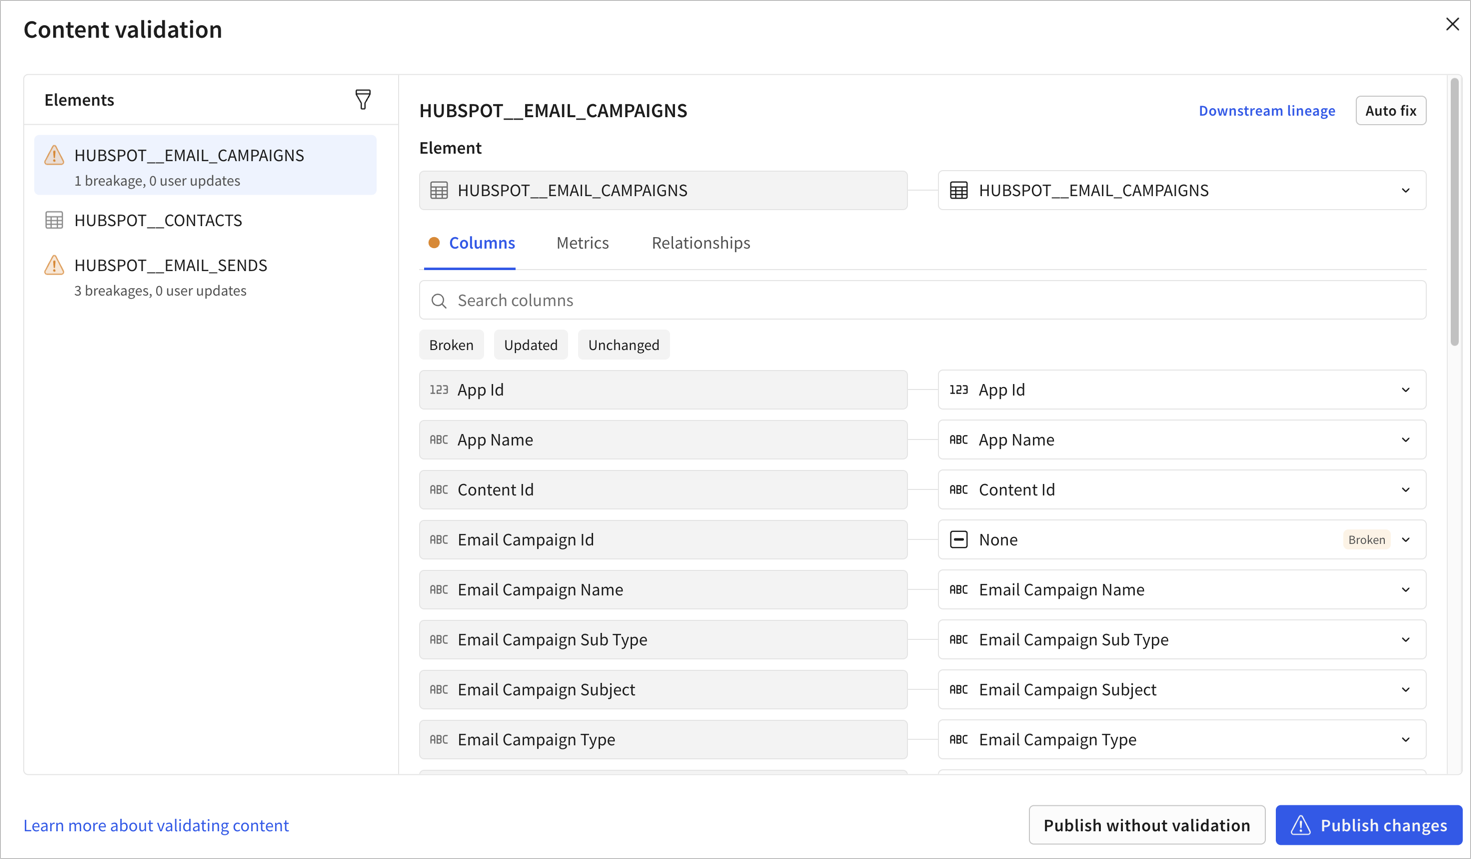
-
If a relevant replacement column exists, select it. Otherwise, leave the default None. If you map the column to None, any elements that use the column downstream display an error after the data model is published.
-
After updating all broken columns, finish validating content.
If the broken or deleted column is used in a metric or relationship within the data model, you must update the metric or relationship separately from validating content. Content validation does not make changes within the data model.
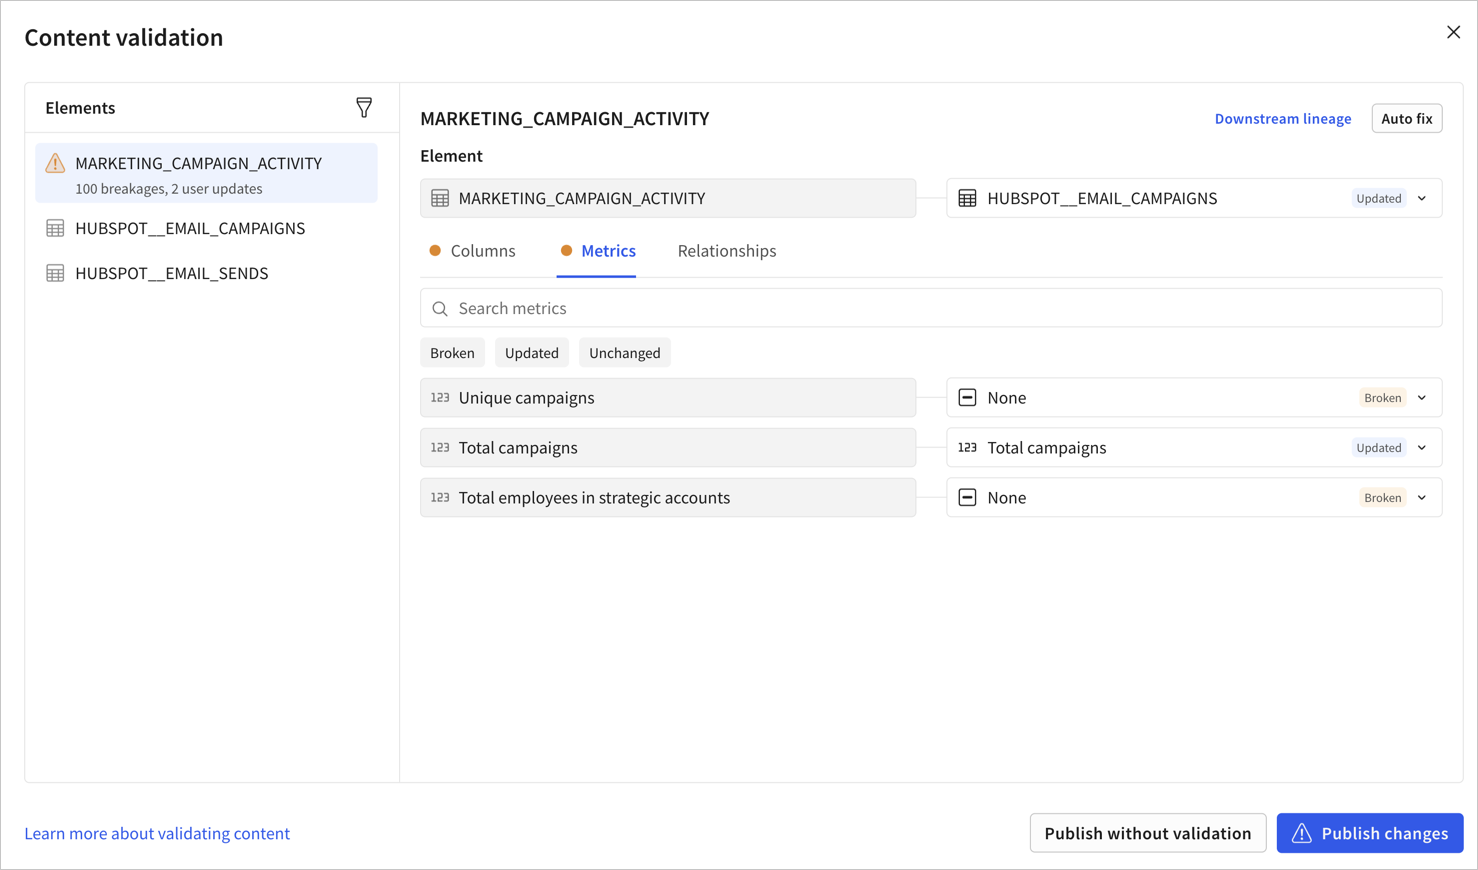
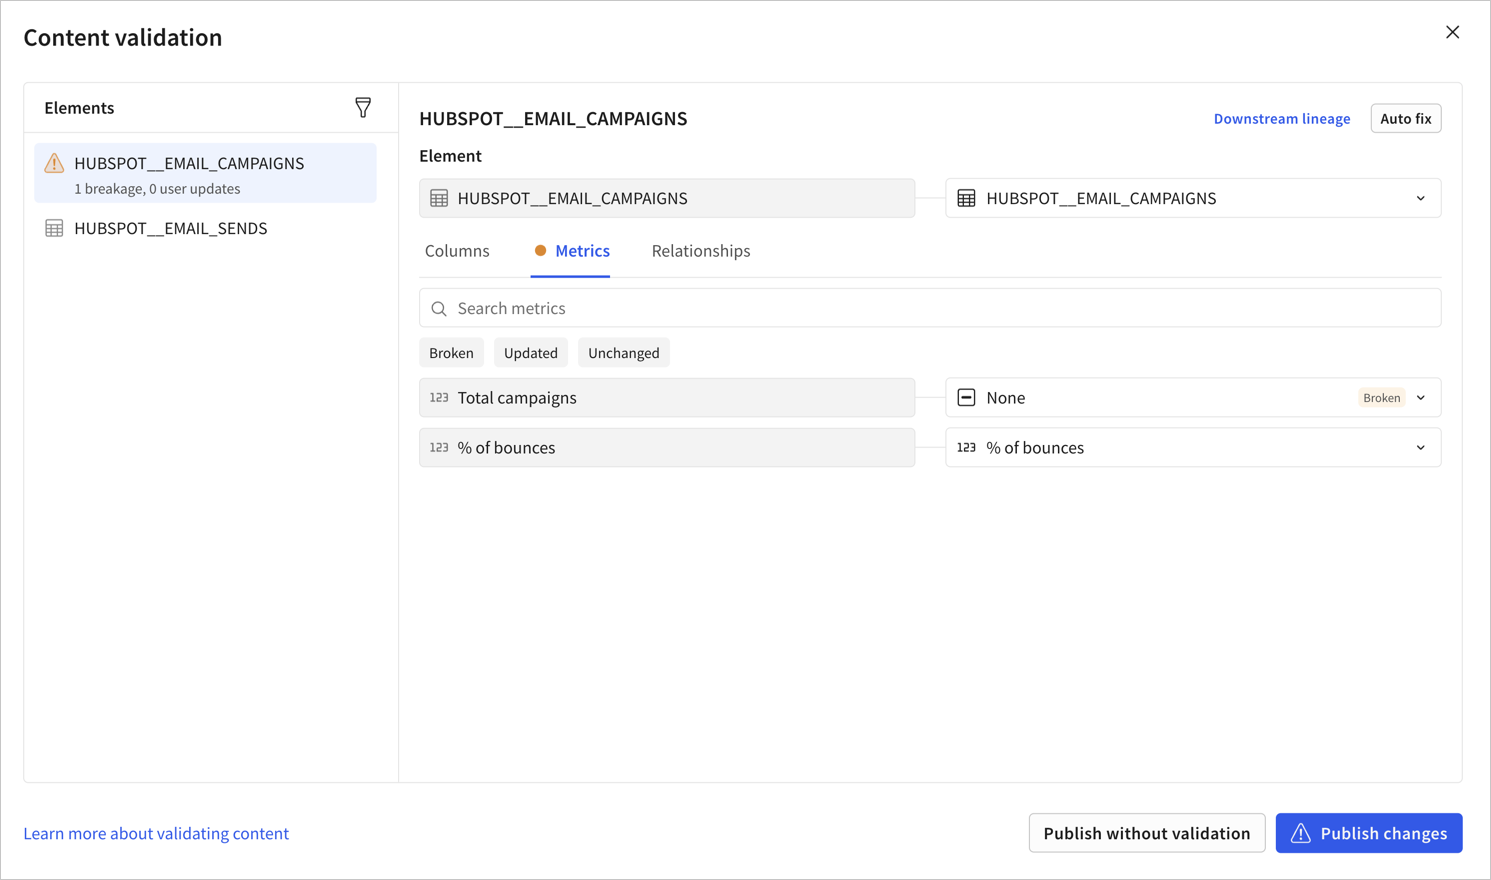
Validate content after making breaking changes to a metric
To fix a broken metric:
-
After selecting an element with breaking changes in the Content validation modal, select the Metrics tab.
-
In the list of metrics, review the broken metrics. Select Broken to show only the metrics that need to be mapped and that will break in downstream documents.
-
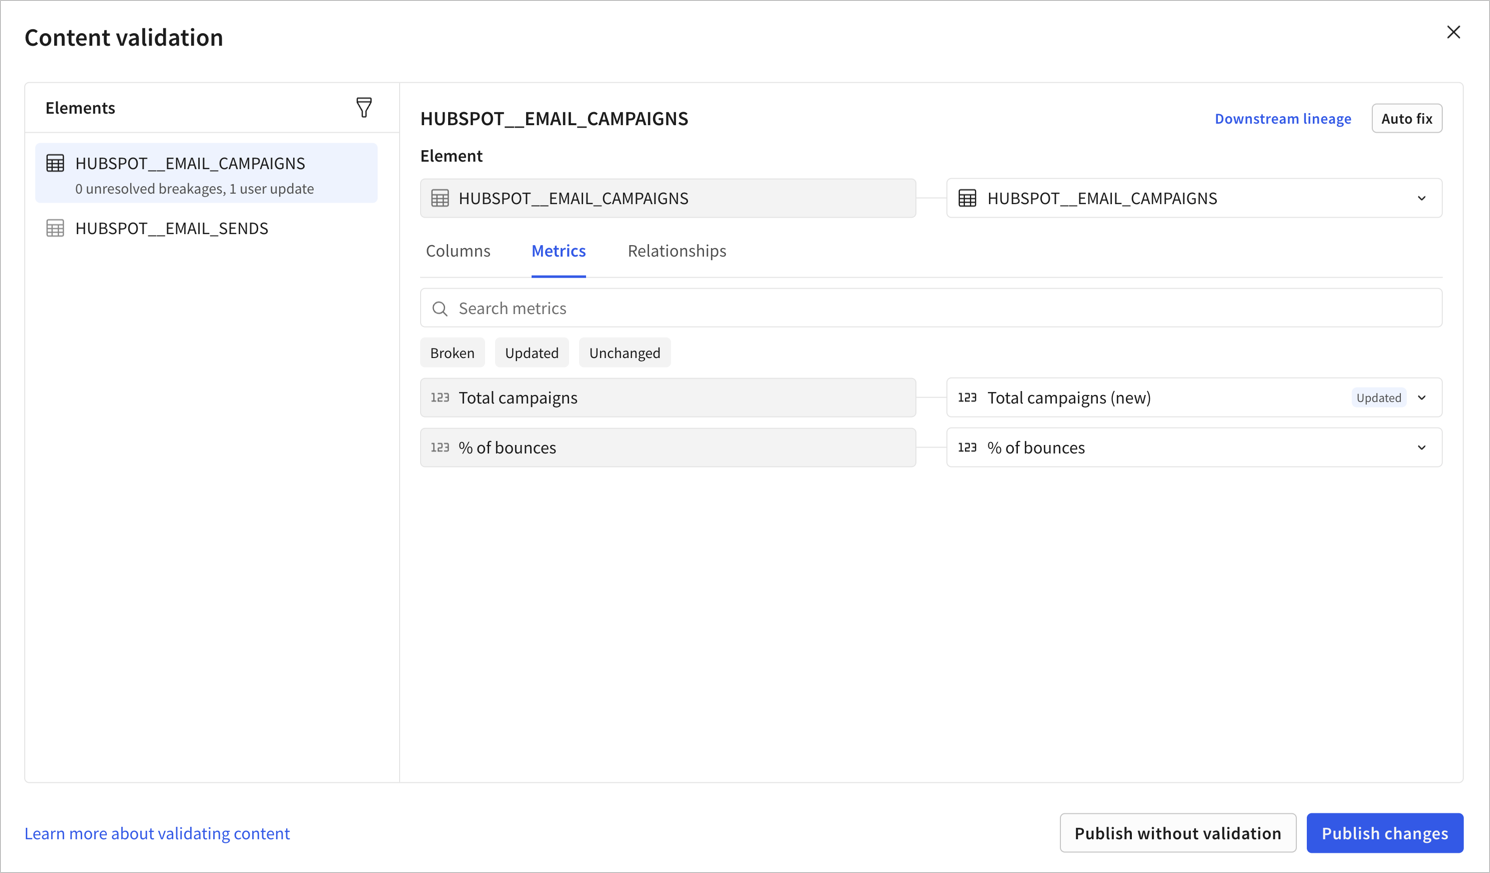
For each broken metric, select the dropdown menu and review the list for a replacement metric.
-
If a relevant replacement metric exists, select it. Otherwise, leave the default None. If you map the metric to None, any columns that use the metric downstream display an error after the data model is published.
-
After updating all broken metrics, finish validating content.
Validate content after making breaking changes to a relationship
To fix a broken relationship:
-
After selecting an element with breaking changes in the Content validation modal, select the Relationships tab.
-
In the list of relationships, review the broken relationships.
-
For each broken relationship, select the dropdown menu and review the list of possible replacement relationships. Each relationship lists the name of the relationship and the name of the target element in the relationship. Review the target of a relationship to ensure that you select a valid replacement.

-
If a relevant replacement relationship exists, select it. Otherwise, leave the default None. If you map the relationship to None, any elements that use the relationship downstream display an error after the data model is published.
-
After updating all broken relationships, finish validating content.
Finish validating content
After performing content validation for every affected element in your data model, select Publish changes. To discard all content validation that you performed, you can choose Publish without validation.
If you choose to publish without validation, any breaking changes in the data model are published without validation. Downstream documents that use the data model as a source might display errors like “Object Does Not Exist: Data model element not found” and prompt the user to add a source, or display “Invalid Argument: Missing element”, or columns might show “Column does not exist” errors.
After publishing changes, the content validation job starts to update affected documents. For long-running jobs, documents might show errors for affected columns or elements until the content validation job runs for the document. For details, see Updates performed by content validation.
You can view the status of the job in your data model. Click the down arrow (![]() ) next to Publish and select Content validation job history. For more details, see Review content validation job results for a data model.
) next to Publish and select Content validation job history. For more details, see Review content validation job results for a data model.
Users who have edit access and are currently in a draft of a workbook or data model that uses the data model as a source are prompted to sync the draft to the latest published version. For more details, see Sync a draft with the latest published version.
Updates performed by content validation
After you publish changes, the following happens:
-
The latest published version of any documents that use the relevant elements in the data model are updated. Documents are updated sequentially.
-
If a user is viewing a draft of the document, they are prompted to sync the draft to the latest published version. For more details, see Sync a draft with the latest published version
Not all drafts can be updated by content validation. For details, see Considerations when validating content.
-
After all documents are updated, the job is complete.
Updates performed by content validation in downstream documents are attributed to the “Scheduler User”.
Review content validation job results for a data model
-
While editing a data model, open the publish menu, then select Content validation job history.
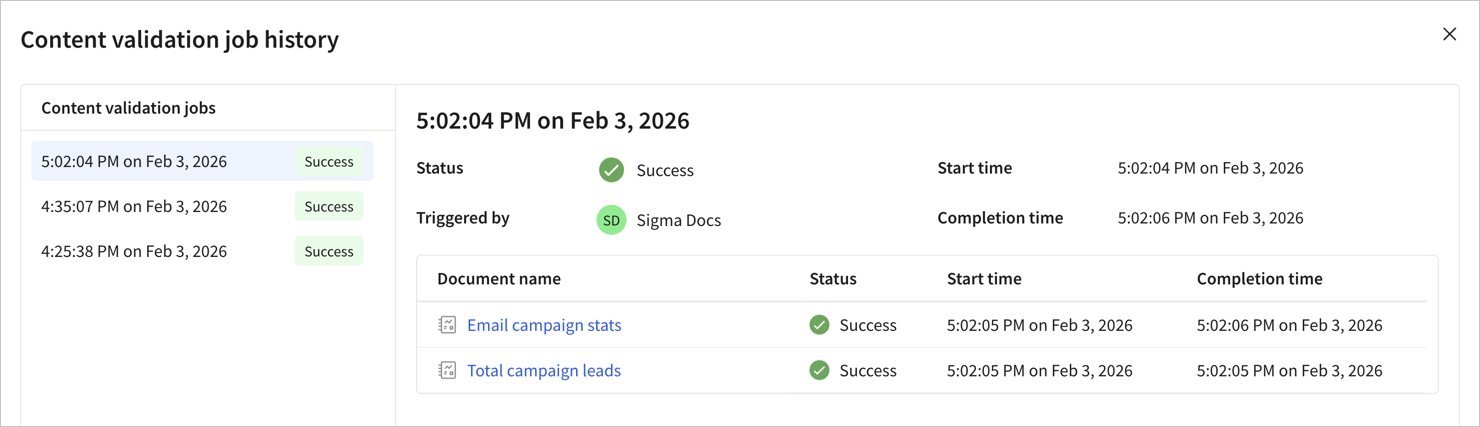
The Content validation job history modal opens.
-
Review the history of content validation jobs performed for the data model. Jobs are listed by start time.
-
Select a job to review the following information:
- The status of the job. For example, Pending.
- The user that triggered the content validation job.
- When the job started and when it was completed.
- The list of updated documents, status, and when the job was started and completed for each document.