Set up row-level security
Set up row-level security
Row-level security (RLS) restricts access to data based on the characteristics of the person viewing the data.
Sigma supports both RLS and column-level security (CLS) to help protect sensitive data. While CLS protects all values in a column from being viewed by users without access, RLS can be used to protect specific rows of data based on the values.
You can set up RLS for a table in a data model or a dataset (deprecated),
If your organization uses OAuth for a connection, any existing RLS rules in your data platform are respected by Sigma.
In Sigma, you can set up RLS based on the following:
- User attribute value (recommended)
- Team membership in Sigma
- User email address
When you configure RLS, you perform two steps:
- Define a column with the RLS rule.
- Filter the data to match.
Row-level security relies on a filter that can be modified by anyone viewing the table on which the filter is applied. As a result, only child elements and downstream data sources can be considered fully protected. If you configure RLS in a dataset or data model, all workbooks that rely on the data are protected.
Never use a control element in a data model to apply row-level security because the value of the control can be modified from a downstream data model or workbook by a source parameter.
Requirements
- You must have Can Edit or Can Explore access to the document where you want to set up RLS.
Configure row-level security with user attributes
Setting up RLS with user attributes is recommended because assignment of user attributes to users and teams is handled separately from the column formulas that control RLS, so are easier to update. User attributes can also be used for RLS in embedding use cases or custom SQL queries.
Before configuring RLS with user attributes, create a user attribute and assign it to the relevant users in Sigma. See Configure user attributes.
-
In the data model table, workbook data element, or dataset that you want to protect, add a new column.
-
Set the formula of the new column to the following formula, replacing
<attribute-name>with the user attribute to use for RLS, and[<column-name>]with the column name that contains the matching values:The attribute value must be the same data type as the column name. For example, text.
The formula evaluate to
Truewhen the attribute value matches the row value, andFalsewhen it does not. -
Add a filter on the new column to show only
Truevalues.Never use a control element in a data model to apply row-level security because the value of the control can be modified from a downstream data model or workbook by a source parameter. Only apply a row-level security filter directly on an element.
-
Hide the column so that downstream users do not see it by default.
For more details, see CurrentUserAttributeText.
RLS in a data model
If you want to set up RLS on the plugs_electronics table of sales data by store region in a data model:
-
Create a user attribute called
Regionand assign the different available region values to different sales teams.- Sales US-West is assigned the value West
- Sales US-East is assigned the value East
-
In a data model, add the
plugs_electronicstable, then add a new column called Region RLS. -
Set the formula of the Region RLS column to the following:
The Region RLS column shows
Truevalues for rows where the Store Region isWestbecause you are a member of the Sales US-West team.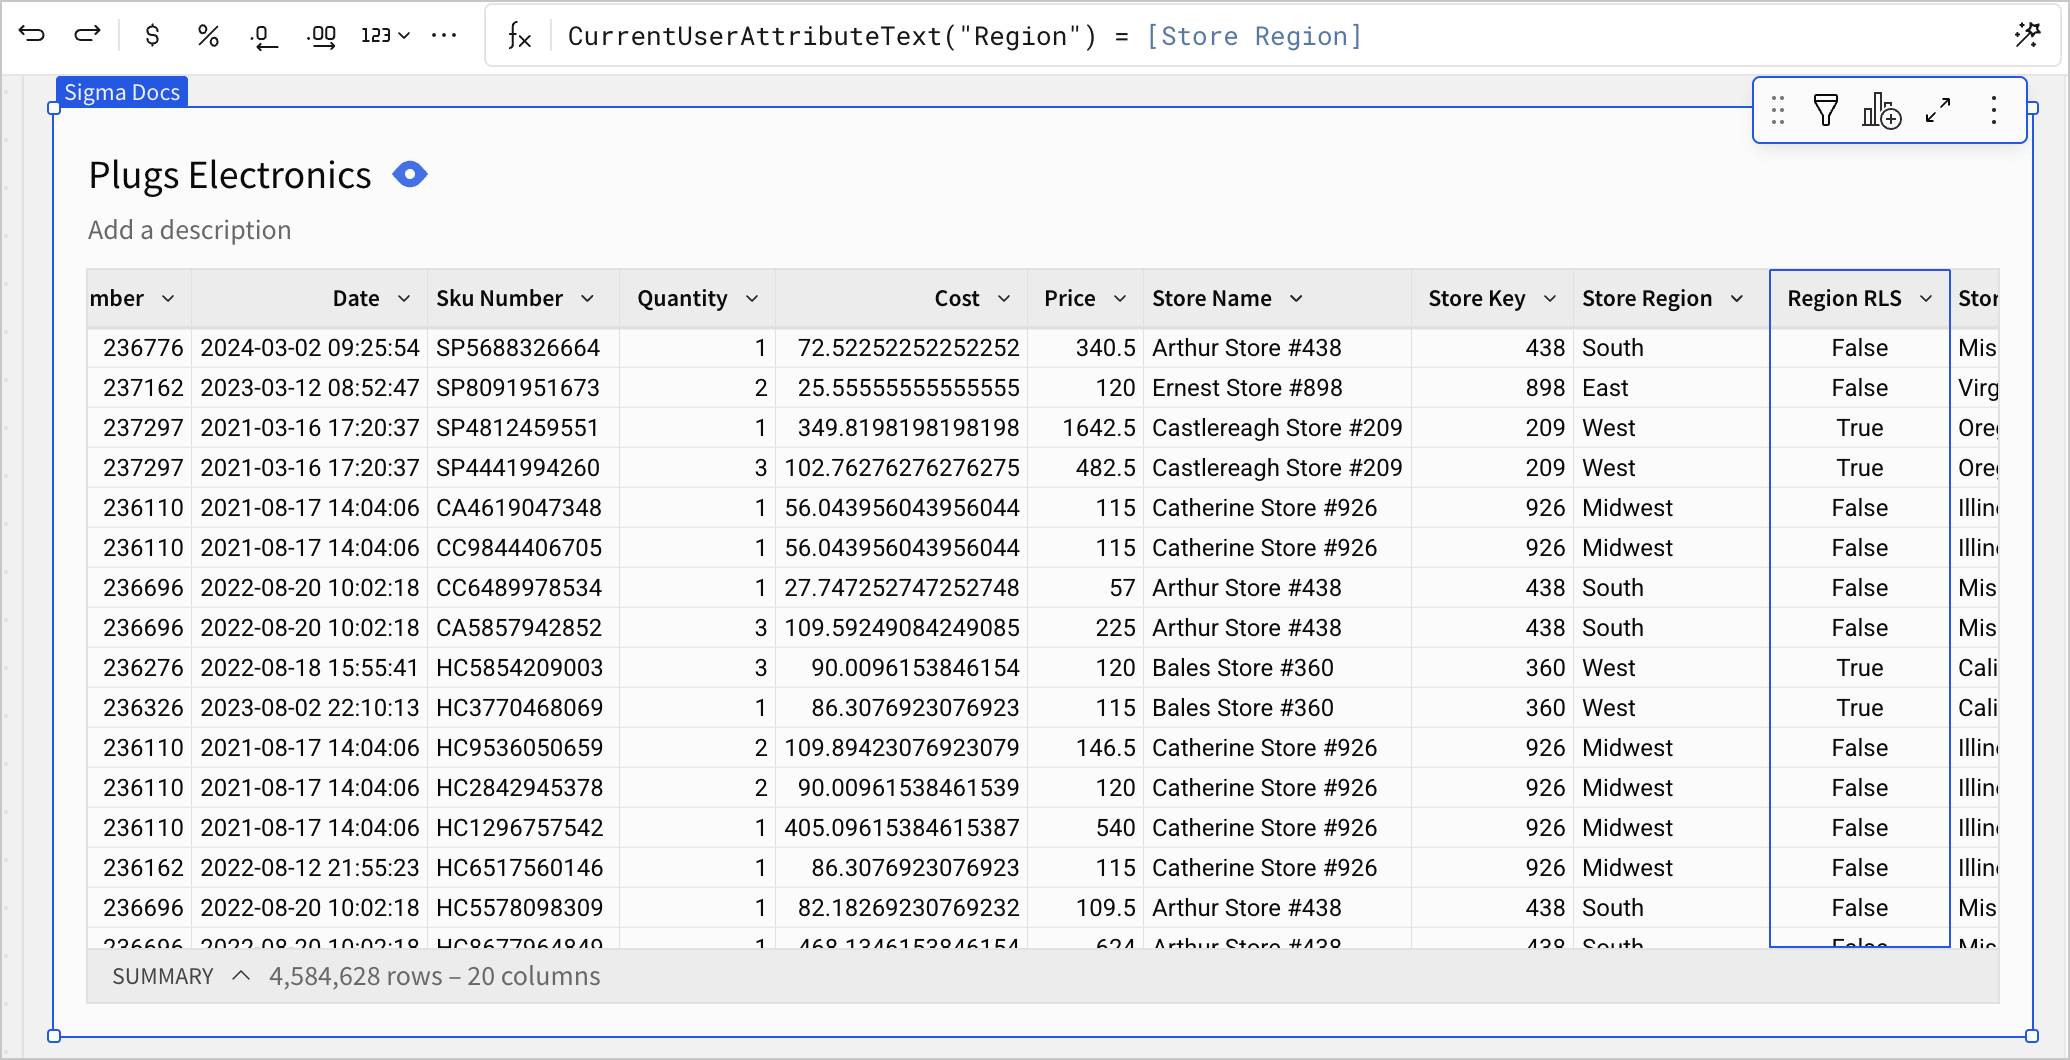
-
Add a filter on the Region RLS column and show only
Truevalues.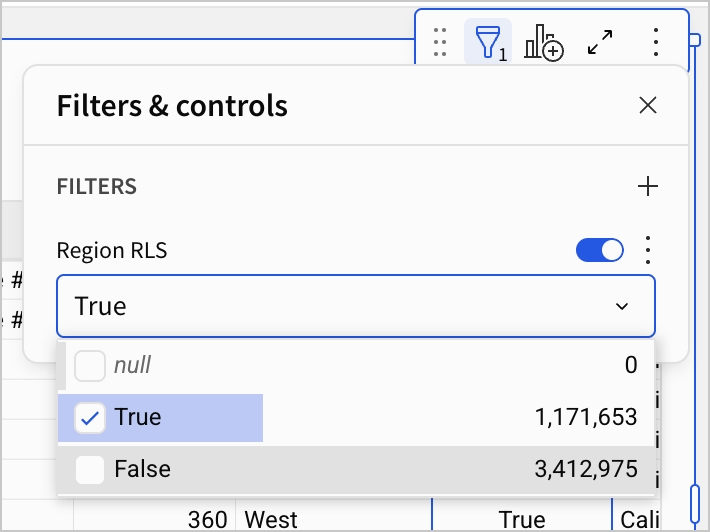
Never use a control element in a data model to apply row-level security because the value of the control can be modified from a downstream data model or workbook by a source parameter. Only apply a row-level security filter directly on an element.
-
[optional] Hide the Region RLS column so that downstream users do not see it by default.
RLS with embedded analytics
If you embed Sigma, you can enforce RLS with a parameter in the embed URL or a JWT claim:
RLS with custom SQL
After you successfully configure user attributes, you can filter the results of a SQL query based on the user attribute of the user running the SQL.
For example:
This query uses the CurrentUserAttributeText function to retrieve the assigned value of the user attribute for the user running the query. The function requires a parameter that references the user attribute name.
If the user attribute name has spaces, use double quotes. For example:
{{system::CurrentUserAttributeText::"Store Region"}} = STORE_REGION
For more details, see Write custom SQL.
Configure row-level security by team
You can configure RLS by team membership using the CurrentUserInTeam function:
-
In the data model table, workbook data element, or dataset that you want to protect, add two new columns.
-
Set the formula of one new column to a formula that associates a value in the data with a Sigma team name, using the Switch or the If function.
-
Set the formula of the other new column to the following formula to set up the RLS rule:
The formula evaluates to
Truewhen the current user is a member of one or more of the teams specified in the Team Assignment column. -
Add a filter on the new column to show only
Truevalues. -
Hide the columns so that downstream users do not see it by default.
For more details, see the RLS by team example.
RLS by team example
To set up RLS by team, create a column in your data that associates the data with the relevant Sigma team called Team Region. For example, given a Store Region column in your data and two Sigma teams, Sales US-West and Sales US-East, write a formula using the Switch function:
You can expand this logic to include all of the teams you want to test for, then create a Team RLS column with the RLS rule to evaluate whether the current user belongs to the team indicated in the corresponding row of the Team Region column:
You can then add a filter on the Team RLS column to show only True values and hide the Team RLS and Team Region columns.
Configure row-level security by user
You can set up RLS by user with the CurrentUserEmail function:
-
In the data model table, workbook data element, or dataset that you want to protect, add a new column.
-
Set the formula of the new column to the following formula, with one or more users to use for RLS:
The formula evaluates to
Truewhen the current user is a member of one or more of the specified teams. -
Add a filter on the new column to show only
Truevalues. -
Hide the column so that downstream users do not see it by default.
RLS by user example
If you have a table with sales results and you want each salesperson to see only their results, set up row-level security by user. To use this approach, you must create or identify a column in your data that contains email addresses of Sigma users. If you need to create a column, refer to the RLS by team example for sample syntax mapping data values.
For this example, assume that your data contains a column, Salesperson Email, that matches email addresses used by Sigma users.Add a new column called Salesperson RLS with the following formula to evaluate the RLS rule:
This formula evaluates the emails in the column [Salesperson Email] and checks whether they match the email of the user currently viewing the data. The formula returns True for all rows where the current user’s email matches the salesperson email.
You can then add a filter on the Salesperson RLS column to show only True values and hide the Salesperson RLS column.
RLS by team and user example
You can also set up filters to test for multiple conditions. For example, add a column to filter your data to show salespeople data only from leads that they own, but show all the data to sales managers:
This formula returns True for all rows when the viewer is in the “Sales Manager” team and for all other viewers returns True only for rows where the viewer email matches the Salesperson Email.