Create and manage a control element
Add a control element to a workbook to provide predefined interactions to users viewing or customizing a workbook, such as inputs that modify data, selections to filter data or change displayed data, drilldown paths, or other ways of manipulating data. Add a control element to a data model to function as a parameter and filter tables in the data model, according to a selected value in a workbook control.
After adding a control element, you can add targets to filter elements or data sources, or pass values to a dataset parameter or a control element in a data model.
You can also duplicate an existing control. For more details about the available types of controls, see Intro to control elements.
Requirements
- You must have Can edit access to the workbook or data model, or Can explore access to the workbook.
Add a control element
You can add one or more control elements to a workbook or data model. You cannot add a control to a dataset worksheet, but you can reference a workbook control value in a dataset with a parameter. For details about the available control types, see Intro to control elements.
To add a control element:
-
Open the workbook or data model for editing.
-
On the Add element bar, select Controls, then select the control type that you want to add.
The new control appears on the canvas.
-
Select the control element, then in the Properties tab of the editor panel, configure the control. Configuration options available in the Settings tab depend on the type of control.
-
(Optional) Select Targets to specify which elements to filter or modify when the user interacts with the control. See Specify the target of the control.
Before you publish a workbook, check the values specified for each control. You might want each control to have a specific value to provide a specific experience for users interacting with the workbook.
After you create a control, you can customize the design.
Change the control type for a control
Some control types, such as a date control, cannot be added directly. Instead, you can change the control type after adding a control element to a workbook or data model:
-
Open the workbook or data model for editing or customizing.
-
Select the control element.
-
In the Properties tab of the editor panel, for Control type, select a different control type.
The control type changes.
You can configure the settings for the new control. Depending on the configuration and control types, previous configurations might be reset. The control ID and formatting remain the same.
Convert an existing element filter into a control
You can convert an existing data element filter to a control, which can simplify the process of configuring and targeting a control.
When you convert a data element filter to a control element, the original filtered data element is automatically added as a target of the new control. You can customize and add additional targets to the control using the editor panel.
To create a control from an existing data element filter:
- Open a workbook or data model for editing.
- Hover over the element that you want to filter. In the element bar that appears, select Filters (
).
- For a specific filter on the data element, select
More, then select Convert to page control.
A control of the same type as the filter appears directly above the selected data element. - Use the editor panel to customize and configure the control.
After you create a control, you can customize the design.
Specify the target of the control
Add targets to a control to specify which data elements and data sources to filter based on the input or selection in the control element.
- To modify a data element or data source, add a target to the control.
- To modify a data model, add a target to the control.
- To modify a dataset, add a dataset as a target.
A control does not require targets. For example, you can use a control without targets as a parameter, passing a selected or inputted value to a formula for a calculated column or a custom SQL statement. See Reference control values as parameters.
When a control targets a data element, the control can also be modified from the data element filter menu:
-
Open a workbook or data model for editing.
-
Select the control.
-
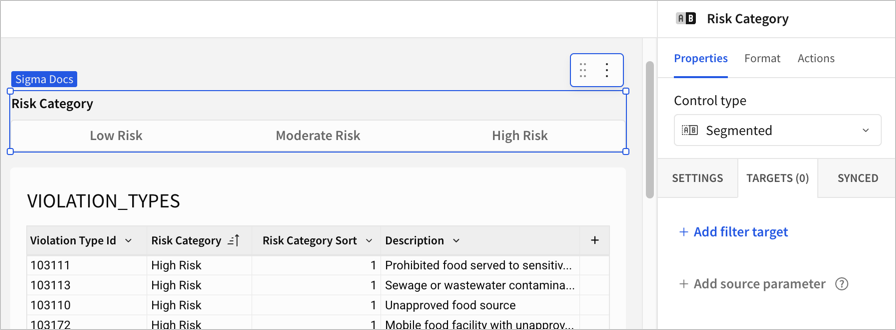
In the editor panel, in Properties, select the Targets tab.
-
Click + Add filter target.
-
Select one or more workbook elements or data sources used in the workbook that you want to be changed by the control.
In this example, the data element tableVIOLATION_TYPESis selected. The table is on the same page of the workbook as the control.
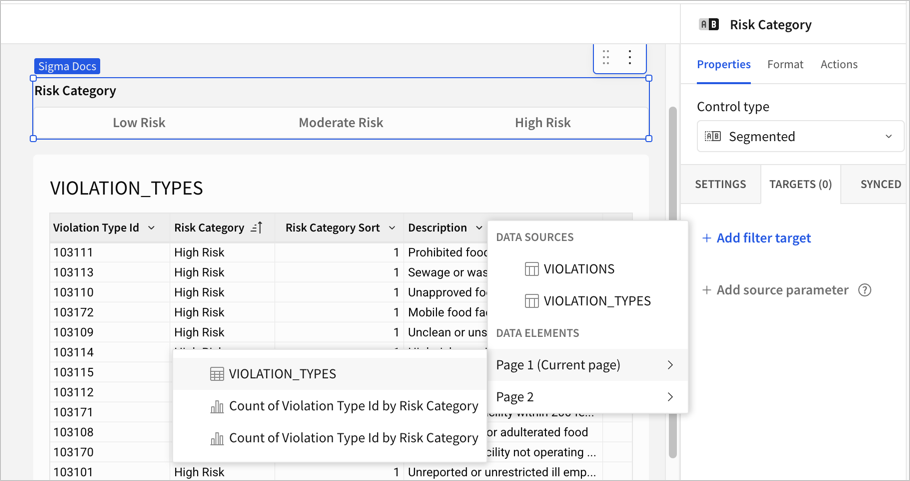
The table appears under Targets, and the count of targets for the control increases to 1.
As you add other targets to this control, the count increases.
-
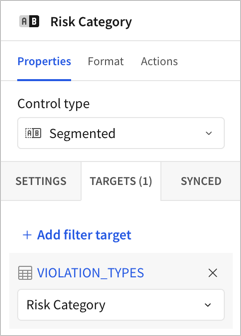
Update the column targeted by the control. By default, the control targets the first column of the table. To change the target column, click the current column and choose the new target column. In this example, the target column Risk Category is correct for the control.
As you change the target column, the default name of the control updates to match the selected column. In this example, the name of the filter control was New Control, then it changed to Risk Category when the table was added as a target.
After adding targets, customize and configure the control. See Types of controls.
Pass a value from a workbook control to a data model control
To filter a data model based on user input in a workbook, you can pass a value from a workbook control element to a data model control element by targeting the data model control ID as a parameter from the workbook control element. This functionality mimics targeting a dataset parameter, but with a data model.
To pass a value to a data model from a workbook as a parameter, the following must be true:
- The data model must be a data source for the workbook.
- The data model must have a control element that targets one or more elements in the data model. To add a control element to a data model, see Add a control element on this page.
- The control element in the data model must be the same data type as the output of the workbook control element. For example, the output of a number input control element is a single value number, which can be passed to a single value list control, a slider control, or a number input control in a data model.
To pass a value from a workbook to a data model as a parameter:
-
Open a workbook for editing or customizing.
-
Select a control element.
-
In the Properties tab of the editor panel, select the Targets tab.
-
Select Add source parameter, then choose the data model with the control that you want to target.
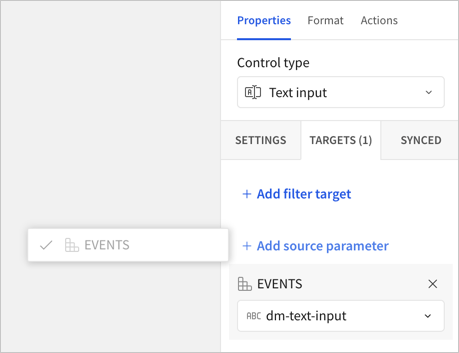
-
In the dropdown list, select the control ID(s) in the data model that you want to populate with the values from the workbook control element. Only control elements with supported data types are available to select.
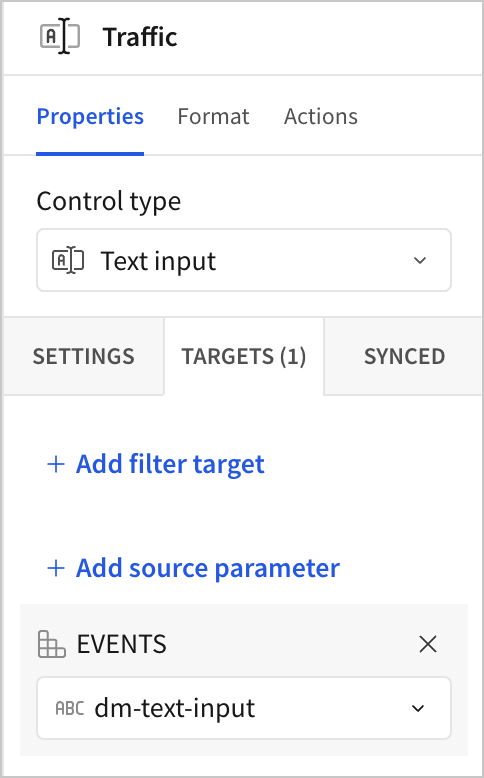
After adding targets, customize and configure the control. See Types of controls.
Pass a value from a workbook control to a dataset parameter
To filter a dataset based on user input in a workbook, you can pass a value from a control to a dataset parameter by targeting the parameter from the control element.
To target the dataset parameter, the output type of the control must be the same as the data type of the parameter. For example, a single value number and a number.
- Open a workbook for editing.
- Select a control element.
- In the Properties tab of the editor panel, select the Targets tab.
- Select Add source parameter, then choose the dataset with the parameter that you want to target.
- In the dropdown list, select the dataset parameter(s) that you want to populate with the value of the workbook control element. Only parameters with supported data types are available to select.
To create a dataset parameter, see Create and manage dataset parameters.
After adding targets, customize and configure the control. See Types of controls.
Duplicate a control
After creating a control element, you can duplicate it. Duplicating a control preserves the formatting, targets, and other settings while allowing you to modify the duplicate control separately from the original control.
If you want to keep the control configuration exactly the same, create a synced copy. See Synced controls.
To duplicate a control without creating a synced copy:
- Open the workbook or data model for editing.
- Select the control element that you want to duplicate, then select
More.
- In the element menu, select Duplicate. You can also use a keyboard shortcut. The duplicate control appears below the original control, and you can make configuration changes or customizations.
Set a control as required
If you make a control element required, all data elements on the same page as the control display no data until a value is selected in the control, even if the elements do not reference and are not targeted by the control. After a user makes a selection in a required control, the data elements on the page load and display data.
You can make a control required in a data model, but data model behavior is unchanged.
To make a control required, do the following:
-
Open the workbook for editing.
-
Select the control.
-
On the Settings tab, select the checkbox for Required.
The changes save immediately. To make the changes visible to those without edit access, publish the workbook.
A drill down control cannot be required.
Updated 5 months ago

