Intro to layout elements
Layout elements are dynamic workbook elements that separate, group, and manage the visibility of other workbook elements. They allow you to design user-friendly layouts and build intuitive workflows for a wide variety of use cases.
Use layout elements to organize existing elements on a single page, or combine them with actions to hide and display multiple layers of content across pages, tabs, and pop-ups.
This document introduces the fundamentals of layout elements such as functionality, types, and use cases.
Layout element functionality
Layout elements allow you to do the following:
- Group elements together
- Separate unrelated elements on the same page
- Style elements as a group
- Direct user attention
- Manage access to workbook pages and elements
- Manage user workflows for data entry
- Reduce visual clutter from multiple filters and controls
Types of layout elements
Sigma offers the following types of layout elements:
- Containers
- Tabbed containers
- Modals
- Popovers
- Navigation
- Single row containers
- Repeated containers
- Forms
You can add a header or sidebar to a page using custom page panels. Page panels are enabled as a workbook setting, and do not appear in the Add element bar. For more information, see Add custom page panels to a workbook.
Containers
Containers are customizable elements that can group several elements on a page. You can place a container around existing elements, or you can move individual elements in and out as needed. They allow you to manage a page’s layout and to style elements as a group.
Tabbed containers
Tabbed containers group elements like a standard container, but they also let you move between multiple tabs of content. You can navigate between the tabs using the provided controls, or you can hide the controls and use actions to move between tabs.
Modals
Modals are page-like elements that appear as an overlay on your workbook. You can configure a modal to be opened or closed by an action, overlaying the current page and directing the user to interact with the modal’s contents.
Popovers
Popovers are smaller layout elements that are anchored to a trigger button. You can group multiple filters or controls inside a popover, reducing visual clutter.
Popovers are similar to modals, but differ in two key ways:
- Popovers are always anchored to a trigger button
- Popovers are less disruptive to user attention, as they do not obscure the current page
Navigation
The navigation element allows you to display a list of destinations for users to explore in the style of a navigation bar or panel. You can configure the navigation element to show each destination as an individual button, which you can configure to send users to a workbook page, workbook element, or external link when clicked.
Single row containers
Single row containers are containers or modals that connect to a data source, and display the details of one row from the data source at a time. You can configure connected elements, such as text, images, and value lists to display dynamic content from the selected row. Actions can update single row containers to change which row is on display.
Repeated containers
Repeated containers connect to a data source, and display a card for each row in the data source. They allow you to define a layout one time, and have it repeat with dynamic content from the data source. Each row in the connected data source generates one card in the layout, and each card displays the data from that row in connected elements like text and value lists.
Forms
Forms allow you to collect user inputs and incorporate them into action workflows, such as adding rows to input tables, setting control values, and calling stored procedures. Forms can be created manually or from an existing data source.
Example use cases
Each layout element serves a specific purpose when adding interactivity to a workbook. Containers, for example, are excellent for organizing a single page of content. But, if you were struggling to fit many elements on a page, a container doesn’t help as much as a tabbed container or modal, which create additional workbook space. If you want to display details from a data source, a single row container or repeated container is a better choice.
Each Sigma element has a suggested minimum size. Sigma allows you to resize elements below these suggested sizes, but displays a Below suggested size warning when you do so. Elements that are below the suggested size might display incorrectly depending on their contents and position, but functionality is not impacted.
Consider the following use case examples as you decide which layout element suits your needs.
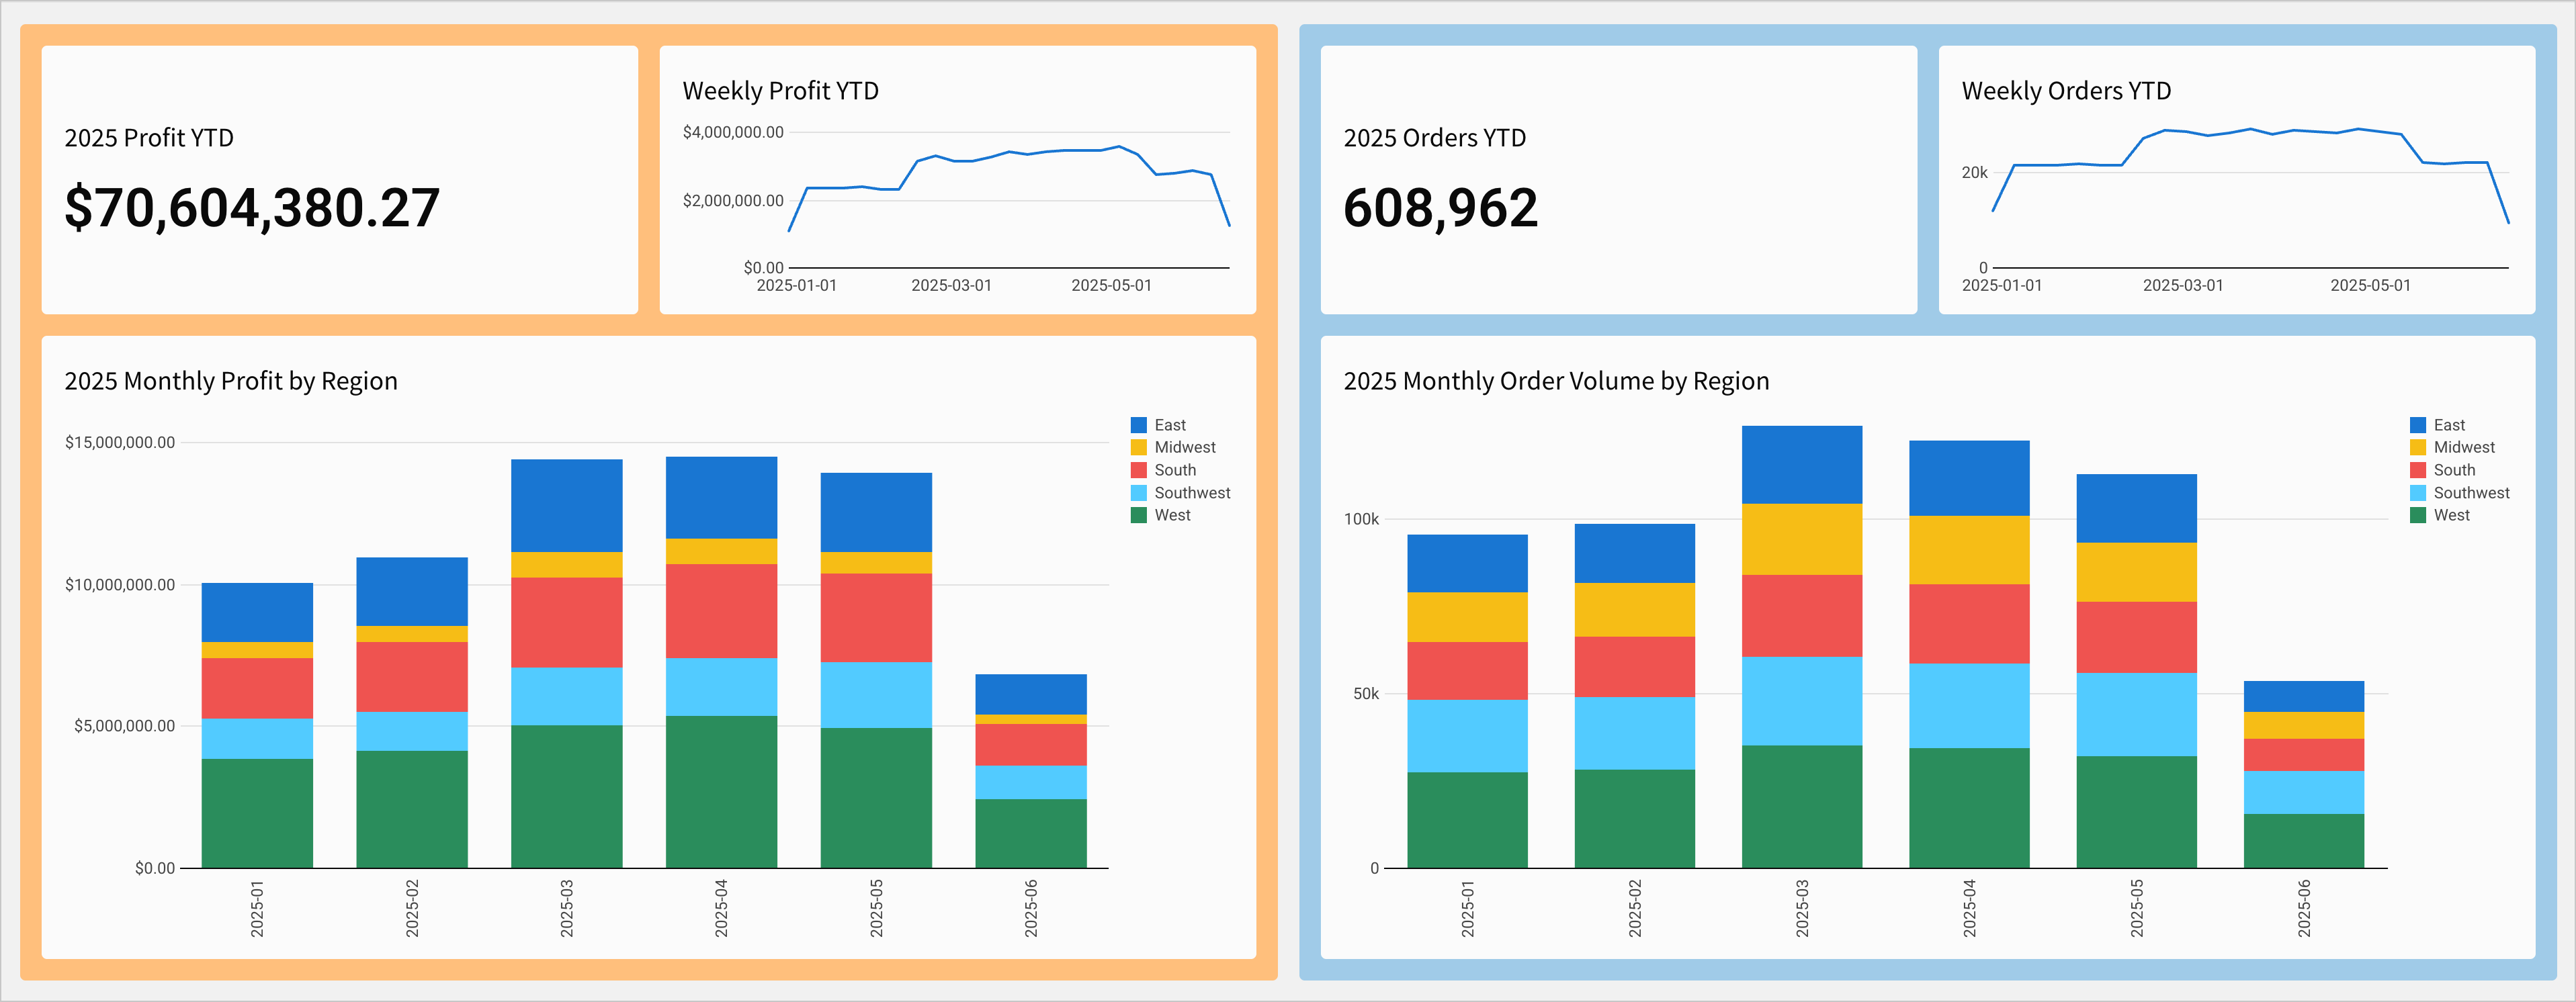
Separate metrics on a dashboard with containers
Containers allow you to group elements together on a page. When using one workbook page to display two separate metrics, you can group the elements associated with each metric into their own container.
By creating a visual division between the elements and applying styles like a background color to each container, you can make it obvious to users which elements are referencing each metric at first glance.
In this example, KPIs and charts for profit and order volume are separated into their own containers.
Handle multiple user inputs with a modal
Modals allow you to obscure the current page, and supply a new set of contents for users to interact with. When using an app to capture user inputs, you can use a modal to direct their attention towards required inputs. By configuring an Open Modal action on a button click, you can further streamline user interaction with your app.
In this example, a Project Tracker app allows end users to enter information about new projects. The Create Project button is configured to open a modal where they can enter the required information, and then insert a new row based on their entries.
Create dynamic layouts with repeated containers
Repeated containers allow you to define a layout one time, and have it repeat with dynamic content for each row in a data source. They also dynamically add or remove cards as the number of rows in the data source changes, meaning they’re a great choice when the number of items in your layout isn’t fixed.
In this example, a gallery of national parks is created using a repeated container. Each card in the gallery displays the name and image of a park, and clicking on a card opens a modal with more information about the park. If new parks are added to the data source, the repeated container automatically creates a new card for the new park.