Share a folder
You can categorize and share documents with people using folders. You share folders with other users and teams by granting access to the folder. Folders support four levels of access permissions:
- Can view
- Can explore
- Can contribute
- Can manage
This document describes folder permissions and how to share folders. For more details on available permissions, see Folder and document permissions.
User requirements
The ability to share a folder requires the following:
- You must be assigned an account type with the Share documents permission enabled.
- You must be the folder owner or be granted Can manage access to the folder.
Permission types
Permission options are the same for folders and workspaces. Permissions set at the folder or workspace level apply to all documents within that workspace or folder.
Share a folder
You can share a folder of documents with other users or teams in Sigma in several ways.
Share from within the folder
- Open the folder.
- Next to the folder’s name on the top of the screen, click
 Share. The Share Folder modal opens.
 - In the text box, type the names of individual users or teams you wish to add.
- (Optional) To change the user’s or team’s level of access, click the dropdown to select a permission type for each team or member. If you do not select a permission, the default permission is set to Can explore.
- (Optional) To notify users about being added to your folder, select the Send email checkbox. For Add a message, enter a message to be included in the email body.
- Click Save.
Share from a navigation page
- Navigate to the folder you wish to share.
- Open the folder’s parent folder.
- Next to the folder you want to share, click
 More.
More. - Select Share… to open the Share Folder modal.
- In the text box, type the names of individual users or teams you wish to add.
- (Optional) To change the user’s or team’s level of access, click the dropdown to select a permission type for each team or member. If you do not select a permission, the default permission is set to Can explore.
- (Optional) To notify users about being added to your folder, select the Send email checkbox. For Add a message, enter a message to be included in the email body.
- Click Save.
Restrict access to a folder using a version tag
If you use version tags to manage access to documents, you can set up a workspace or folder to manage access more easily.
You can share a workspace or folder with a user or teams, and grant those users or teams access to a specific tag. If you do so, workbooks, data models, or reports in that workspace or folder must have that tag applied to be accessible to those users or teams.
For example, if you have a sales organization that covers 5 regions, you can create a workspace for each region and grant each sales team Can explore access to their workspace with a tag for their region:
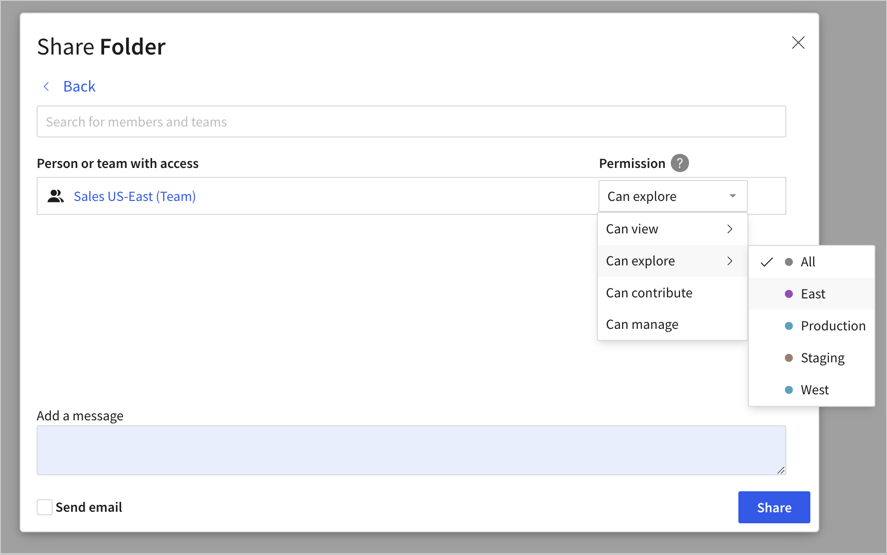
If you do so, all documents in the workspace must have a corresponding tagged version. In this example, all workbooks in the Sales US-East workspace must have a version tagged East so that the members of the Sales US-East team can view and explore the East versions of the workbooks.
If you grant elevated permissions on the workspace to the team members, such as Can contribute or Can manage, those team members can access all versions of documents in the workspace.
Permissions set at the workspace and folder level are inherited by the documents in the workspace or folder. For more details, see Folder and document permissions.
Modify or revoke access to a folder
If you need to change a user or team’s level of access after you give them initial access to a folder, you can change the user or team’s level of access to a folder or even revoke their access entirely at any time.
- Click More on the parent folder and select Share… or click Share on the individual folder’s page to open the Share Folder modal.
- In the Share Folder modal, review the Person or team with access section.
- Modify their access type or revoke access:
- To select a new level of access, use the Permission dropdown menu.
- To revoke access completely, hover over the team or member. Then click
 Remove access.
- Click Save.
Respond to request for access to content
If a user attempts to access your content and doesn’t have permissions to do so, they can request access through the error page blocking their immediate access. This sends an email notification with the subject Request for access to the owner of the folder.
To respond to the request for access, do the following:
-
In the email notification, click Respond to the request. The Share Folder modal opens, allowing you to view the current access requests.
-
(Optional) Use the dropdown menu to set the user’s level of access.
The user cannot be granted access higher than what their account type allows.
-
Approve or deny the request:
-
To approve the request, click Approve. The request is removed from the Share Folder modal, and the user is listed in the Person or team with access tab.
-
To deny the request, click Deny. The request is removed from the Share Folder modal.
-
-
Close the Share Folder modal. The access that you granted or denied is saved after selecting Approve or Deny.