Customize element title
Titles allow you to identify individual data elements (visualizations, tables, and pivot tables) and input tables in workbooks. You can customize element titles to provide context, communicate insights, and improve accessibility.
This document explains how to change title visibility and create custom titles using dynamic values, formatting tools, and descriptions.
User requirements
The ability to customize workbook element titles requires the following:
- You must be assigned an account type with the Create, edit, and publish workbooks and/or Full Explore permission enabled.
- You must be the workbook owner or be granted Can explore or Can edit workbook permission.
Default element titles
Sigma creates default element titles that depend on the element type.
-
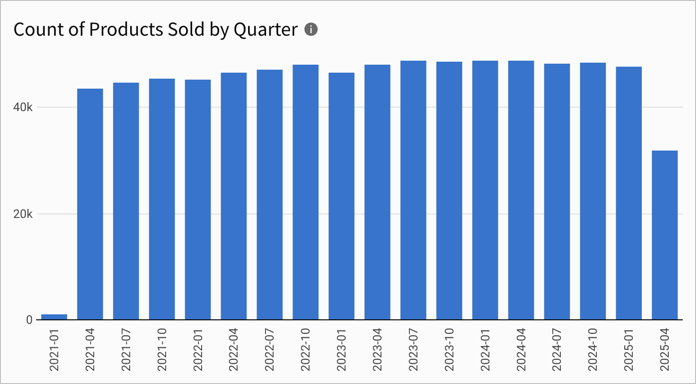
Visualizations: Titles are auto-generated based on the metric value and other data attributes applied to the chart properties. Until a user customizes a visualization element title, Sigma auto-updates it whenever chart properties are modified. Once the title is customized, auto-updates no longer apply.
-
Tables: Titles reflect the data source (database table name, CSV filename, or parent element) or type of data integration (custom SQL, join, or union).
-
Pivot table: Titles default to
New Pivot Table. -
Input table: Titles default to
New Input TableorNew Linked Input Table.
Show or hide the title
Change the visibility of an element’s title.
-
Start customizing a workbook or open it for editing, then select the element you want to modify.
-
In the side panel, select Format, then click the Title header to expand the section.
-
To change the visibility of the element title, turn on or turn off the Show title toggle:
- To display the title, turn on the toggle.
- To hide the title, turn off the toggle.
Edit the title text
You can edit an element’s title text in two ways: in the Title section of the Format tab of the side panel or directly in the element using inline editing.
When you update the title in the side panel, you can edit the text and format the title. Editing the title directly on the element lets you quickly update the text without navigating away from the element.
Element format panel
-
Start customizing a workbook or open it for editing, then select the element you want to modify.
-
In the side panel, select Format, then click the Title header to expand the section.
-
In the text field below Show title, enter your preferred title, then press Enter or click anywhere outside the text field to apply the change.
Inline edit
-
Start customizing a workbook or open it for editing.
-
Locate the element you want to modify, then click the title to enable text editing.
-
Enter your preferred title, then press Enter or click anywhere outside the text field to apply the change.
Create a dynamic title
Use dynamic values to create a more relevant and detailed element title that adapts to selected control values. For more details about referencing control values in formulas, see Reference control values as parameters.
-
Start customizing a workbook or open it for editing, then select the element you want to modify.
-
Start editing the title using either method described in the Edit the title text section.
-
In the title text, enter = where you want to add a dynamic value. Sigma immediately displays an overlay containing a formula bar and Reference label field.
Pressing = opens the formula bar to add dynamic text. To enter a literal equals sign instead, press Ctrl + Option + =.
-
Configure the dynamic value:
-
In the formula bar, enter a control ID or an element title/column enclosed in square brackets. For example,
[date-range]or[Plugs_Electronics/Store Region]. You can also use functions to generate custom calculations or transform control and column values as needed.When referencing a date or date range control, use date functions to customize the value display.
For example, if 01/01/2024 is the end date of the selected date range, enter
DateFormat([date-range].end, “%Y-%m”)to display the dynamic title value as2024-01.Alternatively, enter
DateFormat([date-range].end, “%b %Y”)to display the dynamic title value asJan 2024. -
[optional] In the Reference label field, enter a label that identifies the dynamic value. This label is used in place of the dynamic value when the element title is referenced elsewhere in the product, including in formulas, the workbook lineage, and the list of available element sources.
-
![Title editing in the sidebar with the dynamic text popover shown featuring the described formula of DateFormat([date-range].start, “%b %Y”) and a reference label of date-range-start-sold](https://files.buildwithfern.com/sigma.docs.buildwithfern.com/65494cbebd201f2d8e01d251ac391853d69f9451d61d3fabceae7029b8e5425a/assets/docs-images/db8c2e90822fe5b99340c49dfb0fb31f6510a013ba3d32df6cd160ce4b83307d-element-dynamic-title.png)
Customize the title format
Customize the title font weight, size, and color, and determine the title text alignment.
-
Start customizing a workbook or open it for editing, then select the element you want to modify.
-
In the side panel, select Format, then click the Title header to expand the section.
-
Use the formatting tools to customize the title as needed:
Add a description
Provide extra context about an element and display it as a subtitle or tooltip.
Give your elements concise titles and use descriptions to convey additional details about the element contents.
-
Start customizing a workbook or open it for editing, then select the element you want to modify.
-
In the side panel, select Format, then click the Title header to expand the section.
-
Turn on the Show description toggle.
-
Enter a description (up to 200 characters), and use the formatting tools to customize the text color, size, and weight as needed.
-
In the Description display section, select an option to determine how the description displays within the element:
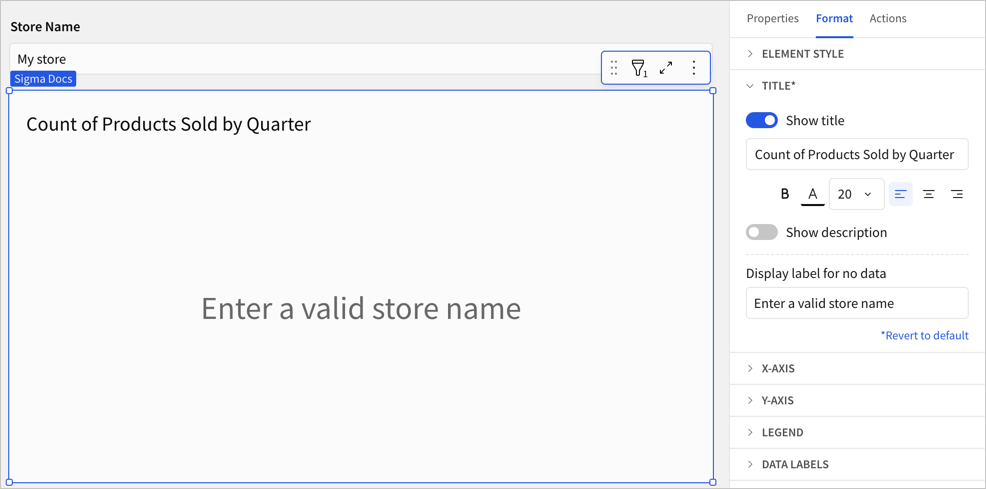
Customize no data text
To customize the text that appears when an element has no data to display, such as when a user inputs an invalid value into a control targeting the data element, do the following:
-
Start customizing a workbook or open it for editing, then select the element you want to modify.
-
In the side panel, select Format, then click the Title header to expand the section.
-
For Display label for no data, enter text to use instead. For example “Enter a valid store name” to reference a text control that targets a chart.