About OAuth with write access
Sigma allows you to leverage the benefits of OAuth permission management with write-access features like input tables, workbook warehouse views, workbook and data model materializations, and CSV uploads.
This document explains how write access works with OAuth connections. For information about configuring OAuth with write access, see the following documentation based on your connection type:
- Snowflake: Connect to Snowflake with OAuth
- Databricks: Configure OAuth features
- BigQuery: Connect to BigQuery with OAuth
OAuth connection with write access
To use an OAuth connection with write access features, an admin must designate one or more schemas as write destinations for Sigma object data. OAuth uses permissions granted to each individual user in the data platform; therefore, a user can only use write access features if they are authorized to write to at least one designated write schema.
To determine whether or not a user is authorized to write to a particular schema, Sigma utilizes the user’s corresponding user account in the data platform (not a service account) to attempt to create a table in each write schema. If a table is successfully created, write access is confirmed for the schema and the validation table is deleted. Sigma initiates this validation process when the user logs in, and the authorized write schemas are cached for the duration of the session to reduce the frequency of queries.
Tables created by the write access validation process can be easily identified by object names prepended with SIGDS_. To ensure proper functionality of write-access features, avoid modifying any table with the SIGDS_ prefix.
When a user is only authorized to write to one schema designated as a write destination for the OAuth connection, the Sigma objects they create are written to that schema by default. Otherwise, Sigma allows the user to select from multiple write schemas when creating the object.
In Snowflake, write permissions can be granted to users through their primary or secondary roles in Snowflake. However, the ability to create objects must be granted through the primary role.
Write-back architecture for warehouse views, materializations, and CSV uploads with OAuth
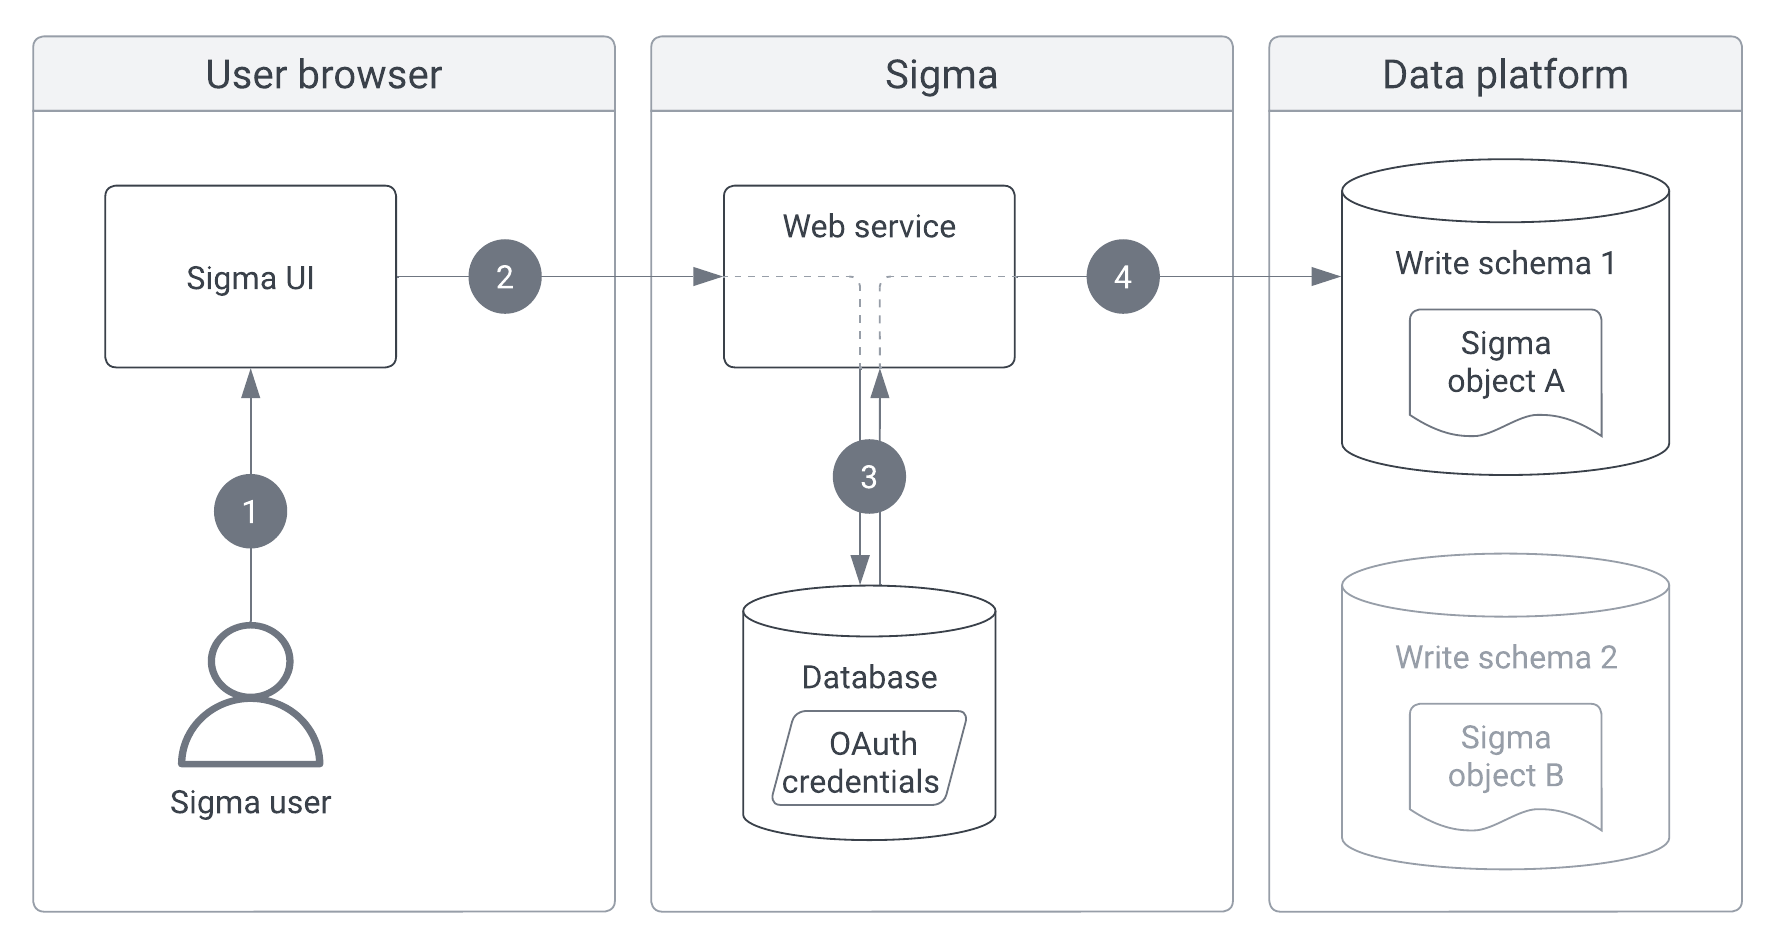
The following flowchart demonstrates how Sigma uses an OAuth connection to write to a data platform, specifically for workbook warehouse views, workbook and data model materializations, and CSV uploads. For information about how Sigma writes input table data to a data platform, see Write-back architecture for input tables with OAuth.
Dataset materializations are not supported on OAuth connections.
-
In the Sigma UI, a user creates or edits a Sigma object (workbook warehouse view, workbook or data model materialization, or CSV upload) with a specified write schema.
-
The Sigma UI sends the object data to Sigma’s web service.
-
Sigma’s web service retrieves the user’s OAuth credentials from the Sigma database.
-
Sigma’s web service applies the user’s OAuth credentials to authorize access to the data platform and write the object data to the specified write schema.
Write-back architecture for input tables with OAuth
Sigma writes input table data to a data platform using the same method as other write access features. However, for every input table, Sigma also creates a separate edit log (also known as a write-ahead log or WAL) to ensure data durability, consistency, and recovery. Each edit log contains a sequential record of all input table changes, including information related to user activity and resulting system operations. The edit logs are stored in the same schemas as their corresponding input table data and use the same OAuth credentials to write to the data platform.
Tables containing input table data and edit logs can be easily identified by object names prepended with SIGDS_. To ensure proper input table functionality, avoid modifying any table with the SIGDS_ prefix.
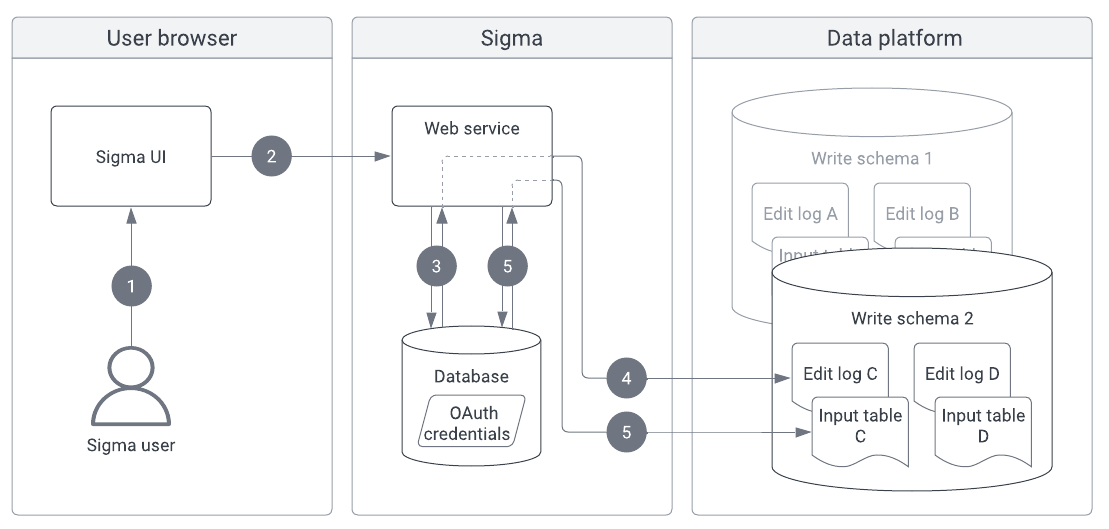
The following flowchart demonstrates how Sigma uses an OAuth connection to write input table data and edit log records to a data platform.
-
In the Sigma UI, a user creates or edits an input table with a specified write destination.
-
The Sigma UI sends the input table data to Sigma’s web service.
-
Sigma’s web service retrieves the user’s OAuth credentials from the Sigma database.
-
Sigma’s web service applies the user’s OAuth credentials to authorize access to the data platform and write edit log records to the specified write schema.
-
Sigma’s web service again retrieves the user’s OAuth credentials from the Sigma database.
-
Sigma’s web service applies the same OAuth credentials to authorize access to the data platform and write the input table data to the specified write schema.