Create and manage version tags
As an admin, you can create and manage version tags. Users can tag specific versions of workbooks, data models, and reports to support testing and publishing workflows. See About version tags to workbooks, data models, and reports.
Create a version tag
To create a version tag, you must be assigned the Admin account type.
Use a protected tag to enforce a request approval process for setting tags on workbook, data model, or report versions.
-
Open the Admin portal, then select Tags.
-
Click Create Tag.
-
Enter a Name for the version tag. The name must be unique and is not case sensitive.
-
(Optional) Enter a Description for the version tag. For example, describe the intended purpose of the tag.
-
Select a color for the tag.
-
In the Permission section, choose whether to create a Public or Protected tag and control who can add the tag to a document.
- A public tag can be added by anyone with Can edit permissions.
- A protected tag can be added by any admin or any user with Can edit permissions in the list of users or teams that you specify. Users and teams that you do not specify must submit a request to apply the tag, which must be approved by users that you specify.
-
(Optional) If you select Protected, search for users or teams that you want to be able to add the protected tag to any documents that they can access, without requesting permission. The users or teams that you specify also receive requests to apply the tag from users without access to apply the tag.
-
Click Create.
Avoid creating a large number of tags, which could lead to multiple versions of a single document. Use descriptive names and create tags to support the teams that might need to access different versions of a document based on their job functions. For example, QA, UAT, or Production.
Manage version tags
After creating a tag, you can select the tag and view the workbooks, data models, and reports that have the tag set on a version.
To manage a version tag, you must be assigned the Admin account type.
-
Open the Admin portal, then select Tags.
-
Locate and select a tag that you want to view. You can sort the columns in the table to list tags alphabetically, or order by the number of workbooks tagged with the tag.
A table lists the documents with the tag applied.
Delete a version tag
You can delete a version tag at any time. When you delete a tag, any tagged data model, workbook, or report versions are also deleted. While the tagged version is deleted, the version is not removed from the version history of the document. The source workbooks, data models, or reports remain unchanged.
To delete a version tag, do the following:
-
Open the Admin portal, then select Tags.
-
Locate and select a tag that you want to delete.
-
Select Delete Tag.
-
Review the affected document versions, if any, then select Delete.
The tag is deleted and the list of Tags opens.
Approve a request to apply a protected version tag
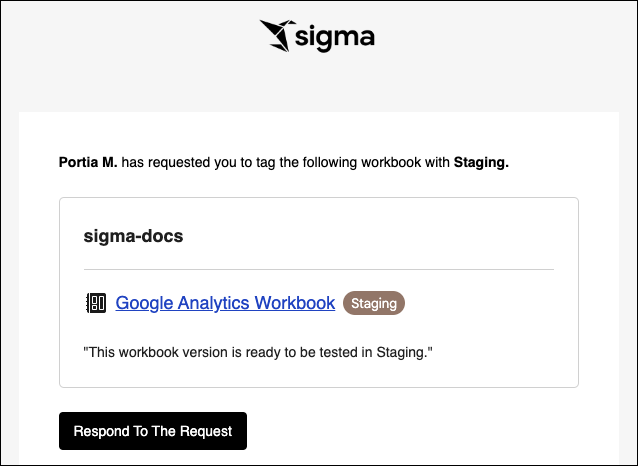
If a user wants to apply a protected tag to a workbook, data model, or report version, the users and team members added as approvers for the version tag (the same users that can directly apply the tag) receive an email with the request.
If you receive an email requesting to apply a protected tag to a version, do the following:
-
Open the email.
-
Review the details of the request, such as the tag name, document name, and the message from the user that wants to tag the document.
-
Click Respond to Request.
-
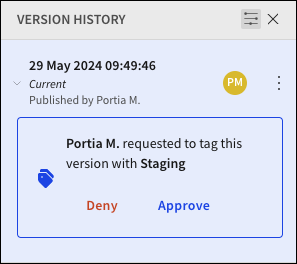
The document opens in Sigma. The version history is open to the specific version that the user requested to tag.
-
Select Deny or Approve. To apply the requested tag, click Approve.
-
In the Set Tag on Version modal, make any necessary adjustments. See About version tags to workbooks, data models, and reports.
The user requesting to apply the tag receives an email notifying them that their request was approved or denied.