Azure Private Link Connections
This document explains how to connect Sigma to your data warehouse that's hosted on Azure using Azure's Private Link.
See Sigma's Azure Private Link lab for more information on how to establish a secure connection between Sigma and an Azure data warehouse.
Requirements
- A Sigma organization running on Azure.
- You must be assigned the Admin account type in your Sigma organization.
- Snowflake, Databricks, PostgreSQL or MySQL Admin, depending on the data warehouse.
- Be an Admin in Azure.
Some connections may have additional requirements that are specified in the corresponding sections below.
Introduction
Sigma organizations running on Azure can securely connect to their data using Azure's Private Link, which allows Sigma to access the data warehouse hosted on Azure via a private endpoint in the virtual network. This not only enhances security during data transit but also improves performance by reducing network latency. With Private Link, Sigma connects to the data warehouse using private IP addresses, ensuring traffic never leaves the Microsoft network and data remains secure without exposure to the internet.
To utilize Private Link, create a private endpoint in your virtual network that maps to the data warehouse, assign it a private IP address, and connect to the warehouse using this address.
Sigma supports connections to the following data warehouses on Azure:
- Snowflake
- Databricks
- PostgreSQL
- MySQL
- Azure SQL Database, Azure SQL Managed Instance, or SQL Server 2022
Create Private Link connection for your data warehouse
Follow the steps below to create a Private Link connection to your data warehouse hosted in Azure.
To initiate this process, the first step for all data warehouses is to retrieve the required information and send to your account manager.
Snowflake
As of September 16, 2025, new Private Links to Snowflake will require a private link to a Snowflake internal stage. Existing Azure Private Links created before September 16, 2025 will not require an additional internal stage Private Link. If you want to add a private link to a Snowflake internal stage and already have an Azure Snowflake private link set up with Sigma, see Add a Private Link to a Snowflake internal stage.
Creating an Azure Private Link to Snowflake is a multi-step process:
- Configure your Snowflake internal stage
- Provide Snowflake information to Sigma
- Configure your Snowflake connection in Sigma
Step 1: Configure your Snowflake internal stage
Sigma requires all Azure Private Links created after September 16, 2025 to also include a link to a Snowflake internal stage.
If your organization has other existing applications or software that are also utilizing your Snowflake internal stage via the public internet, do not proceed with configuring Private Link to internal stage as it will block the existing public access for all existing applications. Please contact your Sigma Account Executive if this is the case.
Configure your internal stage in Snowflake by running the following commands in your Snowflake console:
USE ROLE ACCOUNTADMIN;
ALTER ACCOUNT SET ENABLE_INTERNAL_STAGES_PRIVATELINK = true;
See the Snowflake documentation on Configuring private endpoints to access internal stages for more information.
Step 2: Provide Snowflake information to Sigma
Your Snowflake account must be Business Critical Edition to use Private Link.
Follow the steps below to provide Sigma with the requisite information to create a Private Link for your organization.
- In your Snowflake console, run the following command:
select key, value from table(flatten(input=>parse_json(system$get_privatelink_config())));-
In the output field, copy the values for
privatelink-pls-id,private-account-url,privatelink-internal-stageandResourceID:- The
private-pls-idmay be formatted similarly to:Sf-pvlinksvc-<region>.<id>.<region>.azure.privatelinkservice - The
private-account-urlmay be formatted similarly to<account_id>.<region>.privatelink.snowflakecomputing.com - The
privatelink-internal-stagemay be formatted similarly to/subscriptions/<subscription_id>/resourceGroups/sfc-prod-storage/providers/Microsoft.Storage/storageAccounts/<internal_stage_id> - The ResourceID of the internal stage storage account is defined by the
privatelink-internal-stagekey.
- The
-
Contact your Sigma account manager and provide:
- The
privatelink-pls-idvalue - The
private-account-urlvalue - The
ResourceIDdefined by theprivatelink-internal-stagekey
- The
-
Sigma will create a Private Link and notify you when the link is active.
-
After the Private Link to internal stage has been created, you will need to approve the endpoint request in Snowflake. Call the
SYSTEM$AUTHORIZE_STAGE_PRIVATELINK_ACCESSfunction by running the following in your Snowflake console:
select system$authorize_stage_privatelink_access('<Sigma_Private_Endpoint_ID>');Use the Sigma_Private_Endpoint_ID provided to you by your Sigma account manager.
See the Snowflake documentation on SYSTEM$AUTHORIZE_STAGE_PRIVATELINK_ACCESS for more information.
Once your Private Link is active and you have approved the internal stage endpoint request, follow the steps to configure your Snowflake connection in Sigma.
Step 3: Configure Snowflake connection in Sigma
Follow the steps below to configure your Sigma Snowflake connection to use Private Link. You can only complete these steps once your Private Link is active.
-
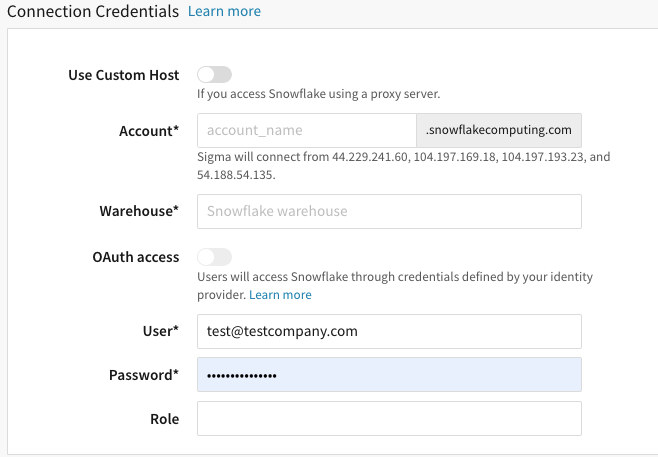
After the private link is active, in Sigma, go to Admin > Connections > Snowflake.
-
Click Create to create a Snowflake connection.
-
In the Account field, enter the three parts of the account URL in this format:
<account>.<region_id>.privatelinkFor example, if the account URL is:
test123.west-us-2.privatelink.snowflakecomputing.comThe Account field is
test123.west-us-2.privatelink -
Under Warehouse, enter your warehouse’s name as listed in Snowflake.
-
If you have OAuth enabled on your organization, and you would like to use it on the connection, switch on OAuth access; see Connect to Snowflake with OAuth. Please note: Steps 9 - 11 are not applicable if you choose to use OAuth without a service account.
-
Under User, enter your Snowflake username.
-
Under Password, enter your Snowflake password.
-
[optional] For Role, you can specify a Snowflake role to be used on this connection.
-
[optional] For Connection Features, you can set a connection timeout and/or enable write access.
-
After completing the form, click Create.
Add a Private Link to a Snowflake internal stage
If you have an existing Azure Snowflake Private Link and want to create a private link to a Snowflake internal stage, follow the steps below:
-
Enable the internal stage in Snowflake by running the following command in your Snowflake console:
USE ROLE ACCOUNTADMIN; ALTER ACCOUNT SET ENABLE_INTERNAL_STAGES_PRIVATELINK = true; -
Obtain the
ResourceIDof the internal stage storage account defined by theprivatelink-internal-stagekey from your Snowflake console, by running the following command:select key, value from table(flatten(input=>parse_json(system$get_privatelink_config())));
The ResourceID may be formatted similarly to /subscriptions/XXX-XXX-XXX-XXX/resourceGroups/sfc-prod-storage/providers/Microsoft.Storage/storageAccounts/XXXX.
-
Contact your Sigma account manager and provide them with the
ResourceID. -
Sigma will contact you once the new Private Link has been created, and provide you with a
Sigma_Private_Endpoint_ID(which is theResourceIDof a Sigma-owned private endpoint). -
After the Private Link has been created, you will need to approve the endpoint request in Snowflake. Call the
SYSTEM$AUTHORIZE_STAGE_PRIVATELINK_ACCESSfunction by running the following in your Snowflake console:select system$authorize_stage_privatelink_access('<Sigma_Private_Endpoint_ID>');
Use the Sigma_Private_Endpoint_ID provided to you by your Sigma account manager.
See the Snowflake documentation on SYSTEM$AUTHORIZE_STAGE_PRIVATELINK_ACCESS for more information.
Databricks
Prerequisites
- You must create an Azure Databricks workspace.
- Your Databricks workspace must be Premium tier.
- A customized networking configuration is required to support Private Link.
Provide Databricks Resource ID to Sigma
Follow the steps below to provide Sigma with the Resource ID to create a private link for your organization.
-
In Azure Services, hover over Azure Databricks and click Create.

-
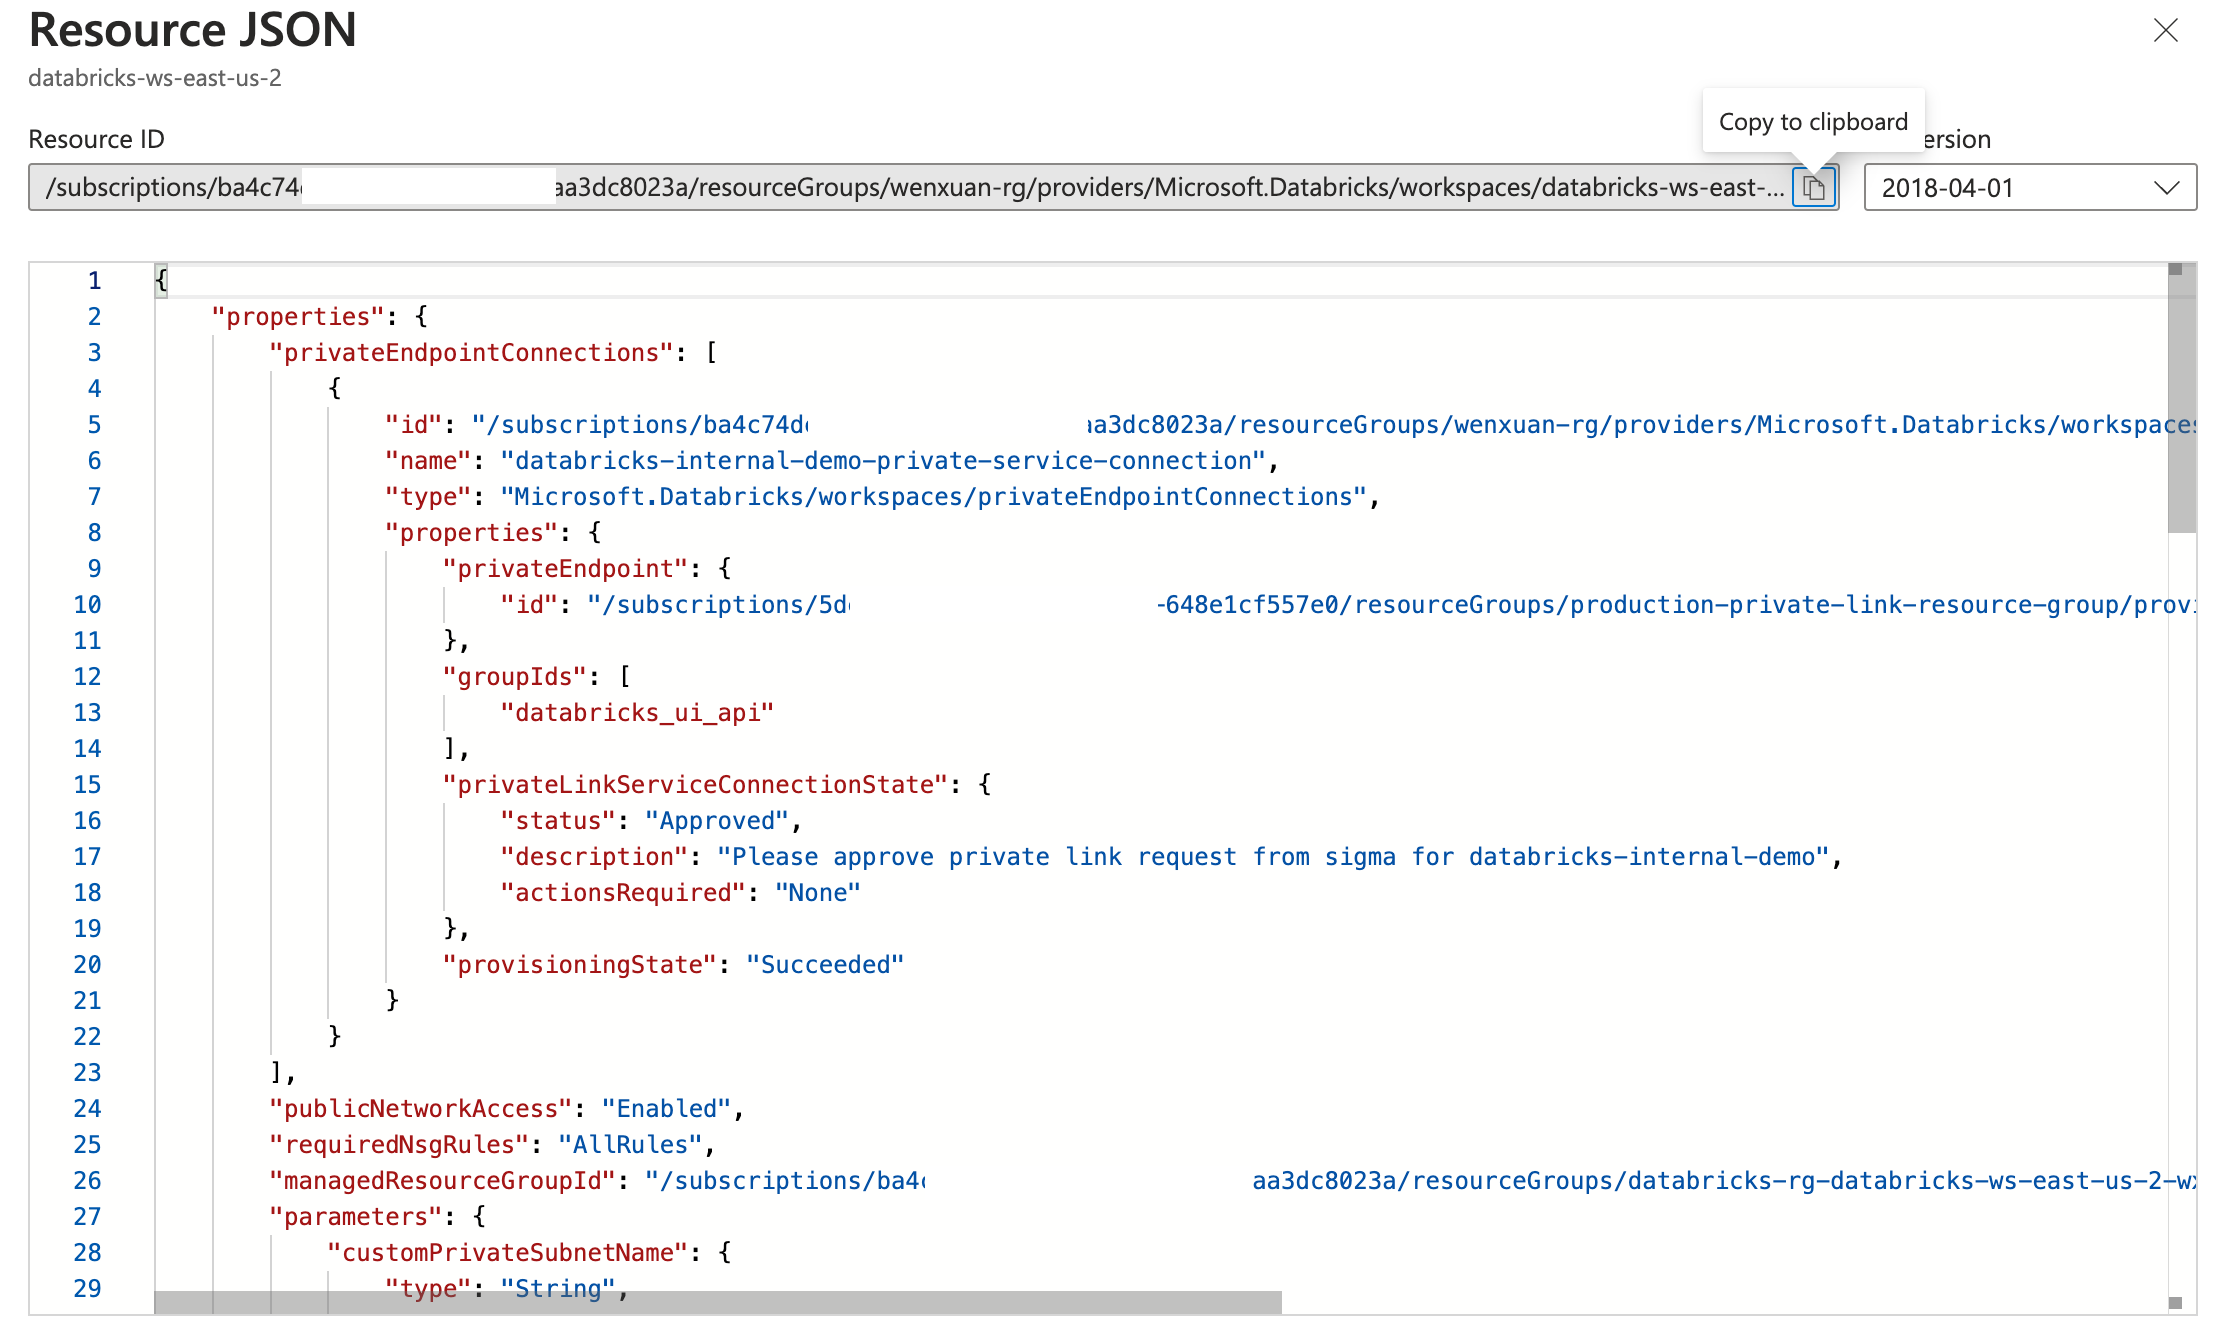
Click JSON View in the top-right corner of the databricks workspace page in Azure.
-
On the Networking tab, you must check Yes for Deploy Azure Databricks workspace in your own Virtual Network and enter pre-configured virtual network and two subnets within the virtual network CIDR range for public and private subnet fields.
-
Copy the following values and send them to your Account Executive:
- Resource ID
- Region Name for the Databricks warehouse (under Location)
- URL for the Databricks service, formatted as
adb-<workspace-id>.<random-number>.azuredatabricks.net.
Private Link approval
Follow the steps below to approve the Private Link after Sigma notifies you.
-
In the Azure portal, go to Azure Databricks.
-
Click the selected Azure Databricks workspace.
-
Click Networking on the left panel.
-
Click on Private endpoint connections.
-
Select the newly created private endpoint. The status will be Pending. Check Approve to approve the endpoint. Copy the name of the private endpoint, it's required when you configure Sigma.

Configure Databricks Connection
-
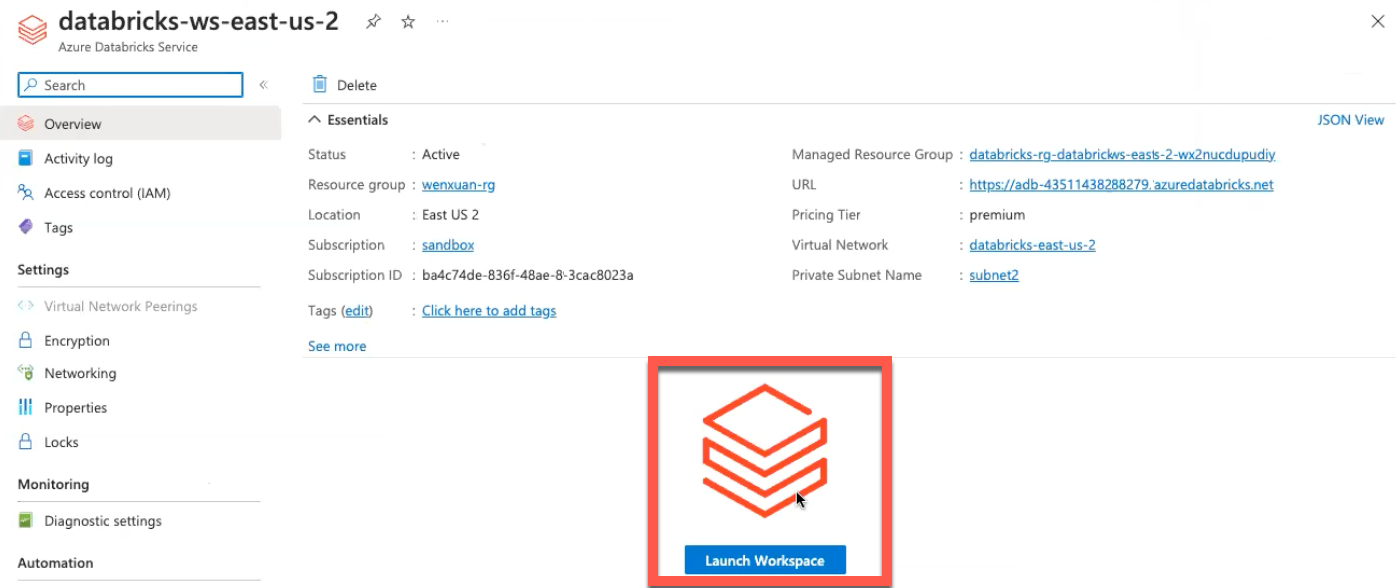
In the Databricks section of Azure, click on the warehouse instance > Databricks Workspace.
-
Click Launch Workspace.
-
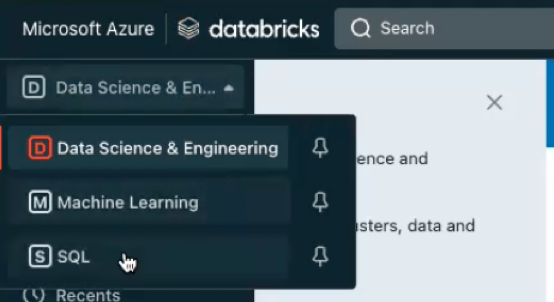
In Databricks, select SQL in the Data Science & Engineering dropdown.
-
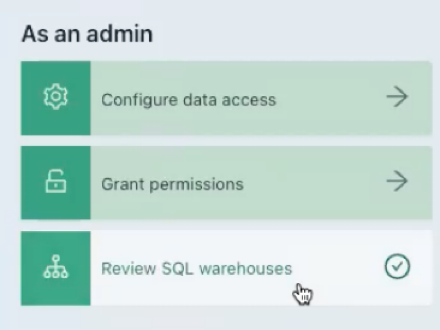
Click Review SQL Warehouses.
-
Select the warehouse.
-
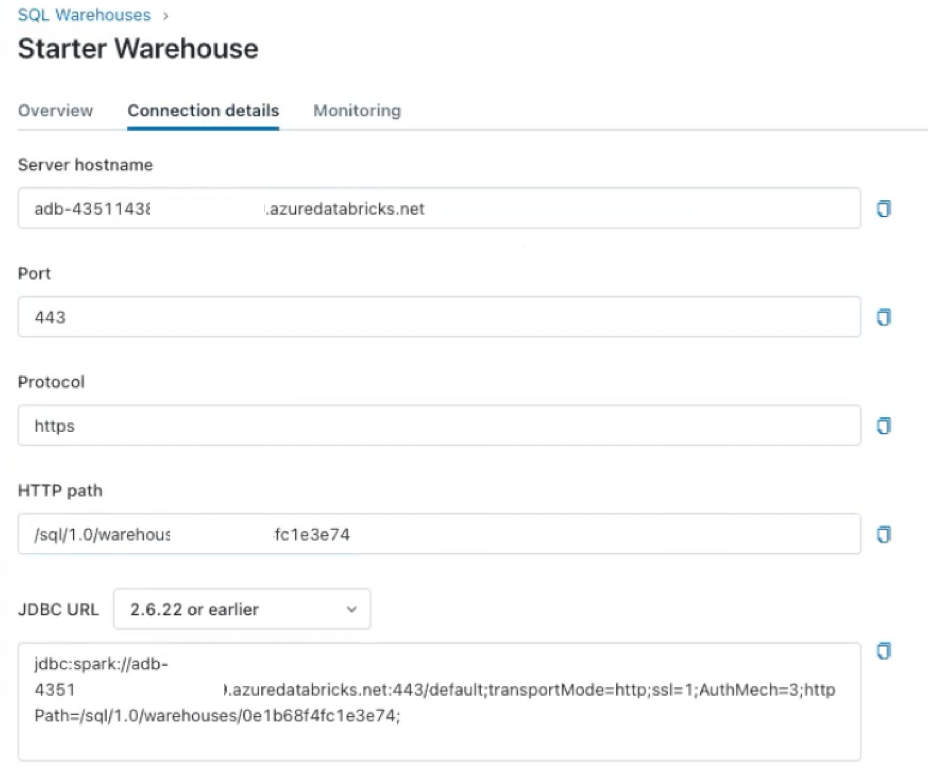
Click the Connection details tab.
-
Copy the HTTP path value in Databricks as it's required in the Sigma UI.
-
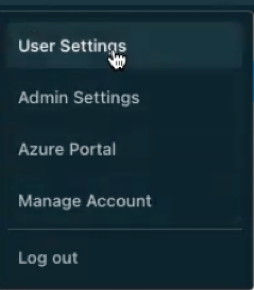
Go to User Settings in Databricks by clicking on your username.
-
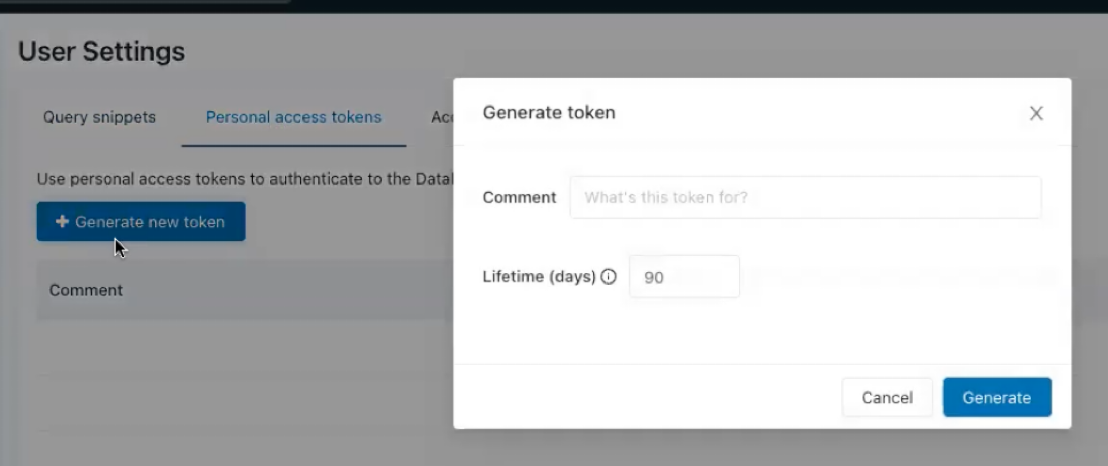
Click Personal access tokens tab.
-
Click Generate new token.
-
In the Lifetime field, set the duration of the private link. The link will expire based on the value.
-
Enter a value in the Comment field.
-
Click Generate. Copy this token as it's required in the Sigma UI.

-
In Sigma, go to Admin > Connections > Databricks.
-
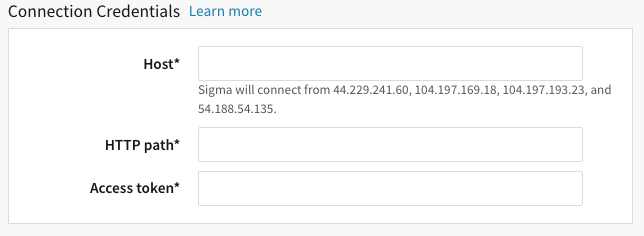
In the Host field, enter the private endpoint you copied when you approved the endpoint, in the following format.
<private_endpoint_name>.privatelink.azuredatabricks.netFor example, if the private endpoint name is databricks-endpoint, then you would enter the following in the Host field.
databrick-endpoint.privatelink.azuredatabricks.netTo locate the private endpoint's name, go to your Azure portal > Azure Databricks Workspace > Networking on the left panel. The private endpoint name is displayed in the Private Endpoint column in Private endpoint connections. -
Paste the HTTP path value from Azure into the HTTP path field in Sigma.
-
Paste the token you created in Azure and enter into Access token field in Sigma.
-
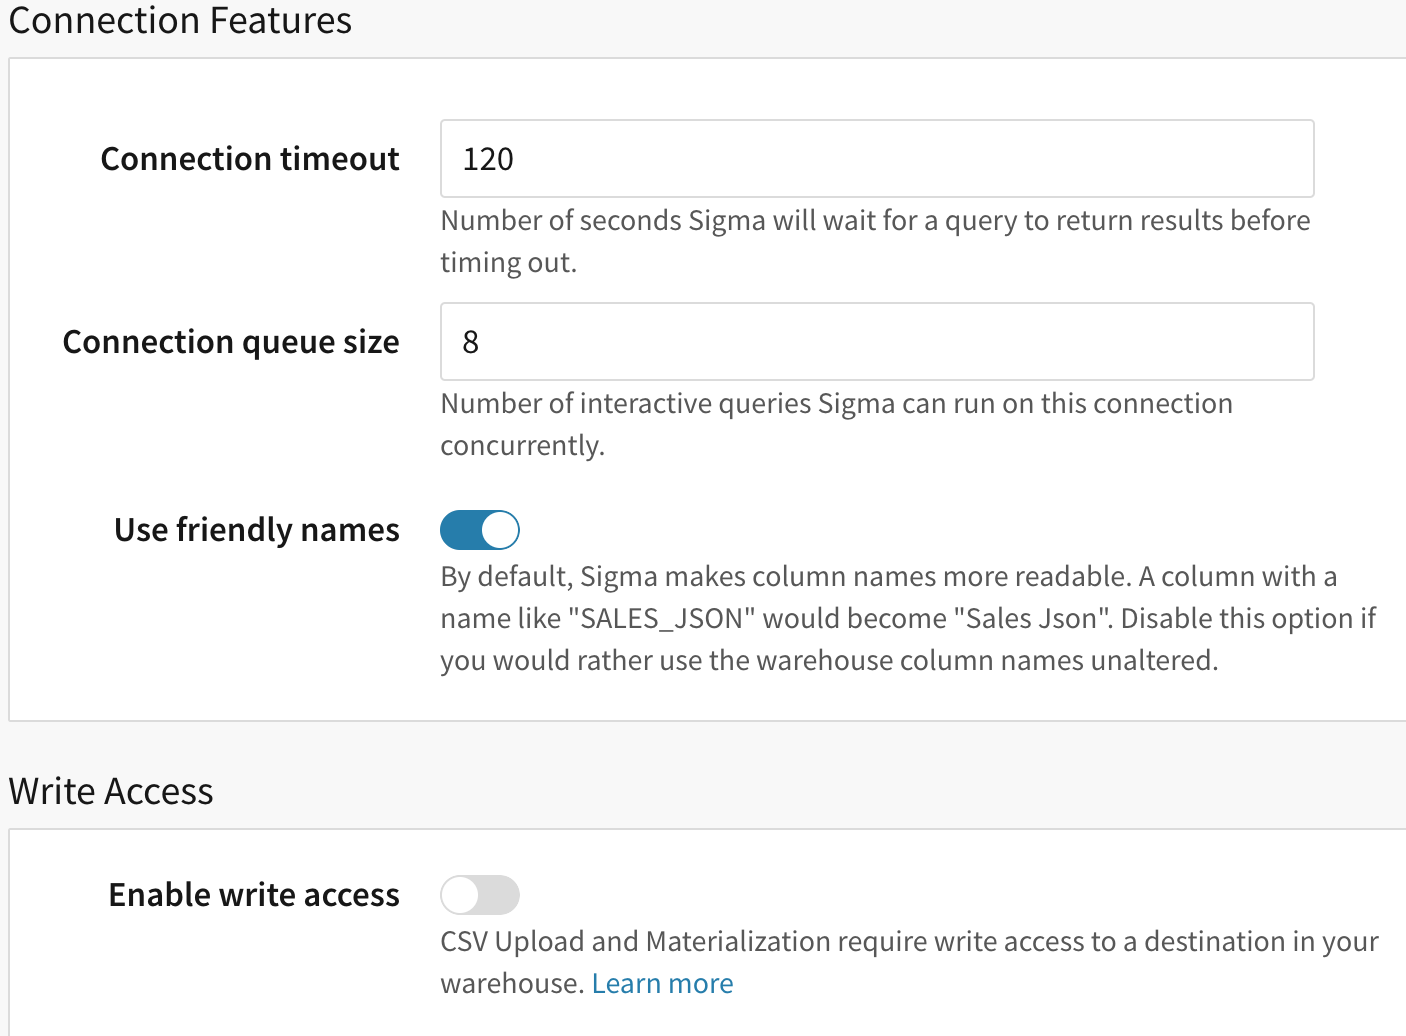
[optional] Under Connection Features, you can set a connection timeout and/or enable write access.
-
[optional] In the Connection queue size field, define the number of interactive queries Sigma can run on this connection concurrently.
-
Click Create in Sigma.
PostgreSQL
Private Link can be enabled for Azure Database for PostgreSQL flexible server instances that are created with public access, or single server instances.
Prerequisites
To add a Private Link connection, you must complete the following procedures:
- Provide your PostgreSQL Resource ID to Sigma
- Approve the Private Link in Azure
- Configure the PostgreSQL connection in Sigma
Provide your PostgreSQL Resource ID to Sigma
Sigma requires your Resource ID to create a Private Link for your organization. View the Azure documentation on How to get your Azure Resource ID. Copy the Resource ID from the JSON View of your server page, as well as the Region Name for the PostgreSQL warehouse. Send these to your Sigma Account Executive.
Approve the Private Link in Azure
After Sigma has finished configuring the Private Link, view the Azure documentation on how to Approve private endpoint connections. Ensure the status of the private endpoint is changed from Pending to Accepted.
Configure the PostgreSQL connection in Sigma
Configure a new Private Link PostgreSQL connection in Sigma:
-
Go to Administration > Connections.
-
Select Create Connection, then select PostgreSQL. Enter a Name for your connection.
-
Fill out the fields under Connection Credentials:
Host Enter the DNS name provided by your Sigma Account Executive. User Enter the Admin Username found in your Azure PostgreSQL server page. Port Enter the PostgreSQL port number. Password Enter the password created to access your data warehouse. Database Enter the name of your database. -
Turn on the Enable TLS toggle on to enable TLS encryption for your connection.
MySQL
Prerequisites
- Private Link can only be enabled for Azure Database for MySQL flexible server instances that are created with public access.
To add a Private Link connection, you must complete the following procedures:
- Provide your MySQL Resource ID to Sigma
- Approve the Private Link in Azure
- Configure the MySQL connection in Sigma
Provide your MySQL Resource ID to Sigma
Sigma requires your Resource ID to create a Private Link for your organization. View the Azure documentation on How to get your Azure Resource ID. Copy the Resource ID from the JSON View of your server page, as well as the Region Name for the MySQL warehouse. Send these to your Sigma Account Executive.
Approve the Private Link in Azure
Once Sigma has finished configuring the Private Link, View the Azure documentation on how to Approve private endpoint connections. Ensure the status of the private endpoint is changed from Pending to Accepted.
Configure the MySQL connection in Sigma
Configure a new Private Link MySQL connection in Sigma:
-
Go to Administration > Connections.
-
Select Create Connection, then select MySQL. Enter a Name for your connection.
-
Fill out the fields under Connection Credentials:
Host Enter the DNS name provided by your Sigma Account Executive. User Enter the Admin Username found in your MySQL server page. Port Enter the MySQL port number. Password Enter the password created to access your data warehouse. Database Enter the name of your database. -
Turn on the Enable TLS toggle on to enable TLS encryption for your connection.
Azure SQL Database, Azure SQL Managed Instance, or SQL Server 2022
Reach to out to your Sigma Account Executive for more information on setting up Private Link for Azure SQL Database, Azure SQL Managed Instance or SQL Server 2022 connections.
Updated 18 days ago
