

Promote a local Sigma table (Beta)
This documentation describes one or more public beta features that are in development. Beta features are subject to quick, iterative changes; therefore the current user experience in the Sigma service can differ from the information provided in this page.
This page should not be considered official published documentation until Sigma removes this notice and the beta flag on the corresponding feature(s) in the Sigma service. For the full beta feature disclaimer, see Beta features.
You can only use a local Sigma table in the workbook where you created it. When other Sigma documents need to read and write its data, you can promote it to make it organization-wide.
An organization-wide Sigma table appears in the data catalog and search results, and other Sigma documents can use it as a data source. When you promote a local Sigma table, you can also customize the table name, choose the destination schema, and decide which columns to include.
This page explains how to promote a local Sigma table to make it available across your organization. For information about creating a new local table, see Create a local Sigma table. For general information about Sigma tables, see Sigma tables overview.
Sigma tables are currently supported by Snowflake, Databricks, and PostgreSQL connections.
Requirements
To promote a local Sigma table:
- You must be the workbook owner or have Can edit workbook access.
- You must be the owner of the table (Can own access). If you created the local Sigma table, you’re the owner by default.
- You must be granted Can create table access to the destination schema you want to promote the table to. The schema cannot be one of the connection’s write-back schemas.
Promotion is permanent. After you promote a table, you cannot undo the promotion or demote the table to make it local again.
About Sigma table promotion
When you promote a local Sigma table, the following changes occur:
- Sigma copies the underlying database table from the write-back schema into the schema you select. The new database table uses the table and column names you specify, and it becomes the underlying database table for the organization-wide Sigma table.
- The organization-wide Sigma table is available in the data catalog, in search results, and as a data source to all users with access to the selected schema.
- In the workbook where you created the local Sigma table, Sigma updates that Sigma table element to use the new underlying database table as its data source. Because the workbook keeps the original Sigma table element, tables and charts that reference it also reflect the new data source and continue to work.
- Your data platform retains the original underlying database table in the write-back schema, but Sigma no longer updates it or uses it as a data source.
Promote a local Sigma table
- Open the workbook draft that contains the local Sigma table.
- Select the local Sigma table element, then open the Properties panel to view the data source. A Local table badge displays next to the source name.
- Click the down arrow (
 ) next to the data source name, then select Promote table in the menu.
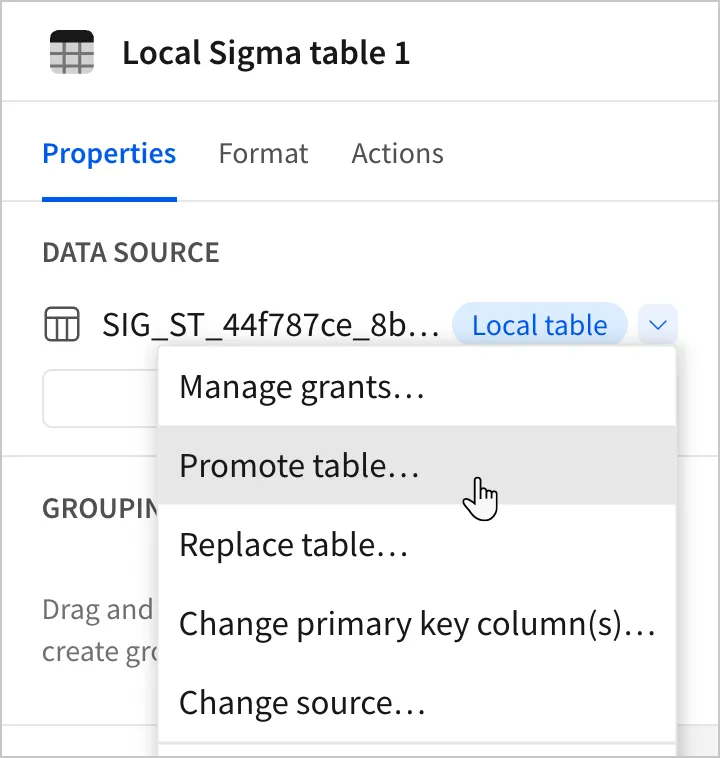
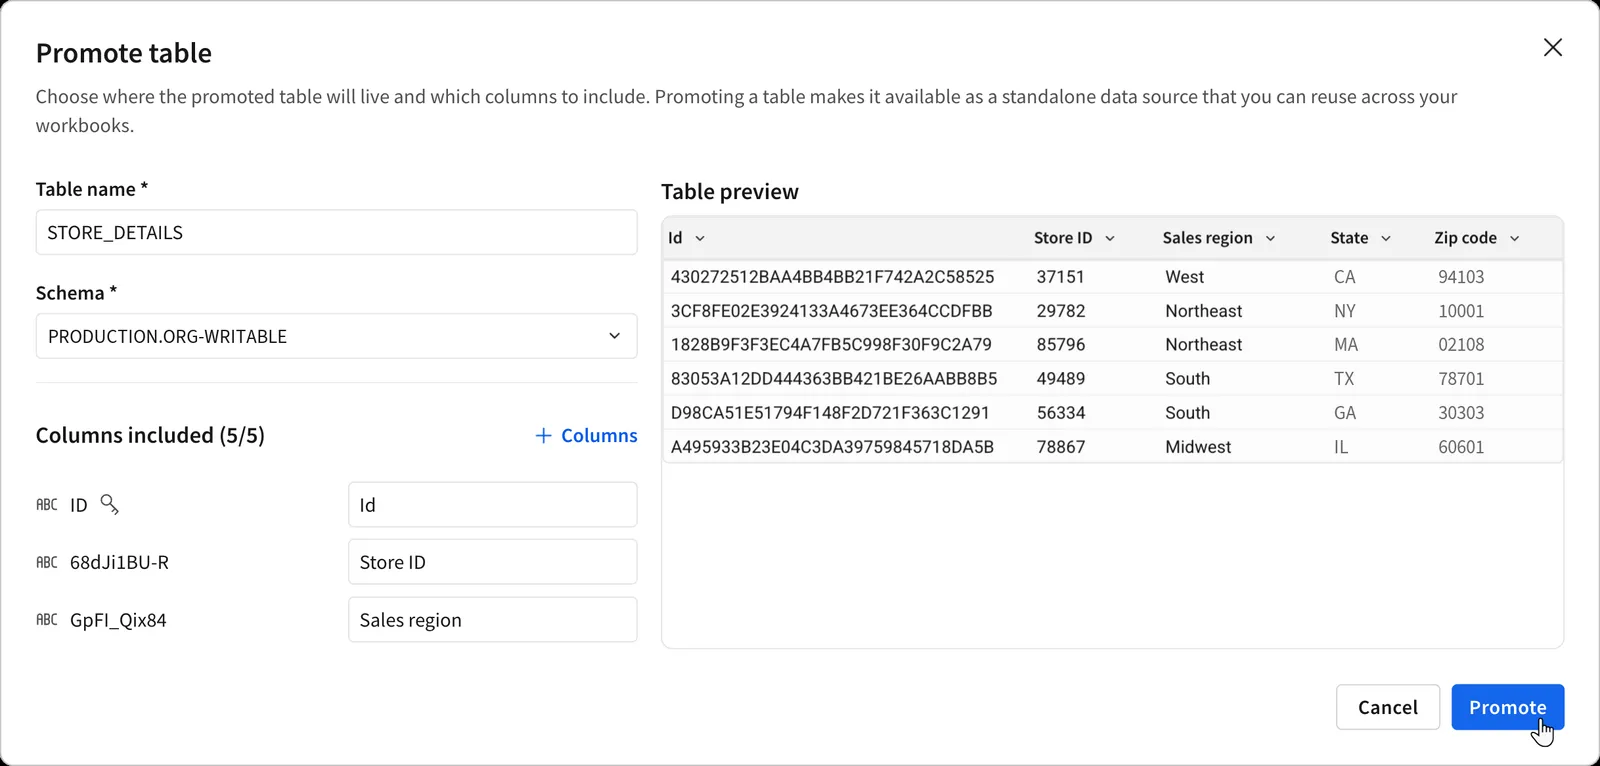
- In the Promote table modal, complete the following:
-
In the Table name field, enter a name for the organization-wide Sigma table. By default, Sigma uses the element title converted to valid database table name syntax, which meets the following criteria:
- Starts with a letter or underscore
- Contains only letters, numbers, or underscores
- Contains a maximum of 128 characters (63 on a PostgreSQL connection)
The name must also be unique in the schema you select in the next step.
-
In the Schema field, select the schema where Sigma creates the new database table. You can select any schema you have Can create table access to in the table’s current connection, except any of the connection’s write-back schemas.
-
In the Columns included section, add and rename columns to include in the organization-wide Sigma table. Primary key columns, identified by a key icon, cannot be excluded.
-
(Optional) To include or exclude columns, click + Columns and select or clear columns in the menu. Column names displayed with a checkmark are included.
Sigma doesn’t copy excluded columns to the new database table, so they don’t exist in the organization-wide Sigma table. The original Sigma table element and all elements using it as a data source still show the excluded columns, but the columns no longer load data.
-
(Optional) To rename a column, edit the text field next to the current column name.
Sigma applies updated column names to the new database table and the original Sigma table element. However, if you previously modified a column name in the local Sigma table, that custom column name overrides the name change in this step. All elements using the original Sigma table element as a data source also reflect the column name override.
-
-
Click Promote.
-
Use an organization-wide table
To use the Sigma table in another workbook, data model, or report, see Add an existing Sigma table to a document.
After you promote a Sigma table, you remain its owner. Other users can use the organization-wide Sigma table as a data source in other Sigma documents, but they cannot modify the table’s structure, annotate the table, edit cell data, or grant other users access to the table until you grant them the required access. For more information, see Configure access for Sigma tables.