

Edit a Sigma table’s data or schema (Beta)
Edit a Sigma table’s data or schema (Beta)
This documentation describes one or more public beta features that are in development. Beta features are subject to quick, iterative changes; therefore the current user experience in the Sigma service can differ from the information provided in this page.
This page should not be considered official published documentation until Sigma removes this notice and the beta flag on the corresponding feature(s) in the Sigma service. For the full beta feature disclaimer, see Beta features.
Edit a Sigma table to update its data or modify its schema. Edits persist in your data platform and are reflected in every document and external system that references the Sigma table, except where noted in Considerations and limitations.
This document explains how to update Sigma table data in a workbook, report, or data model, and how to modify its schema in the data catalog. For general information about Sigma tables and how they work, see Sigma tables overview.
Sigma tables are currently supported by Snowflake, Databricks, and PostgreSQL connections.
Requirements
To edit a Sigma table:
- You must have access to the connection that contains the Sigma table you want to edit.
- You must be assigned an account type with the Edit input tables permission enabled.
- You must have access to a document containing the Sigma table you want to edit.
- You must have write permission on the Sigma table. On non-OAuth connections, this is granted as Can write, Can use, write & annotate, or Can own access in the data catalog. On OAuth connections, permission is granted directly on the data platform. See Configure access for organization-wide Sigma tables.
Considerations and limitations
- Sigma tables don’t support undo/redo functionality, version history, or point-in-time restoration.
- Sigma tables only support text, number, date, and boolean columns.
- When you rename or delete a column, Sigma can validate dependencies to prevent broken references in downstream documents.
- If you delete a column without selecting a replacement, references to the column break.
- Sigma doesn’t run content validation on unpublished references to Sigma tables. For example, if an element in a workbook draft uses a Sigma table as a data source, but the element hasn’t been saved to the published version of the workbook, Sigma cannot validate the drafted dependency.
Update Sigma table data in a document
In a document, you can update individual Sigma table cell values directly, or you can paste data in bulk from another source.
Every Sigma table has a primary key column that uniquely identifies each row. You cannot update or paste values into the primary key column.
To update a single cell:
- Open the document that contains the Sigma table.
- In the Sigma table, select the cell you want to edit, then enter a new value.
- Press Enter to apply the change.
To paste data into a Sigma table:
- Open the document that contains the Sigma table.
- Select the cell where you want the pasted data to start.
- Press Cmd+V (macOS) or Ctrl+V (Windows) to paste the copied data.
The document does not need to be published for Sigma to write edits to the underlying database table in your data platform.
Modify a Sigma table’s schema
In the data catalog, you can access the Sigma table’s schema and apply the following changes (or schema mutations):
When you modify the schema, your changes apply to every document and external system that references the Sigma table, except where noted in Considerations and limitations.
Access the schema
Before you can add a column, rename a column, delete a column, or rename a table, you must access the relevant schema in the data catalog.
- Use one of the following methods to open a Sigma table in the data catalog:
- From Home:
- Go to the Connections page and select the relevant connection.
- In the data catalog, locate and select the Sigma table you want to view.
- From a document:
- Select the Sigma table.
- Go to the Properties panel.
- In the Data source section, click the down arrow (
 ) next to the Sigma table’s name, then select View table in the menu.
- From Home:
- Sigma opens the Sigma table overview in the data catalog, where you can select the Columns tab to view the current schema.
Add a column
Add a column to extend the Sigma table’s schema.
- Access the Sigma table’s schema.
- In the Sigma table’s page header, click Edit.
- Click + Add column.
- In the row for the new column, complete the Column ID and Friendly name fields, then select a data type from the Type dropdown. The remaining fields are optional.
- Click Publish to save your changes.
Sigma doesn’t automatically show the new column in elements that use the Sigma table as a data source. To display the new column, go to the available source columns list and select it. See Add a data source column.
Rename a column
Change a column’s ID (the underlying database column name) or friendly name (the column label displayed only in Sigma).
-
In the Sigma table’s page header, click Edit.
-
In the column’s row, edit one or both of the following fields:
- Column ID: The underlying database column name that applies to every document and external system that references it.
- Friendly name: The column label displayed only where the Sigma table is referenced in Sigma.
-
Click Publish to save your changes. If a document referencing the Sigma table is currently open, refresh it to see the changes.
When you publish the updated schema, Sigma runs content validation that automatically updates the published version of every document using the Sigma table. The update only applies the content validation changes, which are reflected in the document version history as “Published by Scheduler User.”
-
If you changed the column ID, document drafts referencing the Sigma table need to be updated. In the banner above the document header, click Update to latest version.

When the draft is updated to reference the new column ID, Sigma displays the “Successfully rebased published changes” message.
Friendly name changes take effect immediately in every document and external system that references the Sigma table. Column ID changes also apply immediately, but document drafts don’t automatically point to the new column ID.
Instead, drafts continue to reference the old column ID, resulting in expected errors that indicate the column doesn’t exist. Sigma prompts you to update individual document drafts to reference the latest version of the data source and resolve the errors.
This content validation mechanism prevents broken references to the renamed column while giving you control over when changes are applied to a draft you’re actively editing.
Delete a column
Delete a column to remove it from the Sigma table’s schema.
-
In the Sigma table’s page header, click Edit.
-
In the column’s row, click
 More and select Delete column.
-
Click Publish to save your changes.
Sigma deletes the column from the underlying database table in your data platform, making the column and its data unavailable to all documents and external systems that reference the Sigma table.
-
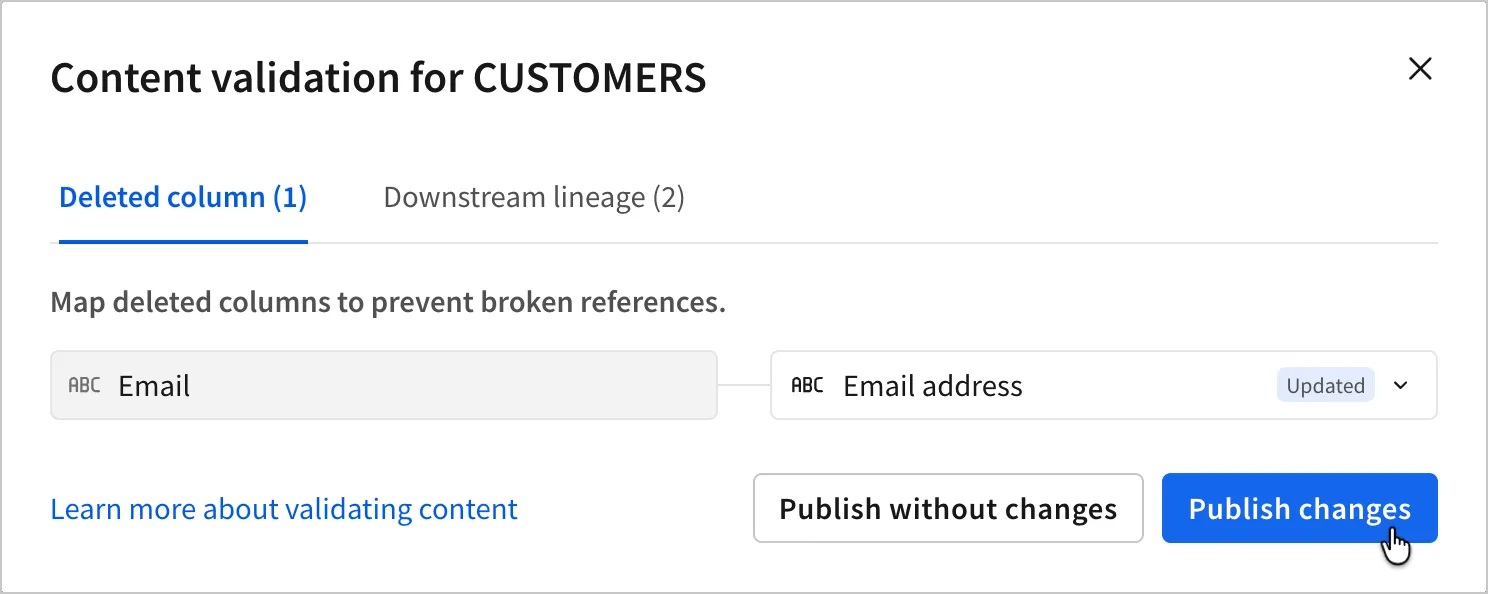
If any documents reference the Sigma table, Sigma displays the Content validation modal that prompts you to remap references to deleted columns as follows:
-
(Optional) On the Downstream lineage tab, review a list of documents that reference the Sigma table. Understanding where the data is referenced can help inform decisions when selecting replacement columns.
-
On the Deleted column tab, select a replacement for each column you delete. Sigma allows you to select any column from the Sigma table that uses the same data type. If you select No column, references to the deleted column aren’t remapped.
-
Click Publish changes to remap references to the replacement columns you selected, or click Publish without changes to delete the columns without remapping.
If you leave a deleted column unmapped or select Publish without changes, the references break after publishing, and the column shows an error that indicates the column doesn’t exist.
When you publish the updated schema, Sigma runs content validation that automatically updates the published version of every document using the Sigma table. The update only applies the content validation changes, which are reflected in the document version history as “Published by Scheduler User.”
-
-
Update document drafts that reference the Sigma table. In the banner above the document header, click Update to latest version.
When a draft is updated to reference the replacement column, Sigma displays the “Successfully rebased published changes” message.
Column deletions take effect immediately in every document and external system that references the Sigma table, but document drafts don’t automatically point to replacement columns.
Instead, drafts continue to reference the deleted column, resulting in expected errors that indicate the column doesn’t exist. Sigma prompts you to update individual document drafts to reference the latest version of the data source and resolve the errors.
This content validation mechanism prevents broken references to the deleted column while giving you control over when changes are applied to a draft you’re actively editing.
Rename the table
-
In the Sigma table’s page header, click Edit.
-
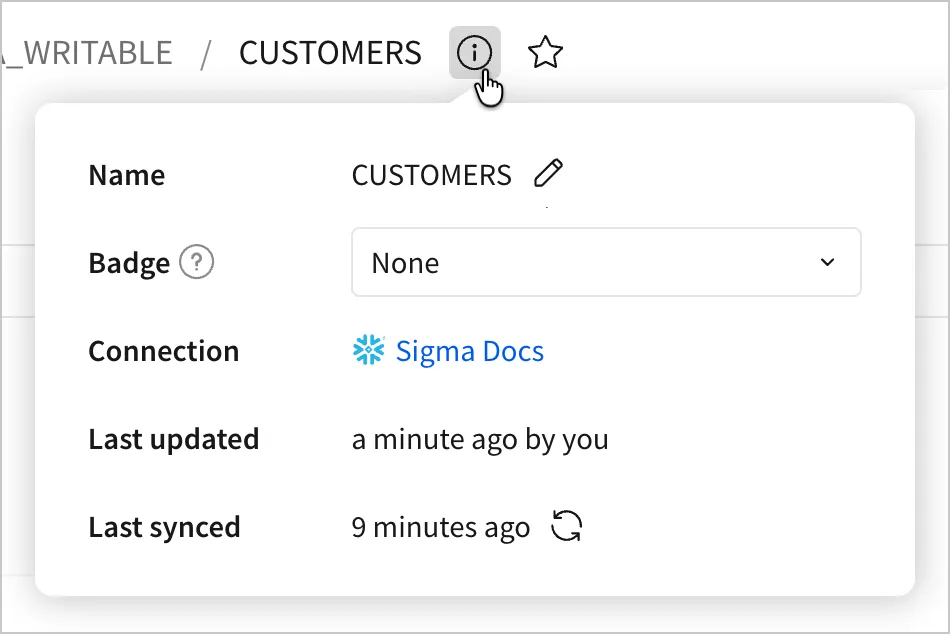
Click the information icon (
 ) to view details about the Sigma table.
-
In the Name field, click
 Edit.
-
In the Rename table modal, enter a new name, then click Save to apply your change.
After you refresh the page, the data catalog displays the new table name. Documents and elements that use the Sigma table as a data source continue to work because they reference the table’s stable internal ID instead of the table name. Anything that references the table by name directly, such as a SQL query or an external system connecting to the warehouse, can break. You must manually update those references.