
Manage workbook localization
Localization allows workbook editors to translate custom workbook text into other languages. Translations apply to workbook previews and embed views.
Administrators can also create organization-level translations that apply across all workbooks in a Sigma organization. For more information about organization-level translation files managed by your administrator, see Manage organization translation files.
Requirements
To manage workbook translations, you must be granted Can edit workbook permission.
Any user with a workbook preview or embed view URL and a valid locale definition can view a translated workbook.
Supported languages and locales
Sigma supports the following languages and locales:
| Language | Locale |
|---|---|
| Chinese (Simplified) | zh-cn |
| Chinese (Traditional) | zh-tw |
| English (United States) | en |
| English (Australia) | en-au |
| English (Canada) | en-ca |
| English (Ireland) | en-ie |
| English (United Kingdom) | en-gb |
| French | fr |
| French (Canada) | fr-ca |
| German | de |
| Italian | it |
| Japanese | ja |
| Korean | ko-kr |
| Polish | pl |
| Portuguese | pt |
| Portuguese (Brazil) | pt-br |
| Russian | ru |
| Spanish | es |
| Spanish (Mexico) | es-mx |
| Swedish | sv-se |
| Thai | th |
Create a workbook translation
Manage locales and translations for your workbook using the Manage locales panel, accessible from your workbook’s settings menu.
-
Open the workbook in Edit mode.
-
Click the settings icon (
 ), located in the workbook’s left sidebar, to open your workbook’s settings panel.
 -
Click Manage locales.
-
To add a new language, click the plus icon (+) next to Available locales.
-
Select a language from the dropdown menu.
Completing this step to create a locale for a workbook enables translation of all standard Sigma text (for example, menu labels, modal text, etc). To translate custom text in the workbook, complete the rest of this procedure.
- To add translations for custom text in your workbook, click the more icon (
 ), and download the json file.
| Option | What to expect | When to use |
|---|---|---|
| Download | This option appears if no organization-level translation file exists. The resulting json file contains all key-value pairs for custom strings in the workbook. | Choose this option to define translations for your custom text when your admin has not defined any translations that apply to the entire organization. |
| Download untranslated strings | The resulting json file contains only the key-value pairs for custom strings in the workbook that do not match keys in an organization-level translation file. In other words, if a translation already exists at the organization level, that key-value pair is omitted in this file. Any keys that are not translated in an organization-level file show the translations defined for this workbook, if any, or show the English values if no translation has yet been provided. | Choose this option when you want to avoid overwriting any values defined at the organization-level. |
| Download all strings | The resulting json file contains all key-value pairs for custom strings in the workbook. Any keys that are translated only in the organization-level file show the values defined by the admin in that file. Any keys that are not translated in an organization-level file show the translations defined for this workbook, if any, or show the English values if no translation has yet been provided. Any keys that are translated in both an organization-level file and the workbook-level file show the translations defined for this workbook. | Choose this option when you want to see all translations that apply to the custom strings in this workbook, or if you want to overwrite any organization-level translations with different translations for this workbook. |
-
Open the downloaded file.
-
The .json file contains a list of key-value pairs.
Update the values to the appropriate translations.Do not edit any of the keys.
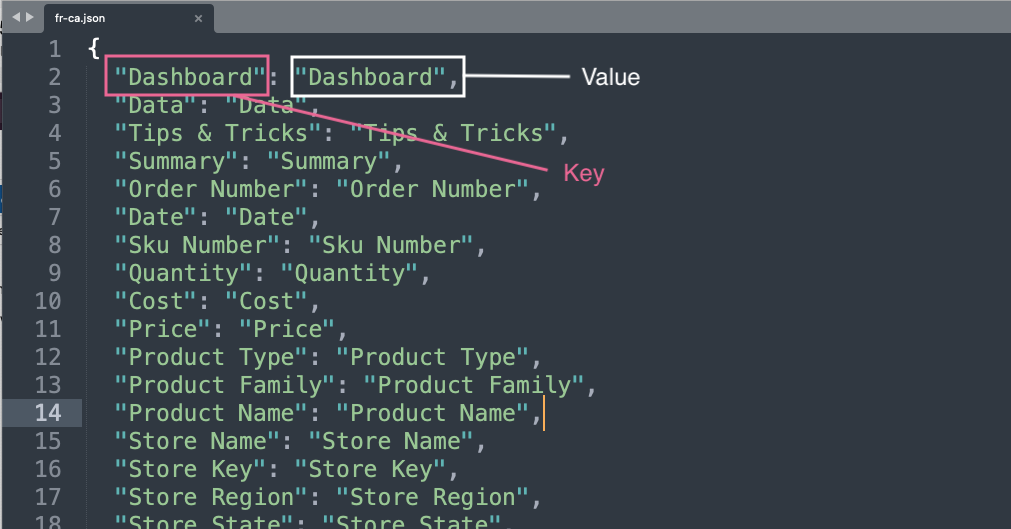
-
Edit and save your file. Do not change the filename.
-
Return to Sigma. Click Upload, and select your updated .json file.
-
Click the preview icon (
 ) to open a workbook preview with translated text.
Update a workbook translation
Each time you publish text changes to your workbook, you need to download and re-upload the locale’s .json file with new translations for any new or changed text strings. Newly added strings appear at the bottom of the json file.
If an administrator has created an organization-wide translation file for the language, you'll need to choose between downloading just the untranslated strings or downloading all strings.
| Option | What to expect | When to use |
|---|---|---|
| Download | This option appears if no organization-level translation file exists. The resulting json file contains all key-value pairs for custom strings in the workbook. | Choose this option to define translations for your custom text when your admin has not defined any translations that apply to the entire organization. |
| Download untranslated strings | The resulting json file contains only the key-value pairs for custom strings in the workbook that do not match keys in an organization-level translation file. In other words, if a translation already exists at the organization level, that key-value pair is omitted in this file. Any keys that are not translated in an organization-level file show the translations defined for this workbook, if any, or show the English values if no translation has yet been provided. | Choose this option when you want to avoid overwriting any values defined at the organization-level. |
| Download all strings | The resulting json file contains all key-value pairs for custom strings in the workbook. Any keys that are translated only in the organization-level file show the values defined by the admin in that file. Any keys that are not translated in an organization-level file show the translations defined for this workbook, if any, or show the English values if no translation has yet been provided. Any keys that are translated in both an organization-level file and the workbook-level file show the translations defined for this workbook. | Choose this option when you want to see all translations that apply to the custom strings in this workbook, or if you want to overwrite any organization-level translations with different translations for this workbook. |
Add a custom translation for a language
You can maintain multiple unique translations for a given language. Adding a custom translation for a language allows you to translate the strings in your workbook differently for different consumers of embedded dashboards, for example.
When you add a custom translation for a language, the custom translation file is used instead of the base language file. To apply a custom set of translations in addition to the base language file, duplicate the base language file in the custom language file.
-
Open the workbook in Edit mode.
-
Click the settings icon (
), located in the workbook’s left sidebar, to open your workbook’s settings panel. -
Click Manage locales.
-
Click the plus icon (+) next to Available locales.
-
In the dropdown menu, select Add custom translations.
-
Type a name for your custom translation file.
If you want to inherit a custom set of organization-level translations defined by your admin for this language, you must use the same name here as the one your admin used when they created the organization-level translation file. Ask your admin for the name of their file.
-
Set the Base language to specify the language to use for all standard Sigma text (for example, menu labels, modal text, etc).
-
Click Add.
-
In the list of available locales, find the custom language variant you just added.
If an organization-level language variant exists and you used the same name for the custom language variant file, the organization-level file displays in gray.
-
To add translations for custom text in your workbook, click the more icon (
), and download the json file.
| Option | What to expect | When to use |
|---|---|---|
| Download | This option appears if no organization-level translation file exists. The resulting json file contains all key-value pairs for custom strings in the workbook. | Choose this option to define translations for your custom text when your admin has not defined any translations that apply to the entire organization. |
| Download untranslated strings | The resulting json file contains only the key-value pairs for custom strings in the workbook that do not match keys in an organization-level translation file. In other words, if a translation already exists at the organization level, that key-value pair is omitted in this file. Any keys that are not translated in an organization-level file show the translations defined for this workbook, if any, or show the English values if no translation has yet been provided. | Choose this option when you want to avoid overwriting any values defined at the organization-level. |
| Download all strings | The resulting json file contains all key-value pairs for custom strings in the workbook. Any keys that are translated only in the organization-level file show the values defined by the admin in that file. Any keys that are translated in this workbook-level file show the translations already defined for this workbook, if any, or show the English values if no translation has yet been provided. Any keys that are translated in both an organization-level file and the workbook-level file show the translations defined for this workbook. | Choose this option when you want to see all translations that apply to the custom strings in this workbook, or if you want to overwrite any organization-level translations with different translations for this workbook. |
-
Open the downloaded file.
-
The .json file contains a list of key-value pairs.
Update the values to the appropriate translations.Do not edit any of the keys.
-
Edit and save your file. Do not change the filename.
-
Return to Sigma. Click Upload, and select your updated .json file.
-
Click the preview icon (
) to open a workbook preview with translated text.
Custom translations can be inherited from organization-level files created by your administrator. See Manage organization translation files.
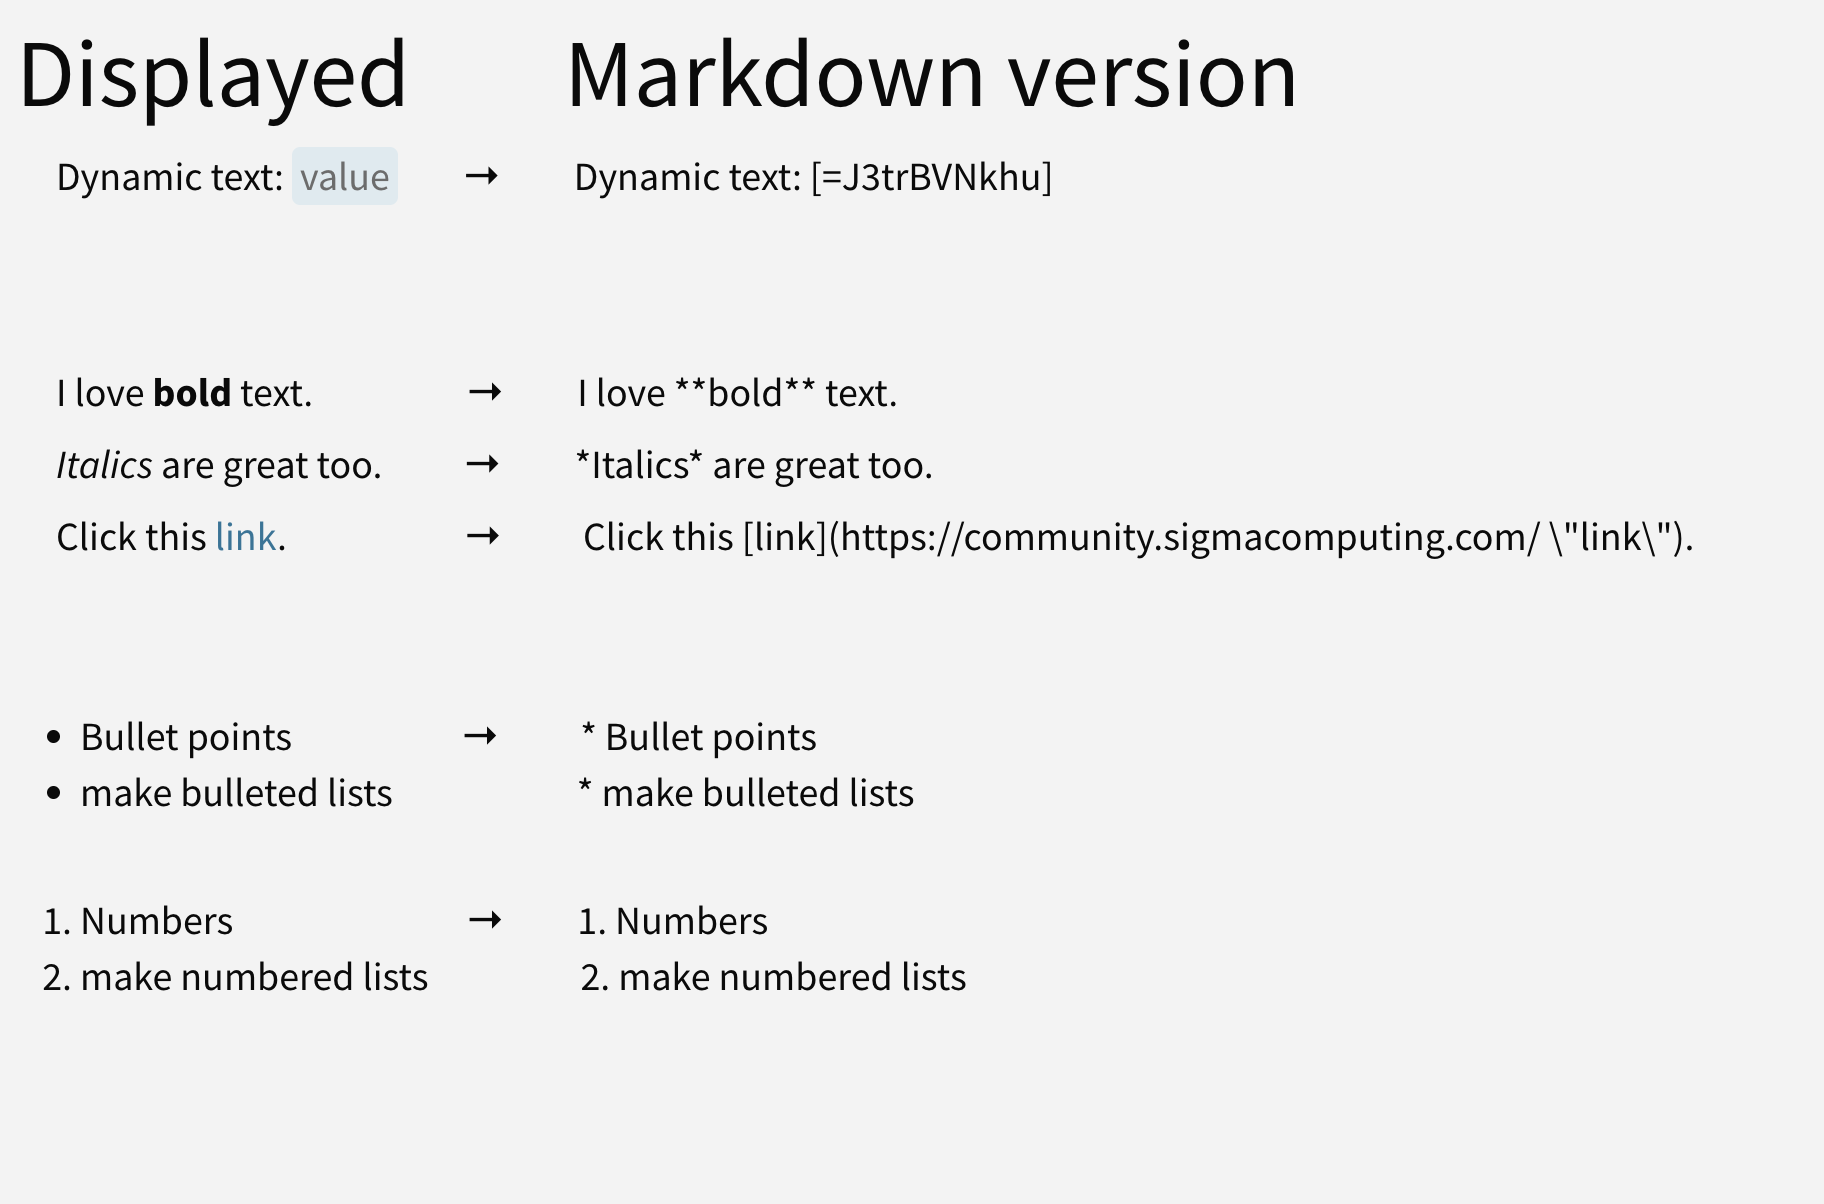
Use markdown and dynamic text in a translation file
You can use Markdown and dynamic text in your JSON values to support rich text.
Use the following syntax to produce dynamic text as part of a value: [={formula-id}]
Use Markdown syntax for other rich text:
Apply locales and translations to embeds or previews
To apply a locale to an embed or preview, append the embed or workbook preview URL with :lng=<your-locale>. Applying a locale translates the standard Sigma text, such as menu labels and modal text, into the language associated with the locale. If a translation file is defined for that locale, applying the locale also translates the custom text in the workbook with any defined translations.
If you are applying a custom translation variant of a language, also append with :lng_variant=<variant+name>. Use URL encoding for any special characters in the name.
Example embed API code:
// NOTE: Localization values are case sensitive
searchParams += '&:lng=fr-ca';
Example embed API code for a custom translation variant:
// NOTE: Localization values are case sensitive
searchParams += '&:lng=it&:lng_variant=Custom+Italian';
Example embed URL:
https://app.sigmacomputing.com/my-company/workbook/My-Workbook-2PG8oM9uFxNLyzxAukJfBrL?:embed=true&:lng=fr-ca
Example embed URL for a custom translation variant:
https://app.sigmacomputing.com/my-company/workbook/My-Workbook-2PG8oM9uFxNLyzxAukJfBrL?:embed=true&:lng=it&:lng_variant=Custom+Italian
A translation file is not required to apply a locale.
Even if no translation file has been defined, you can use the parameters above to apply a locale to an embed or preview in order to display the standard Sigma text, such as menu labels and modal text, in a different language.
For example, if your workbook is written in Japanese and the source data it displays is also in Japanese, you can apply the
&:lng=japarameter so that the workbook's menu labels and other standard text also display in Japanese.
Current limitations
- Auto-generated data element names (for example, Sum of Cost by Year of Date) are not included in the Sigma generated .json file. Manually name all data elements prior to defining your translations.
- Explore mode is not supported.
- Number and date formats are not supported.
Updated 15 days ago