
Schedule a conditional export or alert
You can schedule an export to send only if specific conditions are met, functioning as a conditional alert. Trigger an export based on whether data is available, or on the specific value of a control or column. This flexibility lets you fine tune recurring exports and ensure efficiency and relevance of the exported reports.
For example, configure a conditional alert to support outlier and anomaly detection workflows, sending a Slack notification when data in a specific column is above a specific value, or matches a specific anomalous condition. See Alert on detected outliers and anomalies.
This document explains how to schedule a recurring export with a predefined condition.
User requirements
The ability to add conditions to scheduled exports requires the following:
- You must be assigned an account type with the Schedule exports permission enabled.
- You must be the workbook owner or be granted Can explore or Can edit workbook permission.
Additional requirements might apply depending on the export destination. See the Sharing and exports section in Account type permission availability matrix for details.
About conditional exports and alerts
A predefined data condition acts as a filter to determine whether Sigma initiates a scheduled export. When an export is due, Sigma checks the data and only proceeds if the condition is met. The recurring schedule ensures that an export is timely, while the condition ensures it is relevant.
When configuring a conditional export or alert, select an element on a visible page as the target element. You cannot select elements on hidden pages as target elements.
When you filter your export by control values, Sigma performs the filter before checking if the condition is met.
Exercise caution when exporting or downloading workbook content that uses controls to filter sensitive data. If you request or schedule a download or export of any data, reports, workbooks, logs, or other assets (“Exported Content”) from the Sigma Platform to destinations or recipients selected by you (“Export”), you agree and understand that (i) Sigma may store the Exported Content for up to 24 hours to complete your Export, (ii) Sigma may store applicable control values as URL parameters in trace logs used for debugging and troubleshooting purposes, when Exporting to to PDF or PNG formats, and (iii) Sigma may process, store, and transfer (including transfers to regions outside region where the Export originates) the Exported Content (including any personal data therein) for the purposes of completing your Export.
Schedule an export based on data availability
Schedule a recurring export that only initiates when a specific data element or input table meets a predefined data condition.
-
In the workbook header, click the down arrow (
 ) associated with the workbook's name, then select Share and export > Schedule exports.
 -
In the schedule exports modal, click Create new schedule.
-
In the Frequency section, change the Send selection to If a condition is met.
-
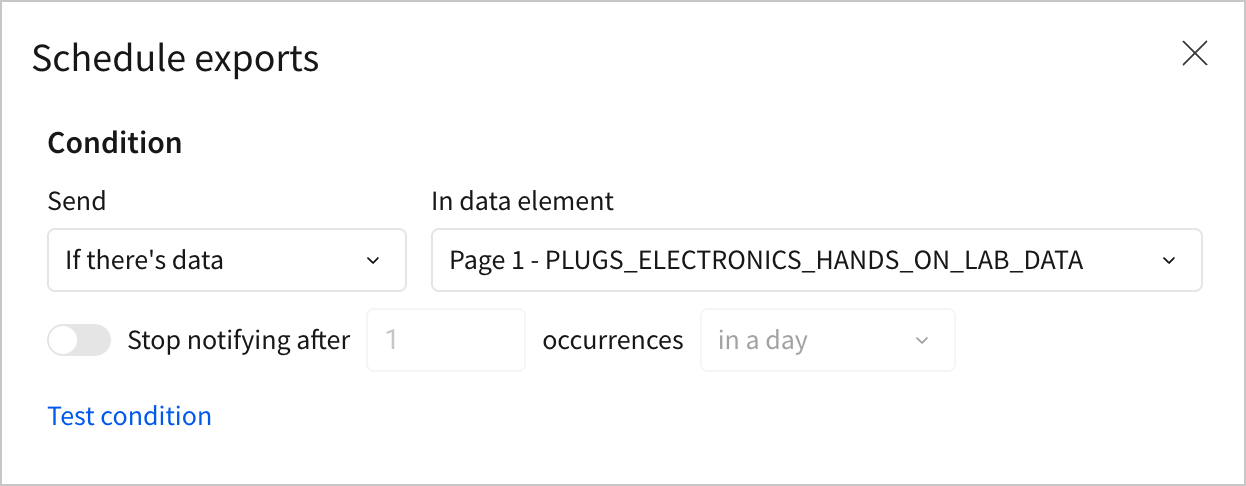
In the Condition section, configure the condition that must be met for the export to run:
-
In the Send field, select one of the following options:
- If there's no data: Export as scheduled if there is no data available in the target element.
- If there's data: Export as scheduled if data is available in the target element.
-
In the In data element field, select the target element that must meet the data availability condition.
Although the condition applies to a single target element, you can configure the schedule to export the entire workbook, specific pages, and individual elements. -
(Optional) Enable and configure the Stop notifying after setting to limit the number of times Sigma runs the export in a day, a week, or in total. (This is a public beta setting and is subject to the Beta features notice.)
-
Click Test condition to check if the target element currently meets the condition. If the results don’t align with your expectations, confirm that you selected the correct target element and configured the condition appropriately.
-
-
Configure the remaining settings in the Schedule exports modal. For more information, see the following documentation based on the preferred export destination.
Destination availability depends on your account type permissions. -
Click Create to save the scheduled export.
Schedule an export based on a conditional statement
Schedule a recurring export that only initiates when a specific data element or input table satisfies a predefined conditional statement.
-
In the workbook header, click the down arrow (
) associated with the workbook's name, then select Share and export > Schedule exports. -
In the schedule exports modal, click Create new schedule.
-
In the Frequency section, change the Send selection to If a condition is met.
-
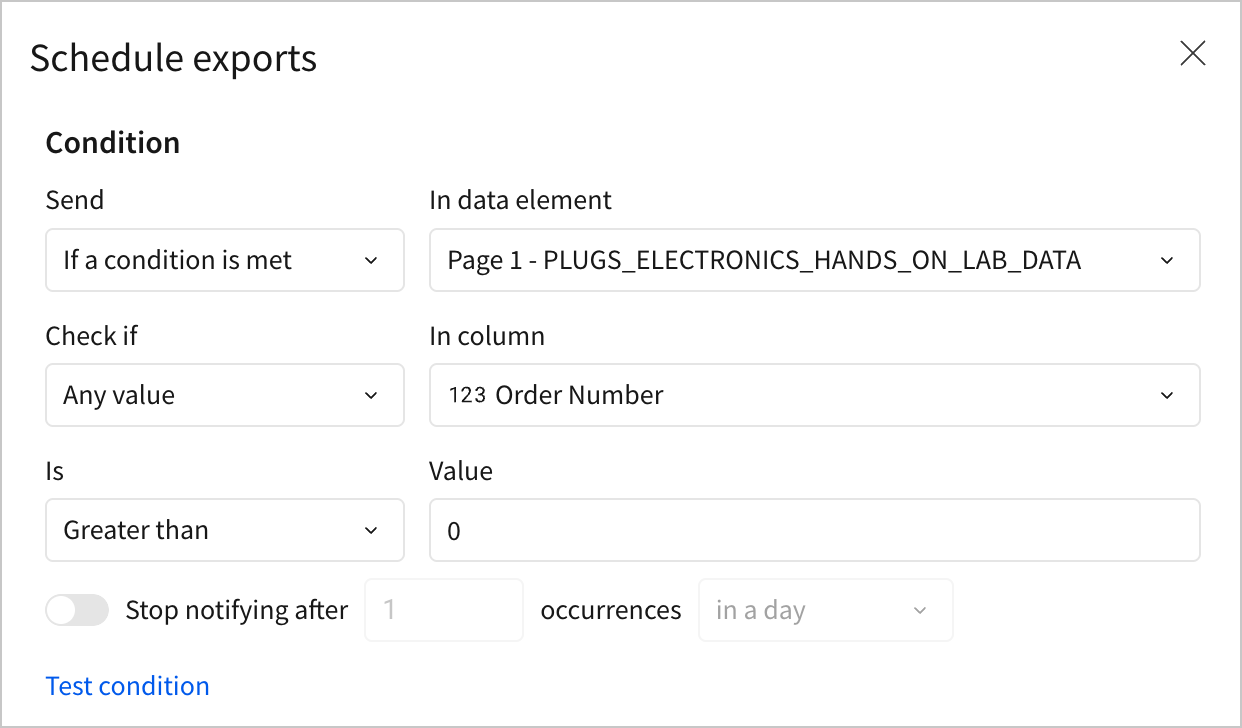
In the Condition section, configure the condition that must be met for the export to run:
-
In the Send field, select If a condition is met to export as scheduled if a specific data condition in the target element is met.
-
In the In data element field, select the target element that must meet the data availability condition.
Although the condition applies to a single target element, you can configure the schedule to export the entire workbook, specific pages, and individual elements. -
In the Check if field, select one of the following options:
- Any value: The condition must be met by one or more values in the specified column (see step d).
- All values: The condition must be met by all values in the specified column (see step d).
- {Element title} (KPI target elements only): The condition must be met by one or more values in the element's Value property column.
- Comparison value (%) (KPI target elements only): The condition must be met by one or more values in the element's Comparison property column.
-
If you selected Any value or All values in the previous step, use the In column field to specify the column to evaluate for the condition.
-
In the Is field, select a comparison operator.
-
In the Value field, enter the value to compare against when evaluating the condition.
-
(Optional) Enable and configure the Stop notifying after setting to limit the number of times Sigma runs the export in a day, a week, or in total. (This is a public beta setting and is subject to the Beta features notice.)
-
Click Test condition to check if the target element currently meets the condition. If the results don’t align with your expectations, confirm that you selected the correct target element and configured the condition appropriately.
-
-
Configure the remaining settings in the Schedule exports modal. For more information, see the following documentation based on the preferred export destination:
Destination availability depends on your account type permissions. -
Click Create to save the scheduled export.
Schedule a conditional alert for an element
To monitor a specific data element or input table, schedule a recurring export as a conditional alert that sends an email, Slack notification, etc.
You can create a conditional alert using the steps in the previous sections of this document, this method auto-populates specific fields to make it easier to quickly configure a conditional alert.
-
In the element toolbar, click
 More to open the element menu, then select Alert when.You can only create alerts for published content. If the target element hasn’t been published or contains unpublished changes, Sigma prompts you to publish the workbook.
 -
In the Schedule exports modal, review the fields that Sigma auto-populates:
- Subject (for email and email burst) or Message (for Slack and Teams): Sigma populates the title of the target element you interacted with to schedule the alert.
- Attachments: Sigma selects the target element you interacted with to schedule the alert.
- Condition section: Sigma configures a conditional statement based on the target element's type.
-
Modify the auto-populated fields as needed, then congifure the remaining settings. See Schedule an export based on data availability and Schedule an export based on a conditional statement in this document.
-
Click Create to save the scheduled export.
Alert on detected outliers and anomalies
You can set up an alert based on detected outliers and anomalies in your data, either a threshold-defined anomaly, or write a formula to detect outliers and anomalies and alert based on the output of the formula.
For example, you might do one of the following:
Example: Configure a static threshold alert
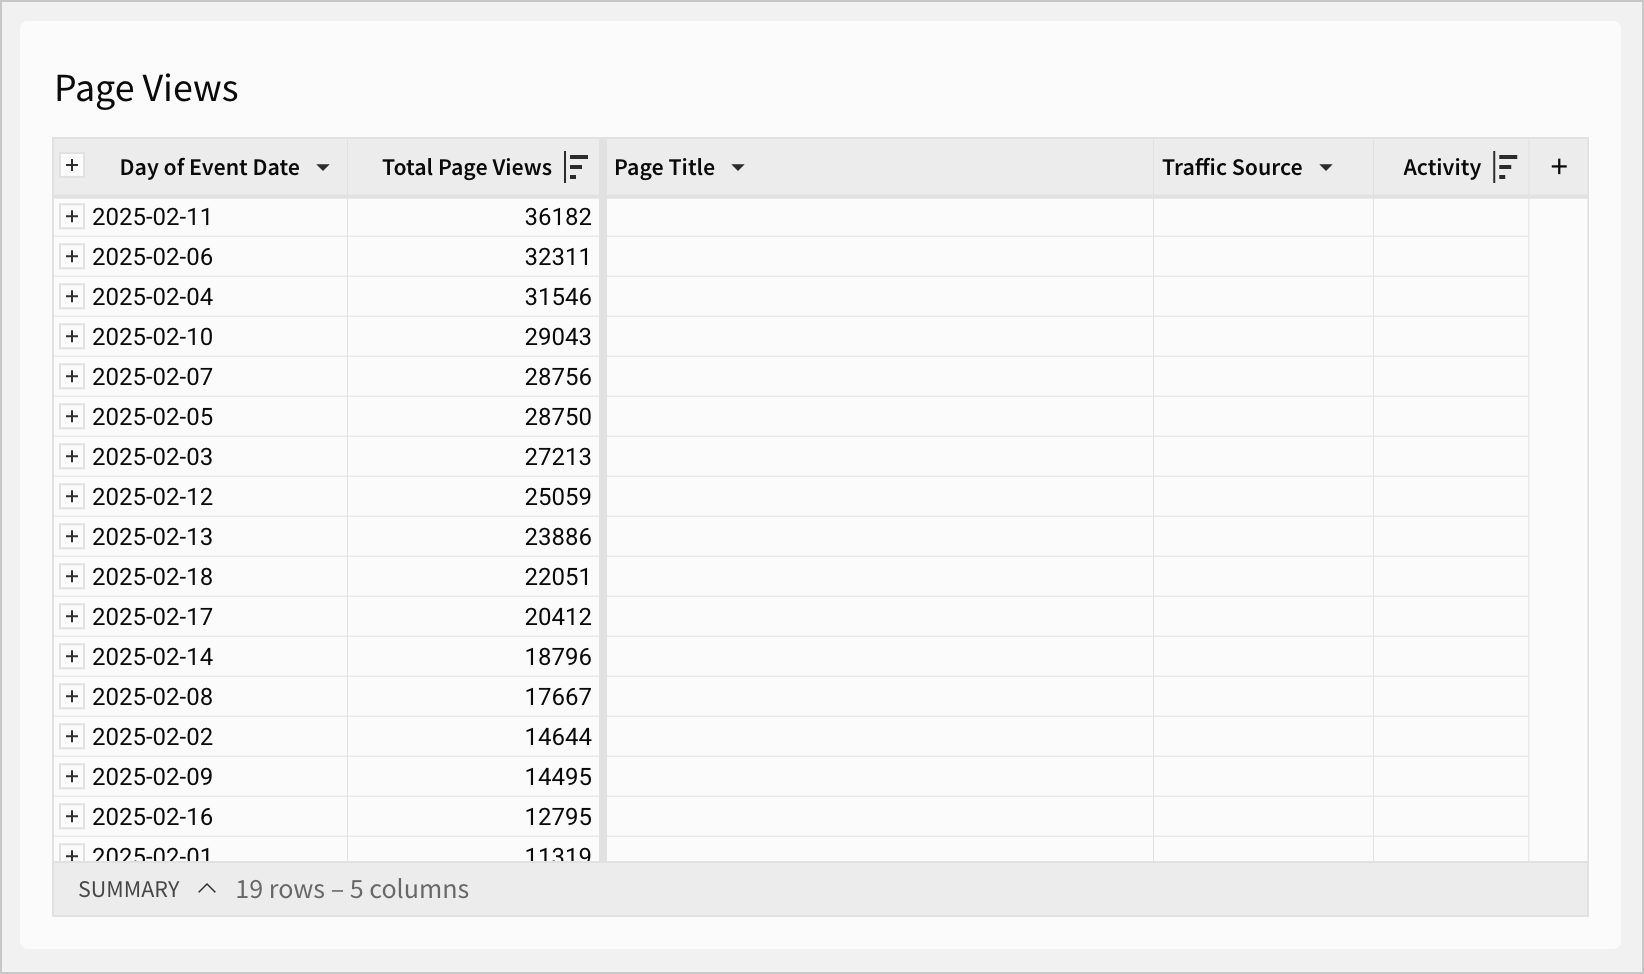
For example, if you want to monitor anomalous page visits to your website, you might configure an alert that sends a Slack message when page views exceed a known threshold, such as 25,000 views for a specific day. You can recreate this example with the Sigma Sample Database Google Analytics Events data.
-
For a website analytics data source, use a table grouping to calculate total page views per day:
-
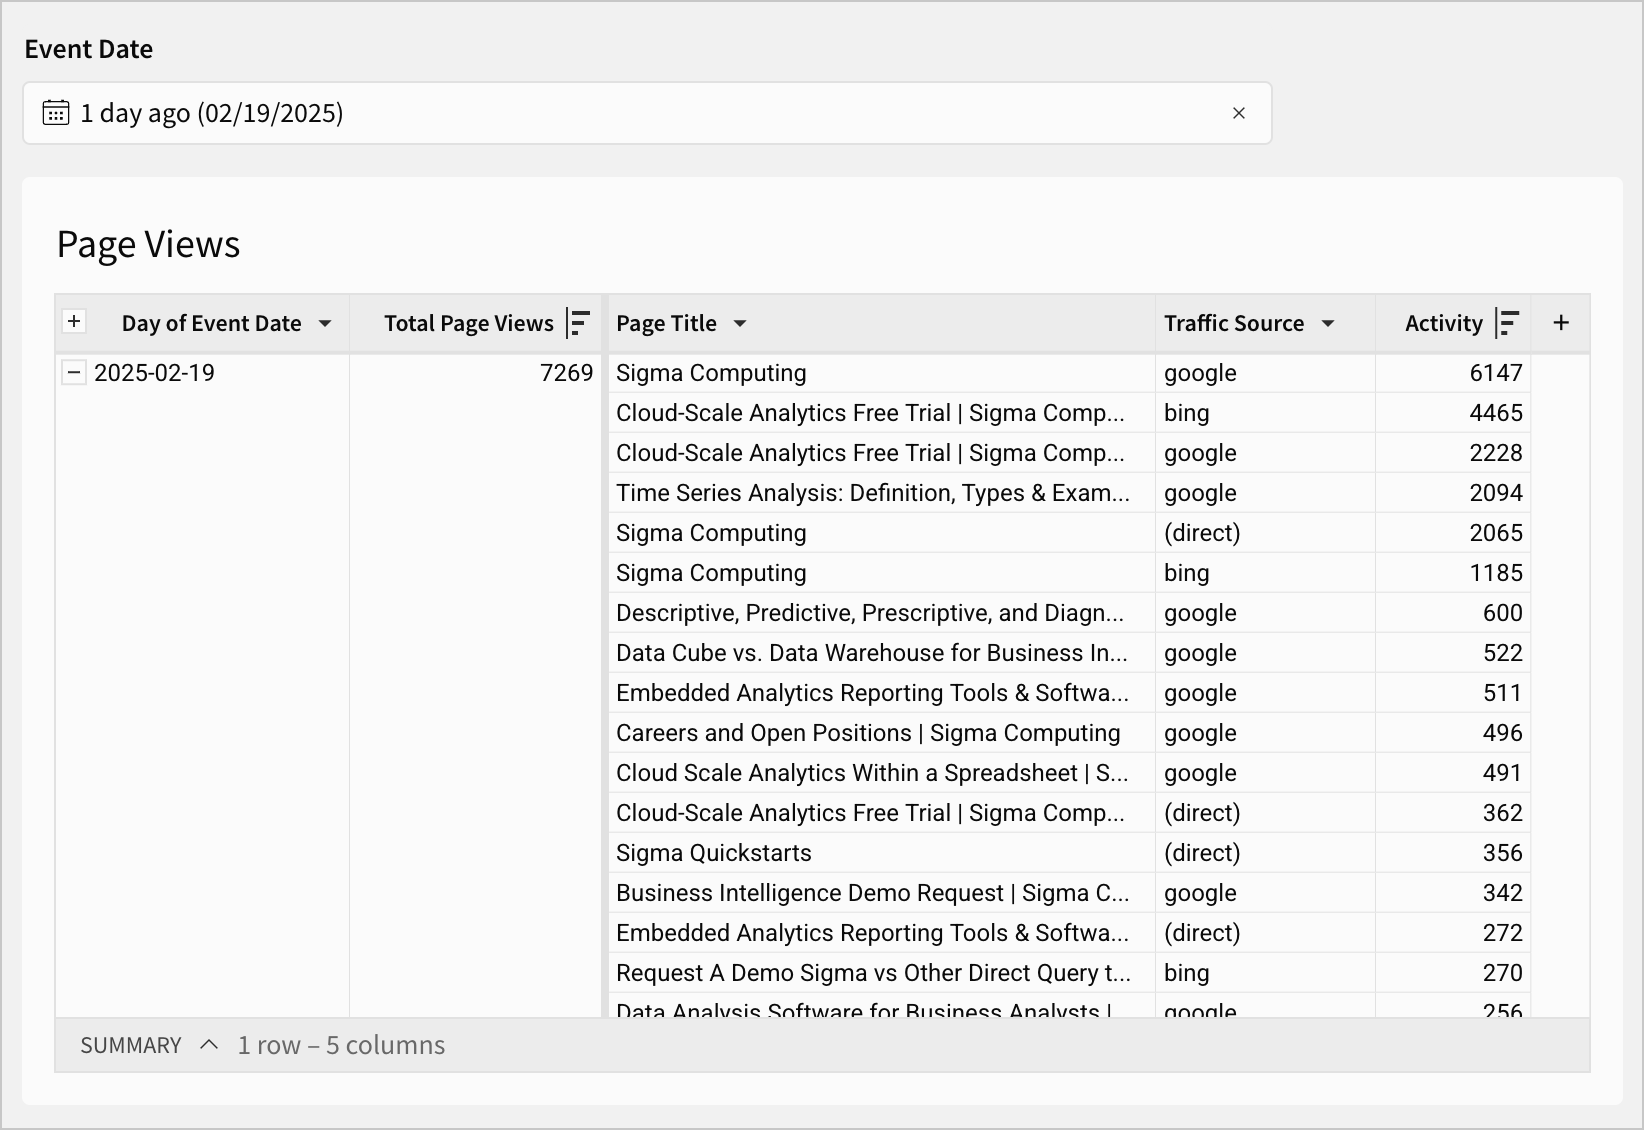
Use a date control element to filter the table to now minus 1 day, to see data for the previous day:
-
On the table, configure an alert when page views exceed a specific threshold:
-
Click
More to open the element menu, then select Alert when. -
Set up the email or Slack recipient and message as desired.
-
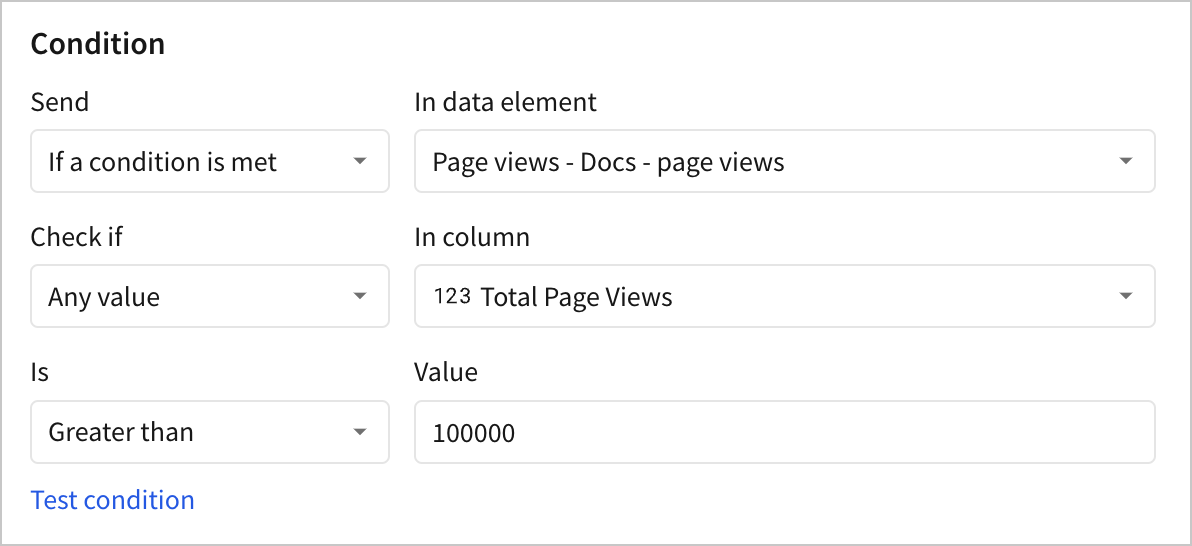
In the Condition section, set Check if to Any value.
-
For In column, select the Total Page Views column.
-
For Is, choose the operator to evaluate the threshold. In this case, Greater Than.
-
For Value, set the threshold. In this case, set a threshold of 25000.
-
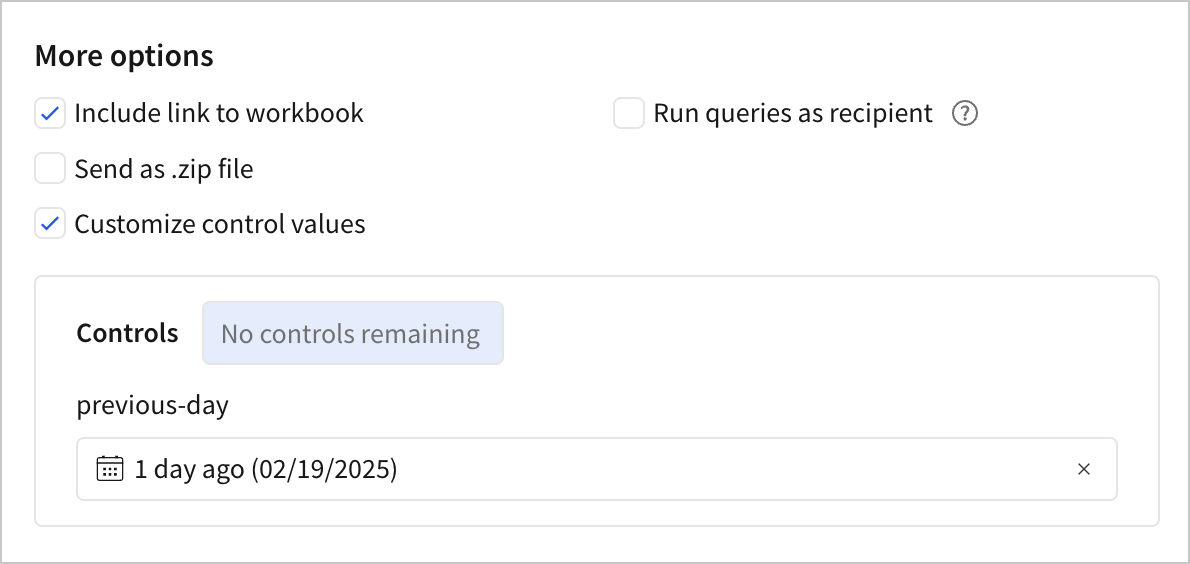
In the More options section, select the checkbox for Customize control values.
-
For Controls, select the date control and validate that the selection is correct.
-
-
Click Create to save the alert.
Example: Configure a formula-based threshold alert
For example, if you want to monitor anomalous page visits to your website, you might write a formula to identify anomalous traffic, then configure an alert that sends a Slack message when the formula output indicates anomalous traffic.
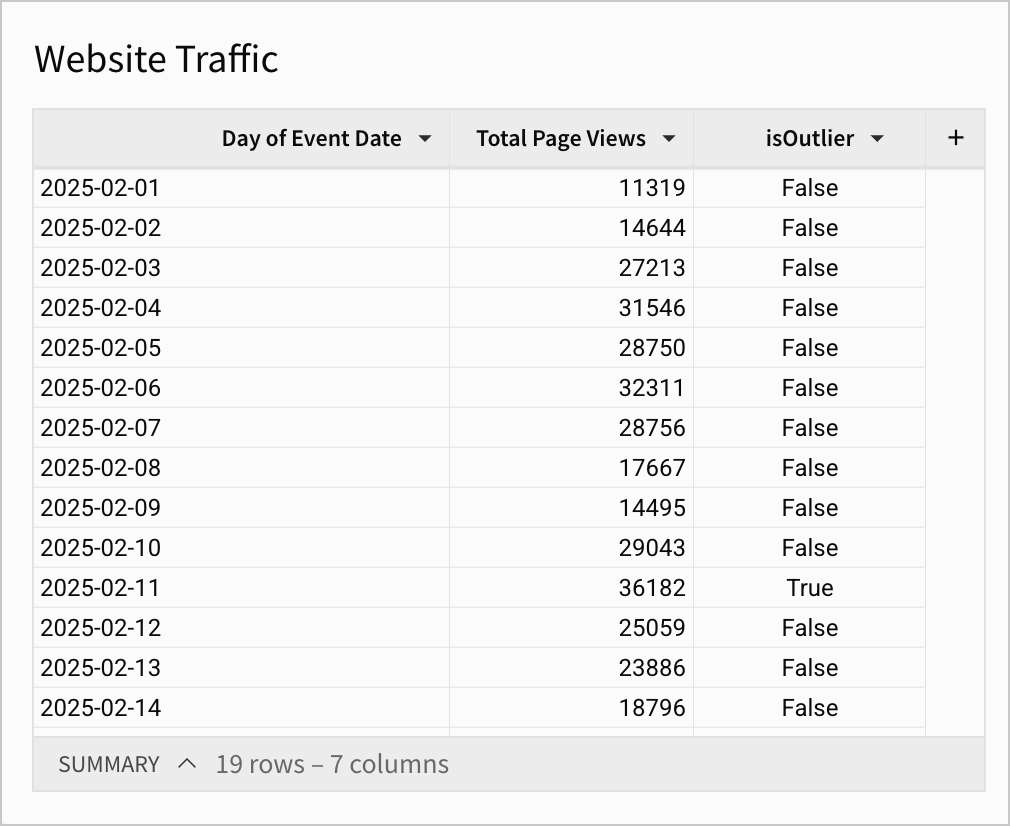
Following the guidance in How to Detect Outliers in Sigma in the Sigma Community, set up a data table and alert as follows. You can recreate this example with the Sigma Sample Database Google Analytics Events data.
-
For a website analytics data source, use a table grouping to calculate total page views per day.
-
Add a summary column to calculate the standard deviation of the Total Page Views column:
Stddev([Total Page Views]). Rename the summary column Standard Deviation. -
Add a summary column to calculate the average value of the Total Page Views column:
Avg([Total Page Views]). Rename the summary column Average.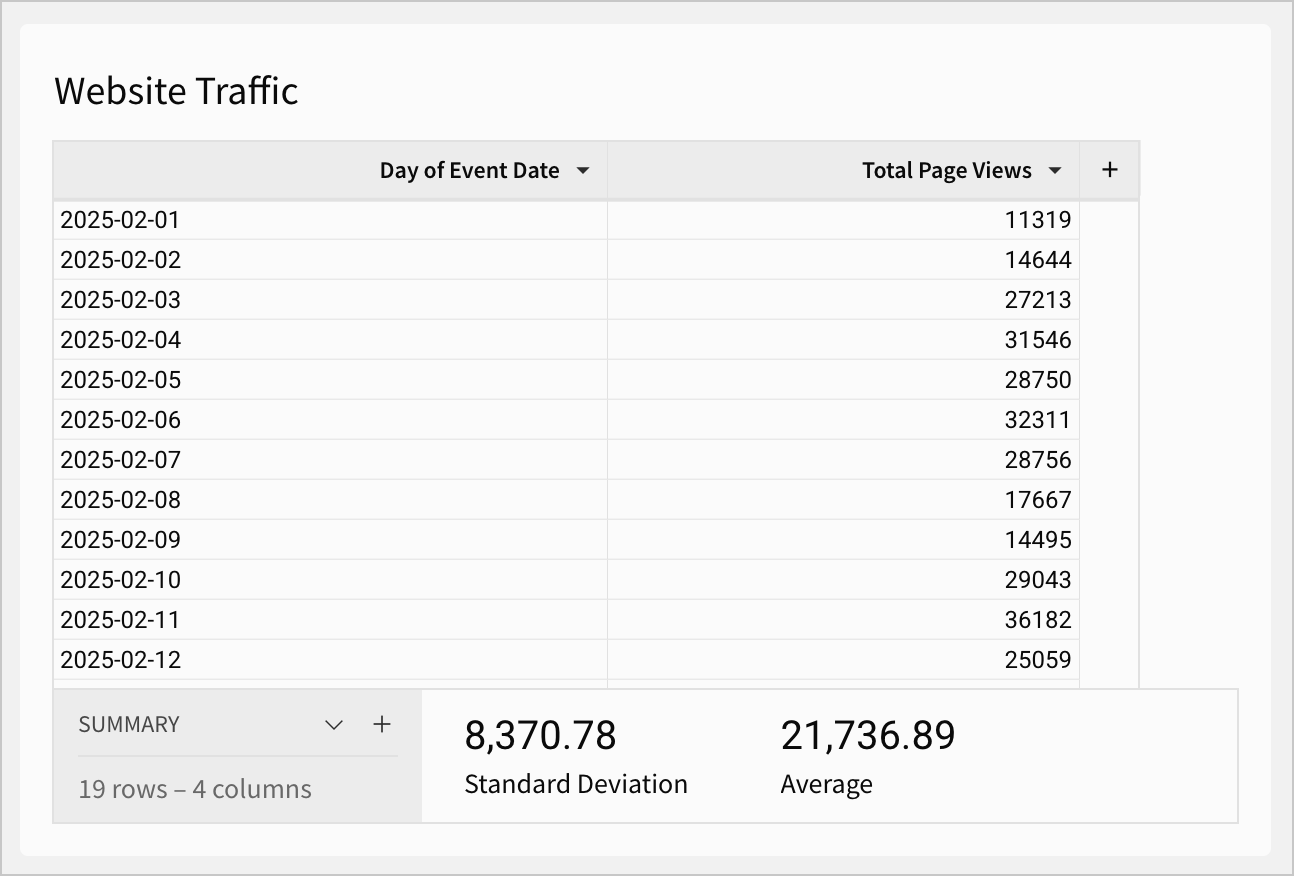
-
Based on your data, determine what an upper and lower bound would be considered for your data. Add two new summary columns:
- One summary column named Upper Bound:
[Average] + (1.5 * [Standard Deviation]) - One summary column named Lower Bound:
[Average] - (1.5 * [Standard Deviation])
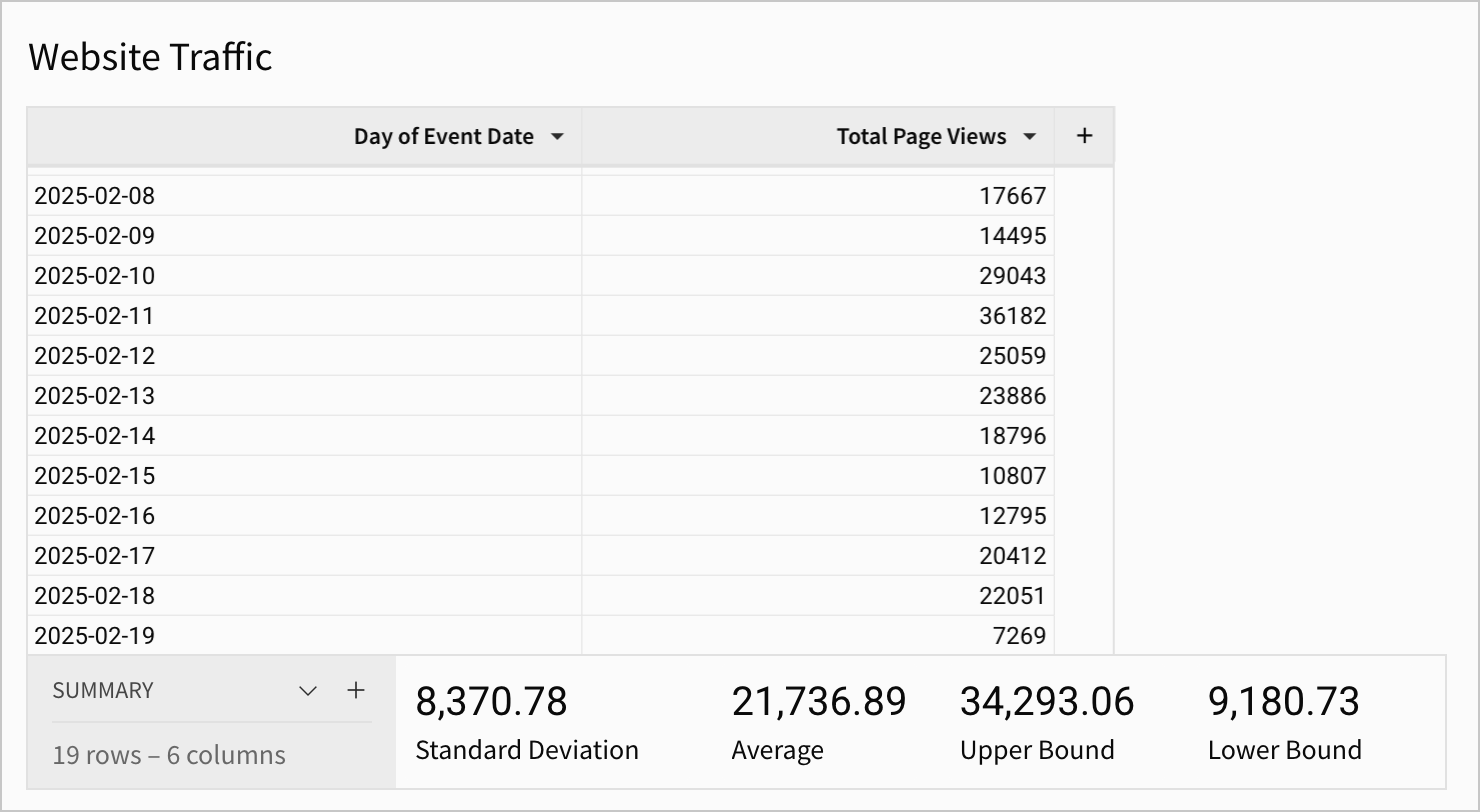
- One summary column named Upper Bound:
-
Add a new calculated column isOutlier to the table grouping to evaluate whether each Total Page Views value falls within the acceptable bounds, or is an outlier:
If(Between([Total Page Views], [Lower Bound], [Upper Bound]), False, True)Each column with a value True for the isOutlier column is considered an outlier according to the formula that you defined.
-
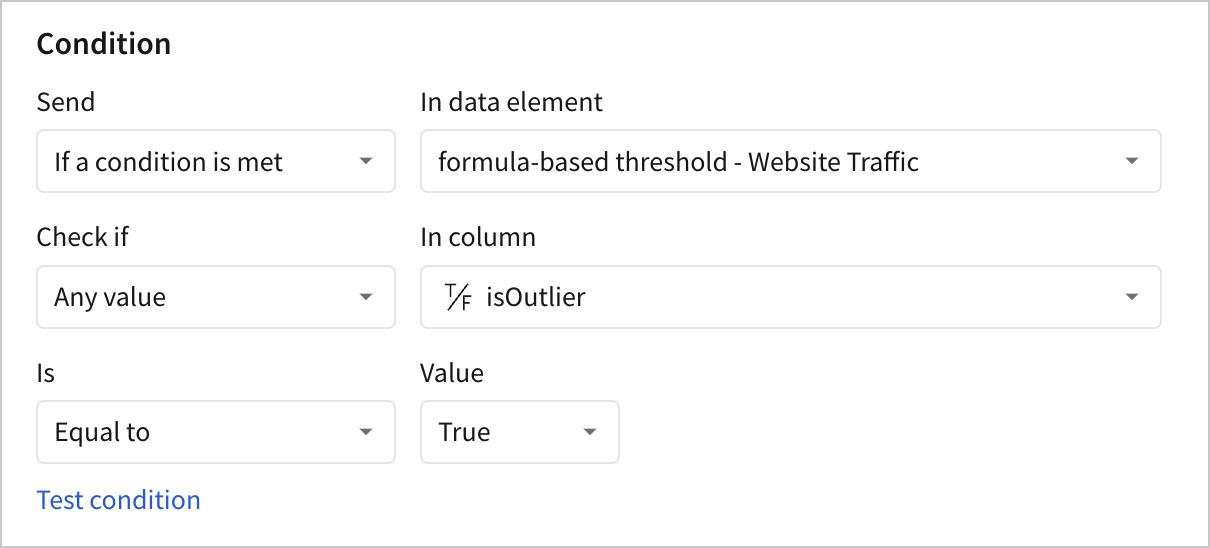
On the table, configure an alert when page views are anomalous and the isOutlier column is true:
-
Click
More to open the element menu, then select Alert when. -
Set up the email or Slack recipient and message as desired.
-
In the Condition section, set Check if to Any value.
-
For In column, select the isOutlier column.
-
For Is, leave the default operator of Equal to.
-
For Value, choose True to send an alert when the isOutlier column is True.
-
-
Click Create to save the alert.