
Work with hierarchies (Beta)
This documentation describes one or more public beta features that are in development. Beta features are subject to quick, iterative changes; therefore the current user experience in the Sigma service can differ from the information provided in this page.
This page should not be considered official published documentation until Sigma removes this notice and the beta flag on the corresponding feature(s) in the Sigma service. For the full beta feature disclaimer, see Beta features.
This feature isn't supported by all data platform connections. To check if your connection supports it, see Supported data platforms and feature compatibility.
Use hierarchies to group columns categorically and define the order of data granularity. For example, some common example hierarchies include:
- Product: type, family, name
- Location: continent, country, region, state, city
- Time: year, quarter, month, week, day
- Organization: department, team, role
You might create a hierarchy to simplify development of a profit and loss statement, bill of materials analysis and reporting, inventory analysis, and more.
Creating a hierarchy in Sigma lets you work with a hierarchy like you might a column — instead of a folder which only creates an association of the columns together, a hierarchy lets you do the following:
- Define the order of the hierarchical data.
- Easily visualize all parts of the hierarchy together in a pivot table or grouped table.
- Format all levels of the hierarchy consistently, such as when applying conditional formatting.
- Filter different levels of the hierarchy using a filter on the data element or with a control element. See Filter your table by hierarchy.
- If your hierarchical data is ragged, Sigma visualizes the ragged hierarchy, letting you view your hierarchy in a dense layout instead of empty rows like a non-ragged hierarchical view. See View a ragged hierarchy.
Migrate existing hierarchies to hierarchy columns
Creating hierarchies in the Manage hierarchies popover is deprecated. Starting September 15, 2026, you will no longer be able to create new hierarchies in the Manage hierarchies popover, or edit existing hierarchies created from the popover. Migrate to hierarchy columns created with the
RaggedHierarchyfunction, as specified in this document (see Create a hierarchy).
If you have an existing hierarchy defined in Manage hierarchies, you can do the following:
- Recreate the hierarchy as a hierarchy column. Follow the steps to create a hierarchy with the same columns that represent your current hierarchy.
- Stop using the hierarchy after support ends.
Limitations
The following limitations apply to hierarchy columns:
- Hierarchies are only fully supported in pivot tables and grouped tables. Charts have limited support, with the first level of a hierarchy being available to reference.
- Hierarchies are not supported in datasets.
- Hierarchy columns cannot be used in input tables.
Create a hierarchy
You can create a hierarchy by selecting columns in your data element, or by using a function. After you create a hierarchy in a data element, any child elements inherit the hierarchy.
From the column list
- Select the element for which you want to add the hierarchy.
- In the list of columns, select the columns that you want to add to the hierarchy, then select the down arrow (
 ) and choose Create hierarchy....
 - A new hierarchy column is added to your data element, titled New Hierarchy by default.
When you create a hierarchy from the column list, it is formatted as a ragged hierarchy by default.
Rename the hierarchy column to whatever you want and add it to a pivot table or grouped table to visualize the hierarchy levels.
With a function
When you create a hierarchy from the column list, Sigma creates a new column that uses the RaggedHierarchy() function. You can also create a calculated column that uses RaggedHierarchy() function directly.
Creating a hierarchy with a function
- Add a calculated column.
- In the formula bar, add the
RaggedHierarchyfunction, then add each column in the hierarchy in order from highest-level to lowest-level. For example:
RaggedHierarchy([Product Type], [Product Family], [Product Line])
For more information, see the function documentation for RaggedHierarchy.
Add a hierarchy to a pivot table or grouped table
To visualize a hierarchy in Sigma, add the hierarchy column to pivot table rows, pivot table columns, or a table grouping level by dragging and dropping the column from the column list.
For example, to add a hierarchy to a pivot table:
- Open the workbook for editing or customize the view.
- Select the pivot table element.
- In the editor panel, for pivot rows, select + (Add column).
- Select the hierarchy column. For example, Product Hierarchy.
View a ragged hierarchy
If your data is ragged, and therefore does not have a value for every level of the hierarchy, Sigma filters out the null values to display them in a compact, ragged view.
For example, given a Location hierarchy defined of Region, State, and City columns with values like the following:
| Region | State | City |
|---|---|---|
| East | New York | New York |
| East | null | Washington, DC |
| West | California | San Francisco |
When viewed in a pivot table or grouped table as the Location Hierarchy, the values appear as if only the non-null values are present:
| Location Hierarchy |
|---|
| East / New York / New York |
| East / Washington, DC |
| West / California / San Francisco |
Modify a hierarchy
After you create a hierarchy column, you can edit the column order of your hierarchy.
Change hierarchy columns
After you create a hierarchy column, you can change the order of columns in the hierarchy or which columns are included in the hierarchy:
- While editing or customizing the workbook, locate the element with the hierarchy defined.
- Select the element and select the hierarchy column.
- In the formula bar, modify the
RaggedHierarchy()function definition to include different columns or change the order.
Filter your table by hierarchy
If you want to filter your pivot table or grouped table by specific values in your hierarchy, add a filter that targets the hierarchy column. You can choose values from any level of the hierarchy to include or exclude. See also Hierarchy in Types of filters.
If your hierarchy contains thousands of distinct values, the filter might not load as expected. Consider filtering your data to fewer rows before using the hierarchy filter.
You can also convert your filter to a control, See Hierarchy (Beta) in Intro to control elements.
Use hierarchies with actions
Hierarchies can be used with actions to create logic and interactivity. For example, you can:
-
Set and clear the value of a hierarchy control with actions. For more information, see Create actions that manage control values.
-
Add the contents of a hierarchy to an input table by using the insert row action. See Example: Add hierarchy data to an input table for configuration steps.
For more information on other available actions, see Intro to actions.
Example: Add hierarchy data to an input table
Actions can be used to add the contents of a hierarchy to an input table, allowing you to select and store hierarchy data, such as when configuring an AI app.
For example, you have a table with a Product Hierarchy column containing different product information (like Product Type, Product Family, and Product Line), and want to add the product information to an empty input table when a user clicks on the hierarchy.
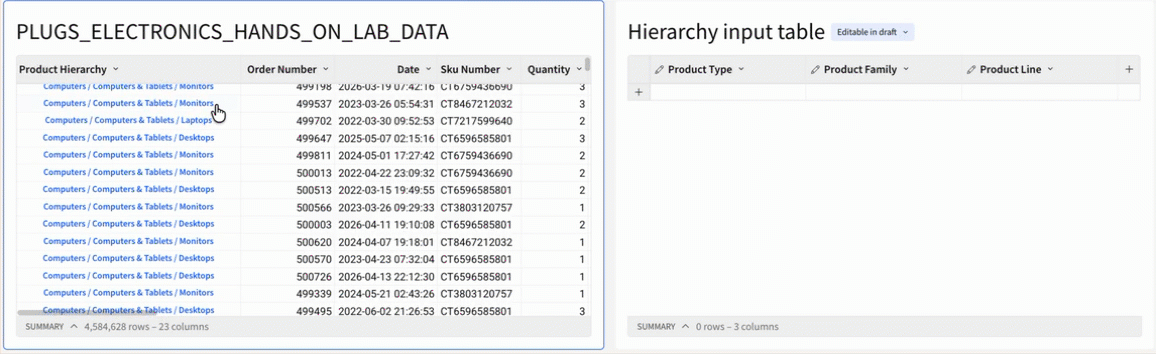
To configure an action sequence that inserts a row with values from a hierarchy column:
-
Create an empty input table named "Hierarchy input table".
-
In the input table, create a new column for each level of Product Hierarchy ,and name the column to match the hierarchy level. For example, Product Type, Product Family, and Product Line.
-
Select the existing hierarchy column. In the editor panel, select the Actions tab. The default action sequence automatically selects On select as the trigger event and Product Hierarchy as the trigger column.
-
Configure the action:
-
Select
 Add action.
 -
For Action, select Insert row.
-
For Into, select the Hierarchy input table.
-
For Set column values, select Formula for each column.
-
For each column, enter the following in the formula bar:
- For Product Type, enter
Text([Selection/Product Hierarchy][0]) - For Product Family, enter
Text([Selection/Product Hierarchy][1]) - For Product Line, enter
Text([Selection/Product Hierarchy][2])
These formulas index the value of each hierarchy level from the selected Product Hierarchy row. For example,
Text([Selection/Product Hierarchy][0])returns the first value of the selected Product Hierarchy row, which is the Product Type value. - For Product Type, enter
-
-
Test the action by selecting a row in the Product Hierarchy column. A new row should be added to the input table with the corresponding hierarchy values.
For more information on actions and input tables, see Create actions that modify input table data.
Updated 11 days ago