
About materialization
Materialization of datasets and data elements in data models is generally available.
Materialization of data elements in workbooks is in public beta.
This documentation describes one or more public beta features that are in development. Beta features are subject to quick, iterative changes; therefore the current user experience in the Sigma service can differ from the information provided in this page.
This page should not be considered official published documentation until Sigma removes this notice and the beta flag on the corresponding feature(s) in the Sigma service. For the full beta feature disclaimer, see Beta features.
Materializations improve the speed and performance of your reports. You can set up materialization for data models, workbooks, and datasets.
About materialization
If you have data sources that use expensive or long-running queries, such as a complex join between data elements, or a dataset with high cardinality and multiple grouping levels and calculated columns, setting up materialization enhances query performance and can help reduce compute costs.
Materialization writes a copy of a dataset or data element back to your warehouse as a table, or in some cases, a Snowflake dynamic table. Materialized data is stored in your cloud data warehouse in a schema managed by the Sigma service, in the same database or catalog and schema used for all write-back data. Materialized tables are prepended by t_mat or T_ID or appended with _MAT, and do not appear in the connection explorer in Sigma.
When materialization is used
When you view or interact with an element that uses materialization, the Sigma query compiler automatically and transparently uses the latest materialization. Your cloud data warehouse does not recompute the query.
If a workbook page control targets a materialized element, changing control values queries live data. Instead, target the control to child elements of the workbook or data model. See Best practices for materialization.
If you edit a materialized dataset or materialized element in a workbook or data model, the materialized data is not used and the underlying data is queried to ensure accurate results.
Materialization ownership
When a user adds an element to a materialization schedule, they become the owner of the materialization for that element, and the materialization job for that element runs using that user's credentials for the connection. To use a service account to perform materialization instead, follow the steps to run the workbook with service account credentials.
If another user modifies the configuration of an element in a materialization schedule by changing the Grouping level, pausing, or unpausing the materialization, they become the new owner of the materialization for that element. Updating the frequency of a schedule does not change the ownership of the materializations in that schedule.
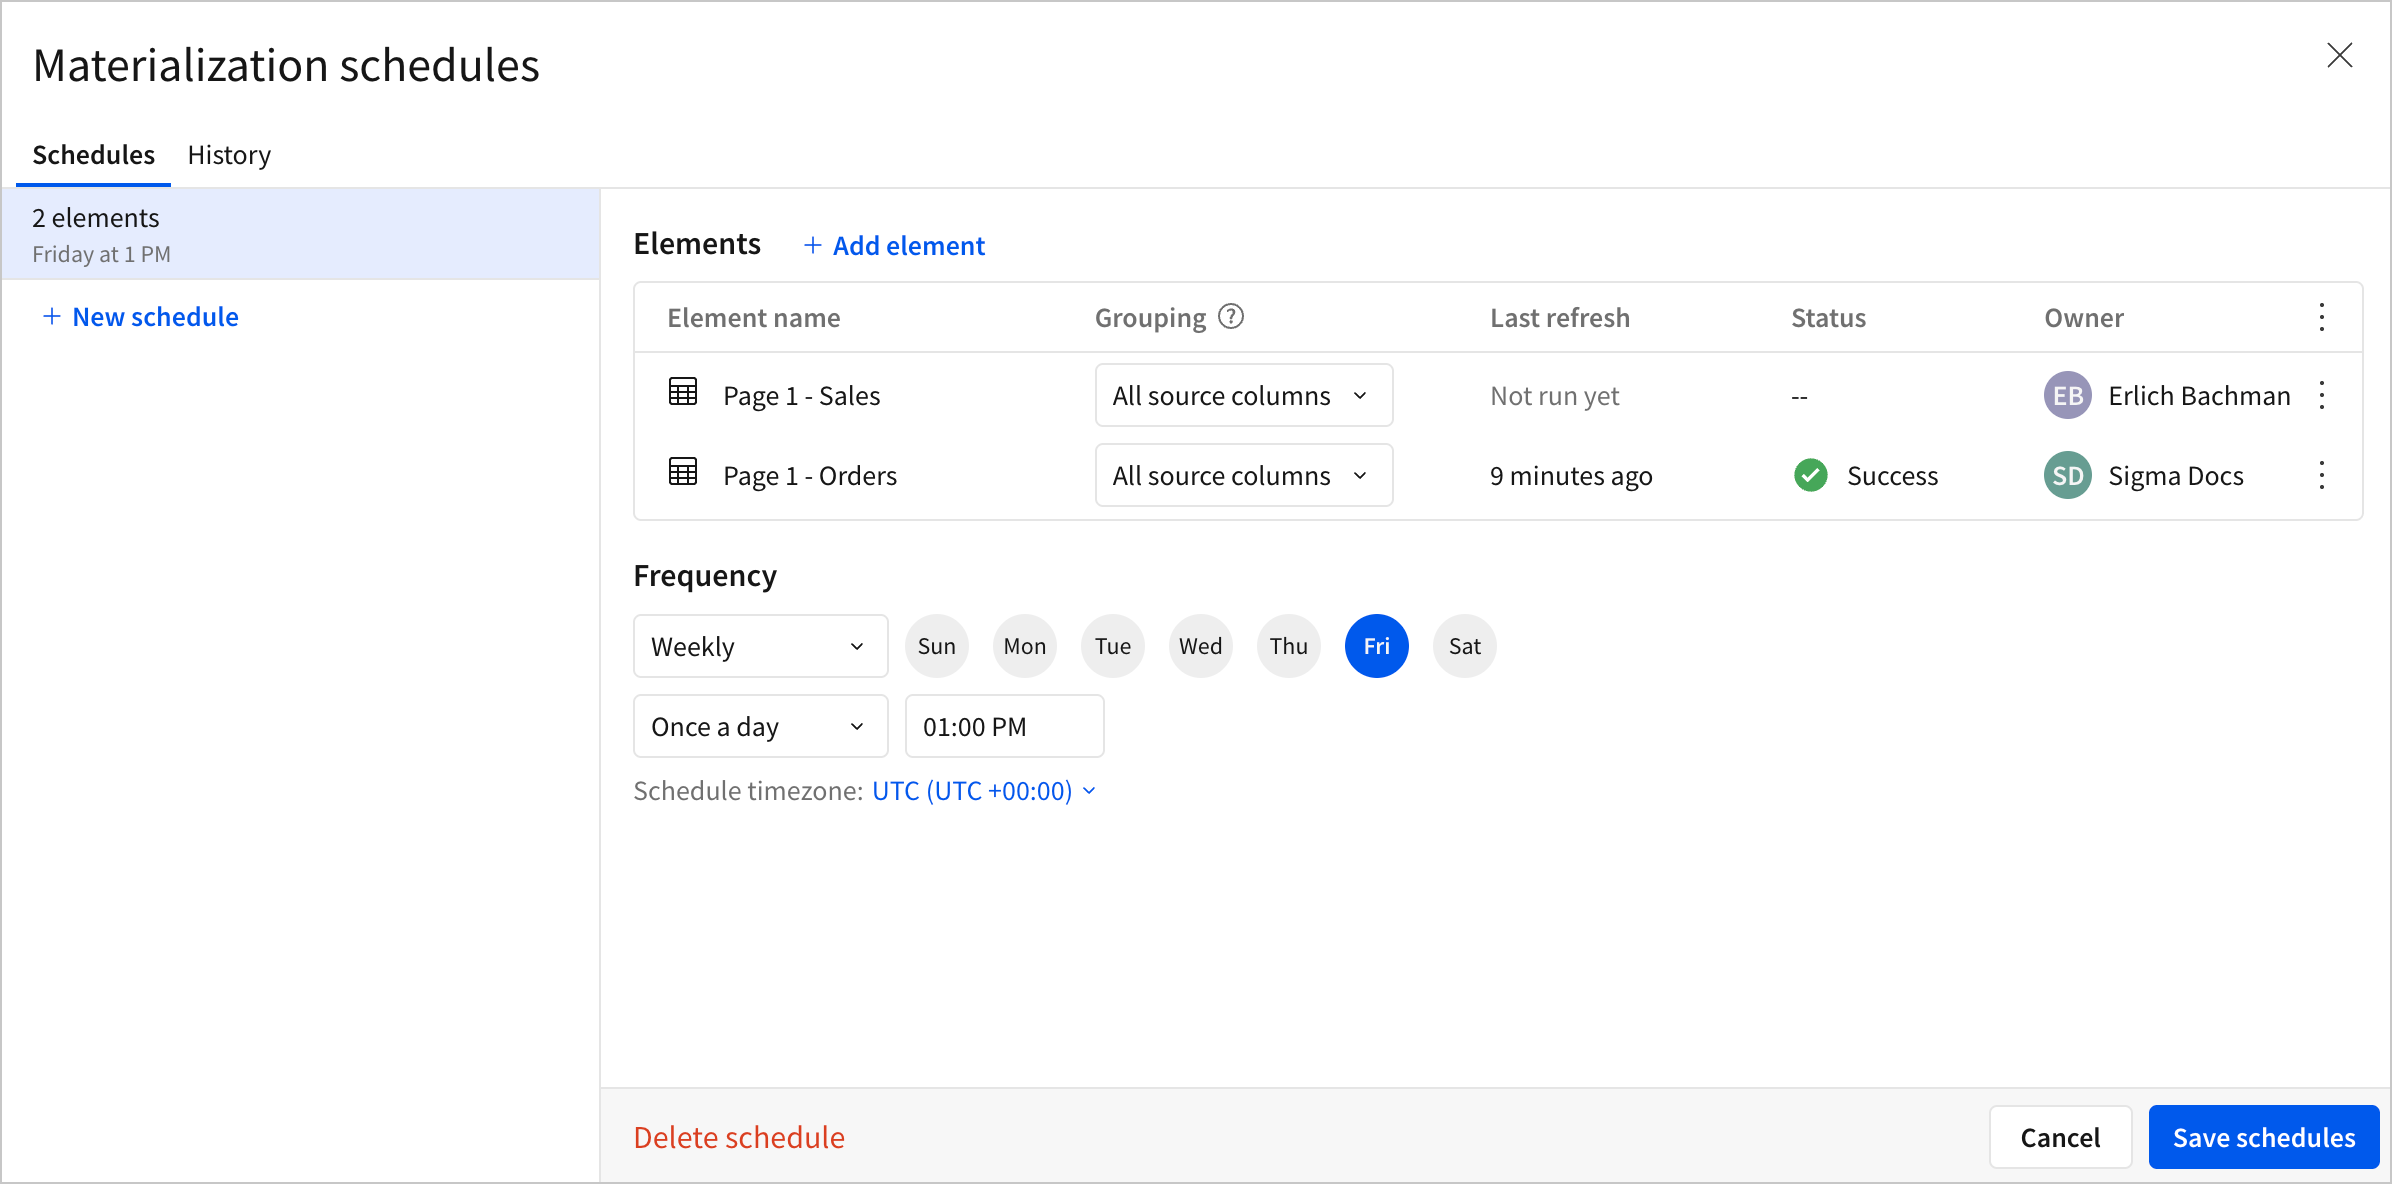
To review ownership for a materialization schedule, open the Materialization schedules modal and review the Owner column. Each row in the modal shows the schedule owner for the corresponding element.
Data model and workbook materialization compared to dataset materialization
Materialized data elements in workbooks and data models have some differences from materialized datasets:
- When you publish a workbook or data model with materialized elements, materializations only run if the published changes affect the materialization. When you publish a dataset, the materialization runs, even if your changes do not affect the materialization.
- If your data element in a workbook or data model contains multiple grouping levels, you can materialize each grouping level. If your dataset contains multiple grouping levels, you can only materialize one grouping level.
- Unused materializations for data elements in workbooks and data models can be automatically paused. Unused dataset materializations cannot be automatically paused. See Manage materializations for more detail on automatically paused materializations.
- If you use materialization with a Snowflake connection, materialized data elements in workbooks and data models use transient tables. For more details about transient tables, see Working with Temporary and Transient Tables in the Snowflake documentation.
Incremental materialization with dynamic tables
By default, materializations create a new table every time. If you use materialization with a Snowflake connection, your connection uses dynamic tables for materialization by default instead. In many cases, dynamic tables allow incremental updates, meaning that when a materialization runs, only changed data is updated.
To use dynamic tables for materialization:
- Configure your connection to use dynamic tables for materialization. See Configure write access in Connect to Snowflake.
- Enable change tracking on any database tables that might be queried to build the dynamic tables used for materialization. See Enable change tracking in the Snowflake documentation about creating dynamic tables.
After you complete these steps, materialization uses a dynamic table and uses incremental refresh if available. If incremental refresh is not available, a full refresh is performed. If a dynamic table is not available or supported, a table is used. You can review the materialization history for an element to determine which method was used. See Review the status of a materialized data element.
Existing materialization schedules attempt to use a dynamic table as part of the next scheduled run. Only data elements in workbooks and data models can use incremental materialization with dynamic tables. Materialized datasets do not use dynamic tables.
For more details about when incremental refresh might not be used, or when a dynamic table might not be used, see Known limitations for dynamic tables in the Snowflake documentation.
Scheduled materialization bypass
When using materialization with a Snowflake connection, Sigma detects data updates in materialized elements in workbooks and data models. If the underlying data hasn’t been updated since the last successful materialization, Sigma skips the scheduled materialization to reduce unnecessary compute time and costs.
When a materialization is skipped due to no changes in the underlying data, Sigma indicates a ![]() Skipped status anywhere materialization statuses are displayed, including the View materialization info popover on the element menu, the Materialization schedules modal, the workbook or data model lineage, and the Admin > Materializations page.
Skipped status anywhere materialization statuses are displayed, including the View materialization info popover on the element menu, the Materialization schedules modal, the workbook or data model lineage, and the Admin > Materializations page.
Best practices for materialization
- Consider the data refresh time when scheduling a materialization. If data in your data warehouse is updated on a schedule, make sure the materialization schedule in Sigma starts after that data refresh completes.
- Schedule materializations to run when the data is not expected to be used, completing before users access the data. If desired, create a dedicated compute resource to use for materialization. For example, create a small compute resource that runs materializations slowly but uses fewer resources.
- If you materialize upstream elements, make sure the materialization schedule of any downstream materialized elements start after the materialization of upstream elements completes.
- Consider the limitations of materialization when setting up a data model or dataset to make sure that changes to the data structure do not cause a future materialization to fail.
- Target controls to the child elements of materialized data sources and elements to ensure reliable interactions and output.
- Consider timeout limits for long-running queries. Materialization queries do not use the Sigma query timeout configured on the connection and instead use the settings defined on the compute resource used by the data platform, such as the query timeout setting for a virtual warehouse in Snowflake.
Materialization limitations
-
Some data structures cannot be materialized. If your data contains one or more columns that use a system function, such as a dataset with row-level security, materialization fails to run.
-
Tagged versions of workbooks cannot be materialized. Only the published version of a workbook or the published version or tagged versions of data models can be materialized. See Schedule materialization for a version-tagged data model.
-
Because materializations reflect the fixed output of the data at the time the materialization was run, some data structures can produce unexpected results:
- If your data element in a workbook or data model is targeted by one or more controls, the materialization runs using the initial value of the control. After materialization, using the control to interact with the materialized data element does not use the materialized data and instead runs a query to retrieve the latest data. Instead, target the control to child elements.
- If your data element in a workbook or data model is filtered with a dynamic date control, such as a relative date range like "Last 7 days", incremental materialization with a dynamic table cannot be performed and full materialization is performed instead.
- If your dataset uses parameters, the materialization runs using the initial value of the parameter. Future changes to the parameter have no effect.
-
You can materialize data elements in workbooks or data models that reference other data elements, such as with a lookup, join, or relationship, unless one of the source data elements cannot be materialized.
-
If you add, edit, or delete a metric on a data model that is materialized, or that has materialized child elements, the materialized data is not used until a new materialization job runs. See About metrics.
-
You can materialize datasets that reference other datasets, such as with a lookup, link, or join, unless one of the source datasets cannot be materialized.
-
When connected to a data platform using OAuth authentication, you can materialize data elements in workbooks and data models, but you cannot materialize datasets.
-
You cannot materialize a custom SQL element that uses
sigma_element()syntax to reference another Sigma element.
Set up materialization
To set up materialization for elements in a data model or workbook, or a dataset: