
Troubleshoot your connection
If you need to troubleshoot issues with your connection, such as missing tables or an inability to connect, follow the guidance on this page.
Add Sigma IPs to the allowlist
In some cases, you might need to add Sigma's IP addresses to the allowlist to successfully connect to your data. This is a necessary step when your warehouse is closed to external connections due to firewalls, security groups, or other IP-based security policies.
Sigma lists its egress IP addresses on all individual Connection page. To see them, follow these steps:
- Open the Administration > Connections page.
- Select the relevant connection. If you don't have a connection to the data source, click Create Connection.
- In the Connection Credentials section, see the IPs listed under the Host field.
The IP addresses listed on the connections summary are not applicable to connections over Private Link. If you need the IP addresses for a Private Link connection, contact Sigma Support.
For more guidance specific to individual data platforms:
- PostgreSQL: Sigma must be authenticated either at the Network level, or through Client Authentication.
- Redshift: See Amazon Redshift cluster security groups.
- Snowflake: See Network Policies.
Permissions for the Snowflake user role
Sigma uses the Snowflake user role specified on the connection. Unless you have the correct privileges granted to the role in Snowflake, you cannot see the data in Sigma.
If the connection uses OAuth, the connection inherits the permissions for each member of the organization directly from Snowflake. To troubleshoot permissions for an individual user or a service account user, confirm the following:
- The primary role granted to the user provides the relevant access in Snowflake.
- The user inherits the intended role through your OAuth provider.
Syncing your data and connection indexing
Connection indexing is the process where Sigma scans your data warehouse to discover and catalog all available objects (databases, schemas, tables, views, stored procedures, etc.). This creates Sigma's internal catalog that powers the UI browsing experience and ensures users can find and access their objects.
Sigma automatically syncs your connection's metadata on a nightly basis to index various information from your data warehouse. These long-running overnight queries include:
- Catalog scans that enumerate tables, views, and schemas in your warehouse.
- Metadata queries to discover column names, data types, and table structures.
- Permission checks to determine what objects users can access.
Why they happen regularly:
- Data freshness - new tables, columns, or schema changes need to be discovered.
- Permission changes - user access to objects may have changed.
- Reliability - ensures Sigma's catalog stays in sync with your actual warehouse state.
- User experience - keeps the data browser up-to-date and responsive.
Sigma also automatically syncs your connections when a user accesses a schema that hasn't been checked recently, or when it detects that a catalog may be outdated and has stale data.
Manually sync your data
When you make changes in your cloud data warehouse, such as updating the schema for a table or view, you must perform a manual sync so these changes are reflected in Sigma. Syncs can be performed at the connection, database, schema, or table level.
Syncing only occurs at the level selected. To see changes at all levels, you must perform a manual sync at all levels.
You can perform a manual sync using the UI, or programmatically. For guidance on performing a manual sync using the Sigma REST API, see Sync a connection by path.
To perform the manual sync in the UI, follow these steps:
-
Navigate to Administration > Connections.
-
Select the relevant connection from the list.
-
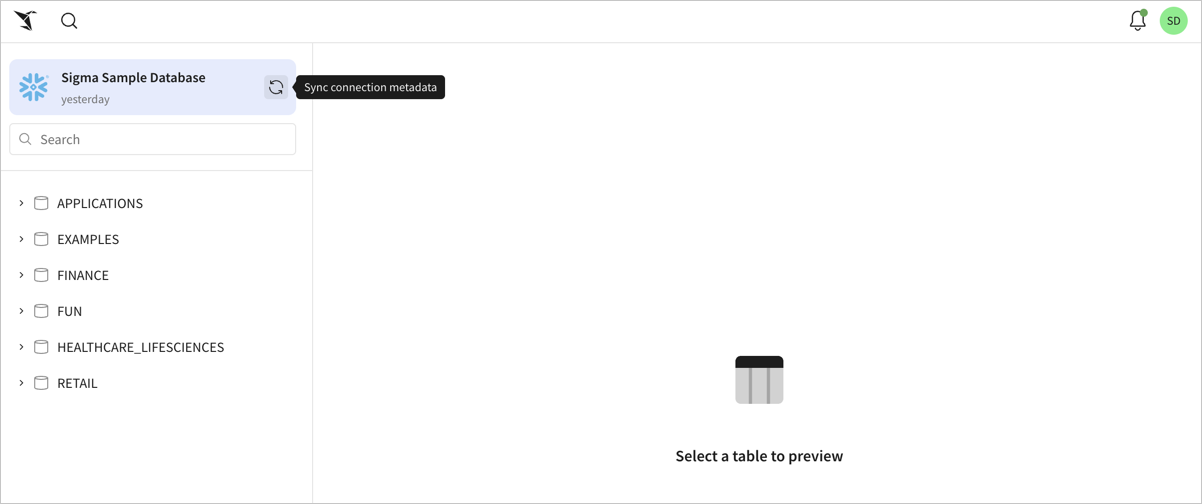
Click Browse connection.
-
To sync the connection, which discovers updates to the databases available on that connection, click Sync connection metadata (
 ) for the connection.
-
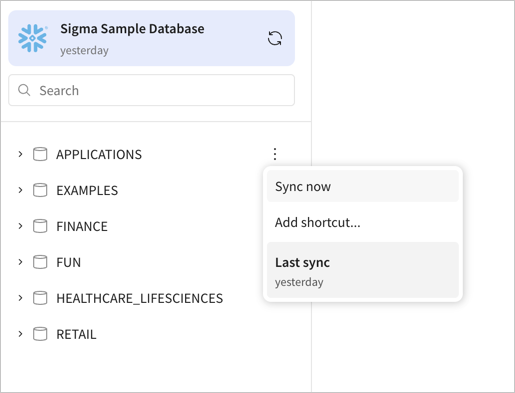
To sync an individual database or schema, locate the relevant database, and click
 More next to the name of the database or schema. Alternatively, find the database or schema by searching for the name.
From the drop-down menu, select Sync now.
-
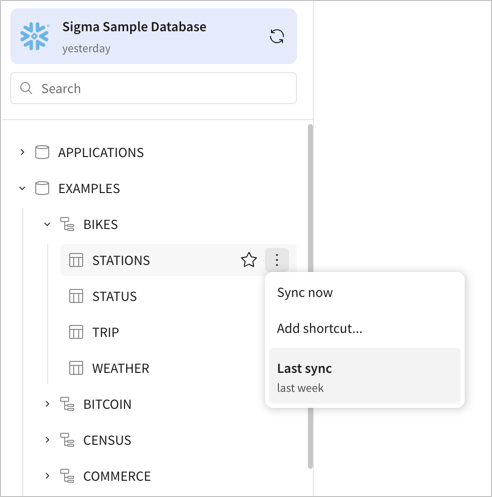
To sync an individual table, expand the connection, find the database that contains the table, expand that database, find the table, and then click
More next to the name of the table. Alternatively, you can find the table by name by searching for it.From the drop-down menu, select Sync now.
Sigma recommends that you manually sync your connections when:
- You added objects to your database or catalog that do not yet appear in Sigma, such as new tables or views.
- There are schema changes, like column additions, type changes, or renamed objects.
- User permissions and access have changed and the catalog needs refreshing.
- Expected objects like tables aren't showing up when browsing your connection in Sigma.
- Object counts or schemas are outdated.
Updated 7 months ago