
Configure column-level security
Configure column-level security to restrict access to or mask column-level data in a data model or dataset. With CLS, your organization can manage access to data, ensuring that sensitive and confidential information is secure and accessible only to authorized users.
Depending on how you model your data, you can enforce column-level security in different ways:
- For data models, enforce CLS with user attributes or teams and users.
- For datasets (deprecated), enforce CLS with user attributes.
User requirements
- To configure user attributes and create teams, you must be assigned the Admin account type.
- To configure column-level security in a data model, you must be granted Can edit access to the data model.
- To reference existing user attributes in a dataset, you must be granted Can edit access to the dataset.
Understanding column-level security
In Sigma, column-level security is managed through team assignments, user attributes, and document configurations. You can use column-level security to grant access to individual columns within a table for different embed clients.
Some additional benefits of column-level security include the following:
- Data privacy: Secure columns that contain sensitive information, including personal identifiers such as Social Security Numbers, financial data, or medical records.
- Data sharing and collaboration: Enable controlled data sharing and collaboration. Organizations can share select columns with external parties or partners without exposing the entire dataset.
- Data confidentiality in multi-tenant environments: In multi-tenant systems or cloud-based environments where multiple clients or organizations share the same infrastructure, column-level security ensures that each tenant's data remains isolated and protected from other tenants.
- Data masking and anonymization: Combine with data masking and anonymization techniques to protect sensitive data while still allowing certain authorized users to work with pseudo or obfuscated values.
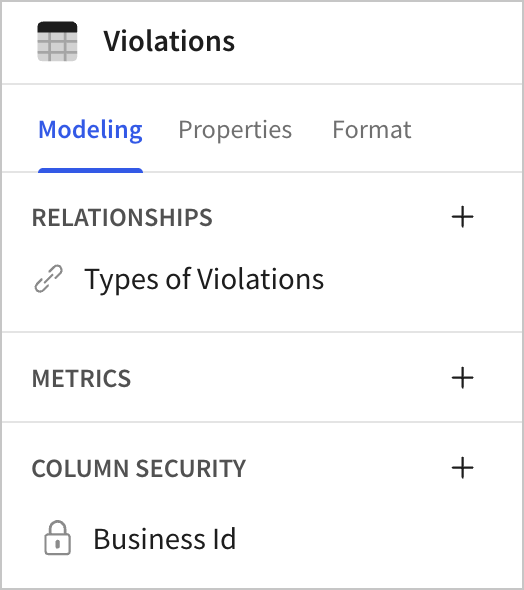
Configure column-level security in a data model
Configure column-level security for a data model by specifying whether access to a column is restricted or not for one or more users or teams using the data model table downstream. You can define CLS based on user or team membership, or using user attributes.
To more easily manage column-level security, Sigma recommends creating a team for each group of users to whom you want to restrict column access.
If a user is not granted access to a protected column, it is not visible or available to select when using the data model as a data source. To make a column available to downstream users but not added (included) by default, hide the column in the data model table.
-
Open a data model for editing.
You can add column-level security rules from the Modeling tab or from the column menu of a table. To add from the column menu, locate the column in the table or Properties tab, then select the down arrow (
 ) and select Column security....
 -
Select the table to which you want to apply column-level security rules.
-
In the editor panel, select the Modeling tab.
-
In the Column security section, select + (Add column level security...) to add a column-level security rule.
A new rule appears, with a popover to Add new column security.
-
For Restricted columns, select one or more columns to restrict access to.
You cannot set column-level security rules for grouped columns. -
For Criteria, choose between the following options:
- No one can view: Restrict access to everyone
- Specific users and teams: Create an allowlist to permit access only to the users and teams that you specify.
- Assigned user attribute value: Specify a user attribute value to permit access only to the users and teams assigned a matching user attribute value.
-
If you select Specific users and teams, search for the users and teams that you want to have access to the column. Only 5 users and teams appear in the dropdown by default. After you select a user or team, they appear in the list.
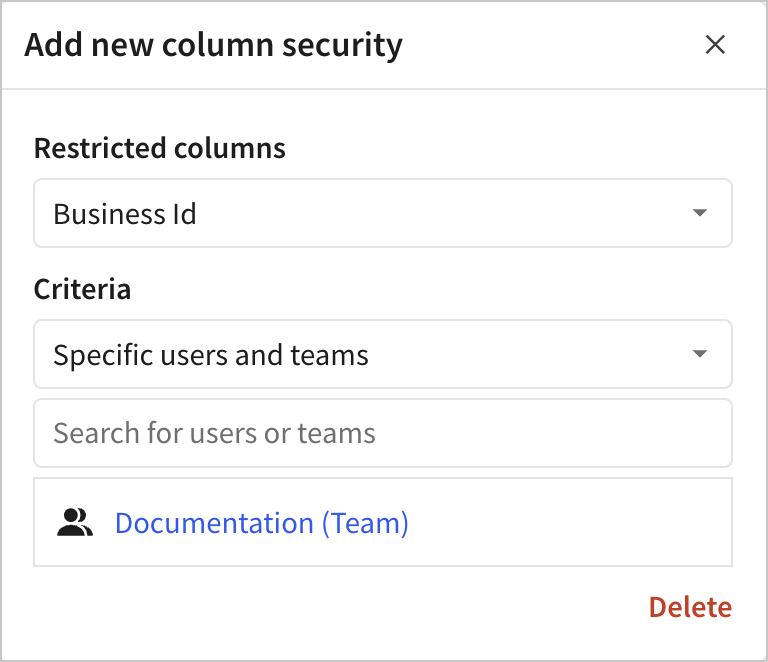
The rule is created. Click the X to close the popover.
-
If you select Assigned user attribute value, select the relevant user attribute to use to restrict access to the column. Enter the Value to match to permit users and teams assigned that value to view the column.
If you want to reuse a user attribute set up for column-level security in datasets, enter a value of
0, and then create a second rule with a value of1, to allow users assigned a value of0or1to view the data in the column.The rule is created. Click the X to close the popover.
-
Click Publish to update the data model and immediately enforce the column security rules.
If multiple access restrictions apply to one user and one column, the restrictions are applied as a union of the rules. For example, if a team is granted access to view a column, and another rule restricts access to the column to anyone (no one can view), the team members can view the column.
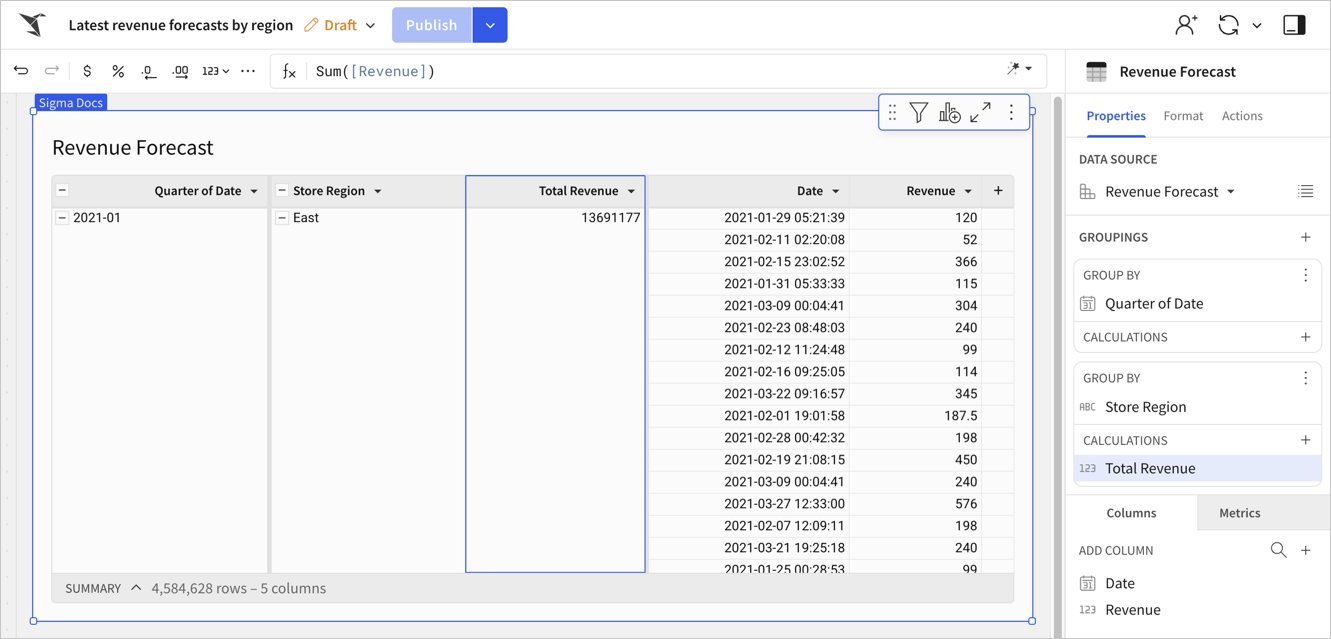
Example CLS configuration with user attributes for a data model
In this example, you want to restrict access to revenue data in the Business Forecast data model to only the users or teams assigned the Confidentiality user attribute. This example sets column security rules from the Modeling tab of the editor panel, but you can also set up column-level security from the ERD.
-
Start by creating a user attribute to use to manage access to the column values. In this example, create a Confidentiality user attribute. Assign the user attribute to the relevant teams or users. For example, a
Financial leadershipteam is assigned a value ofPrivileged. Optionally set a default value of Open. -
Open the Business Forecast data model for editing.
-
On the Modeling tab, in the Column security section, select the + to add a rule for the Revenue column.
-
For Restricted columns, choose Revenue.
-
For Criteria, select Set via user attribute and select the
Confidentialityattribute. -
Set the value to
Privilegedto make sure that only users whose assigned value matches that value can view the data in the column. In this example, members of the financial leadership team can view the data in the column. -
Click Publish to update the data model.
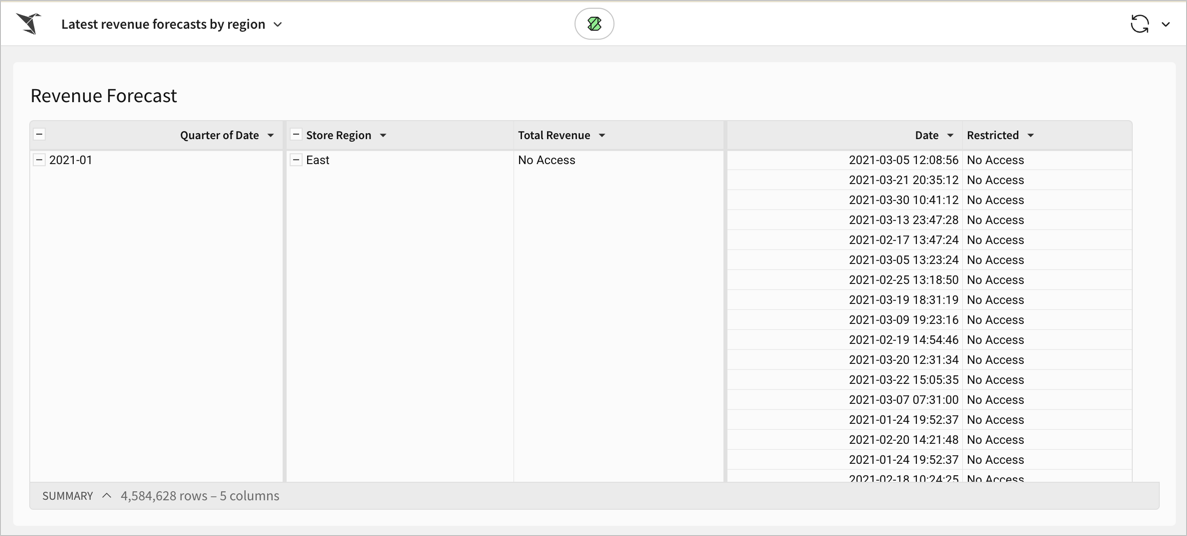
Someone in the financial leadership team can then build a workbook using the data model as a data source and the data from the Revenue column. If you are not part of the financial leadership team, you cannot create a workbook for them because you do not have access to data in the Revenue column. A workbook that you create from the data model does not contain the Revenue column at all.
If you or someone else without access to the Revenue column attempts to view a workbook with that data, you see a column name Restricted and values of
No accessfor that column.
Example CLS configuration with teams for a data model
In this example, you want to restrict access to revenue data in the Business Forecast data model to only the Sigma users in the financial leadership team. This example sets column security rules from the column menu, but you can also set up column-level security from the data model ERD.
-
Start by creating a team for the users that you want to have access to the revenue data. In this example, create a Financial leadership team. Add the finance leaders as members of the team.
-
Open the Business Forecast data model for editing.
-
For the Revenue column, select the down arrow (
), then select Column security.... -
For Visibility rules, click Add rule (+). The Revenue column is preselected as the restricted column.
-
For Criteria, select Specific users and teams and select the
Financial leadershipteam.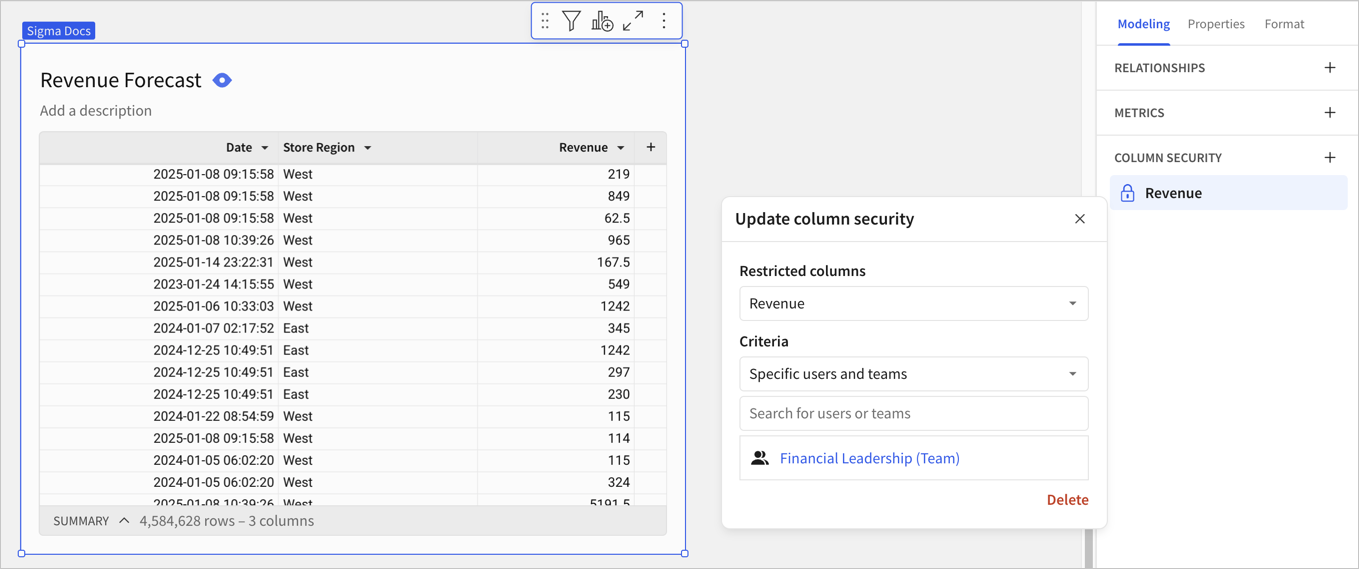
-
Click Publish to update the data model.
Someone in the financial leadership team can then build a workbook using the data model as a data source and the data from the Revenue column. If you are not part of the financial leadership team, you cannot create a workbook for them because you do not have access to data in the Revenue column.
If you or someone else without access to the Revenue column attempts to view a workbook with that data, you see a column name Restricted and values of
No accessfor that column.
Child elements inherit column-level security rules
Child elements inherit column-level security rules from parent elements. Like filters, the column-level security rules apply to the columns but cannot be viewed, modified, or managed on the child elements.
Within a data model, if you reference a restricted column in other data model elements, the column inherits the CLS rules and is restricted. For example, if you create a lookup from one table to another within the data model, and the column that you look up is restricted by a CLS rule, the column added via the lookup is restricted by the same rule.
If you reference a restricted column in a SQL statement with
sigma_element()syntax or Python code using thesigma.get_element()method, column-level security is not inherited. To continue to protect the column with column-level security, add the CLS rule to the output of the SQL statement or Python code.
Using CLS-restricted columns in formulas
You can create metrics and calculated columns that use columns restricted with column-level security rules. The metrics and calculated columns inherit the CLS rules from referenced restricted columns.
For example, if your data model table includes a restricted column, Email, and a metric calculates the count of email addresses for each domain, restricted users can view the metric name and definition (including the column name), but if used in a workbook, the metric is restricted (no access).
As another example, if your data model table includes a restricted column, Name, and another column, Formatted Name uses the formula Proper([Name]), the Formatted Name column inherits the CLS rules and is also restricted.
Configure column-level security in a dataset (Deprecated)
Datasets are deprecated:
- Starting June 2, 2026, you will no longer be able to create datasets or edit existing datasets.
- Starting September 15, 2026, you will no longer be able to use datasets as a data source or view datasets in Sigma.
Migrate your datasets to data models and update any documents that use datasets as a data source to use a different source. See Migrate a dataset to a data model.
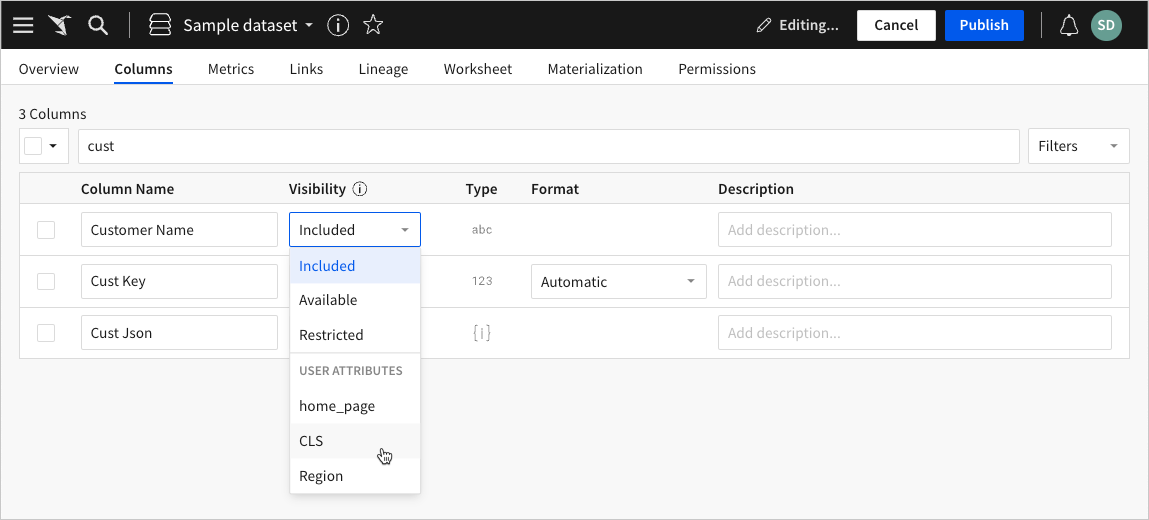
To configure column-level security in a dataset, do the following:
-
In the Administration portal, create a user attribute or open an existing one to edit.
When you create a user attribute for column-level security, ensure you define a default value. If you don't specify the default value, Sigma automatically assigns attribute value "2" as the default, which restricts column data for applicable users.
-
Assign attribute values to teams using the following preexisting assigned values intended for column-level security:
Assigned value Column-level security outcome 0 Column data is included in workbooks by default 1 Column data is available, but not added to workbooks by default 2 Column data is unavailable (restricted) in workbooks -
Open the applicable dataset or create one, then grant the team permissions on the dataset. The assigned permission type does not affect the column-level security settings.
To prevent unintentional results or errors, avoid using user attributes in a materialized dataset. -
Select the Columns tab, then click Edit in the dataset header.
-
Locate the column you want to configure for column-level security, then click the Visibility dropdown and select the applicable user attribute.
-
Repeat step 5 for all columns that require column-level security, then click Publish in the dataset header to save your edits.
-
You can now create a workbook that uses the dataset with column-level security as a data source. When you share the workbook with applicable teams, the data is included or restricted based on each user's team assignments, user attributes, and corresponding dataset visibility configurations.
Example CLS configuration with a dataset
This example demonstrates an implementation of column-level security with a dataset, using a user attribute and teams.
A Sigma organization has two teams: Team A and Team B. Members of Team A require access to the Domain column in an existing dataset called Customer, while members of Team B need to be restricted from viewing that same data.
-
Start by creating a user attribute to manage data security. In this example, create a Domain CLS user attribute.
-
Assign the attribute value
0to Team A (to access data) and the attribute value2to Team B (to restrict data).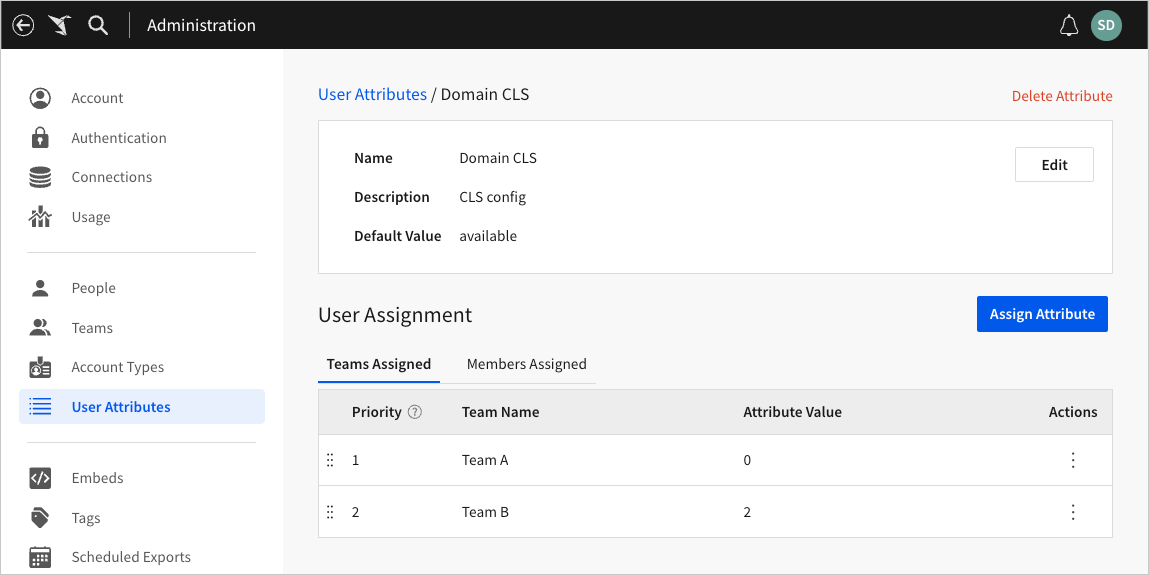
-
Next, verify that members of both Team A and Team B can access the dataset. Open the Customer dataset and select the Permissions tab.
-
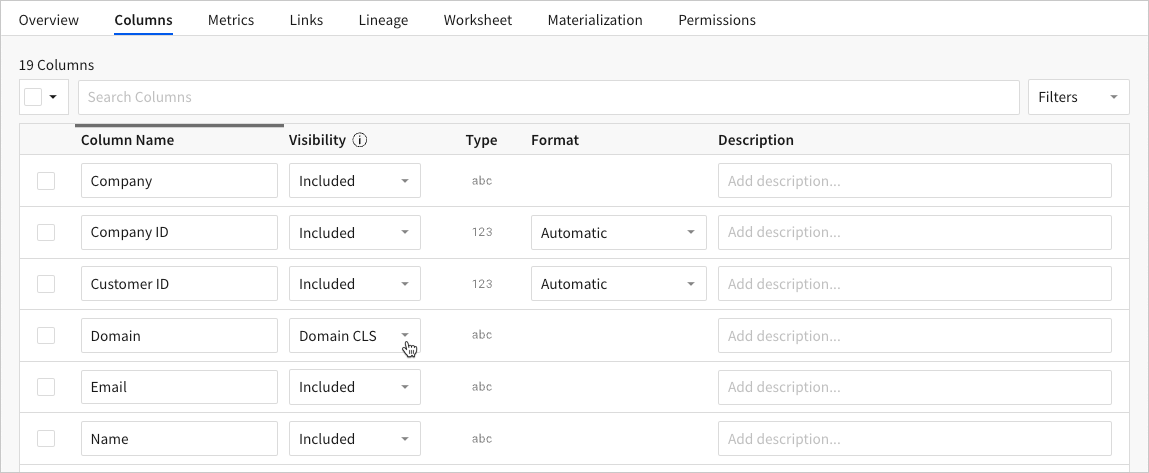
Then, update the column visibility for the dataset. To start editing the dataset, select the Columns tab and click Edit.
-
In the Columns tab, find the Domain column, then click the corresponding Visibility dropdown field and select the Domain CLS user attribute. The values of the Domain CLS user attribute assigned to Team A and Team B are applied to the Domain column.
-
Publish the changes to the dataset to save them.
-
Create a workbook from the dataset, which adds a table with all dataset columns, and share the workbook with both Team A and Team B.
-
When a members of Team A opens the workbook, Sigma displays all data in the Domain column.

-
When a member of Team B opens the workbook, Sigma obfuscates the name of the Domain column, displaying Restricted instead. For each row in the column, the user sees "No access" because the data is restricted.