Application Embedding (Legacy)

Application Embedding isn't supported for new customer configurations. New customers should use User-Backed Embedding

This is a Premium Feature.

Application embedding allows you to securely display your workbooks and data elements in other applications without requiring your users to authenticate through Sigma. Your embedded data updates in real time with Sigma, as it responds to new data from your warehouse.

To implement an embed, use an embed secret, custom session durations, a server-side generated embed URL, along with additional custom parameters.

To learn more about embedding in general and explore all our two other embedding options, visit Workbook Embedding: An Overview.

Summary of Content

Requirements
Embed Security
      Who Can See my Data?
Create an Application Embed
      High Level Overview
      Generate an Embed Secret
      Create the Embed Path
      Add the Embed to your Application
            Create the Embed API
            Call the API to Fetch and Render the Embed URL
            Node.JS Example
Workbook Controls in Embeds
JavaScript Events
      Accessing Events in JavaScript
      Events
            workbook:loaded
            workbook:variables:onchange
      Updating Controls within Sigma
      Actions
            workbook:variables:update
Related Resources


Requirements


Embed Security

Application embedding is the most complex of Sigma’s three embedded analytics options. An admin generated embed secret, limited session durations, and server-side code in your application, all contribute to your data’s security. 

Application Embeds are made possible by the creation of a unique and encrypted embed URL pointing to the workbook, workbook page, or element you wish to display. This URL is generated on the server side of your application, accessed through the API you set up,  and rendered client side in an HTML iFrame element.

When you create the API to generate your embed URL you can specify parameters that define what viewers will see and how they can interact with your embed.

Each API generated URL can only be used once.


Who Can See my Data?

Anyone with the embed URL will have access to view the embedded workbook, workbook page, or element. However, access to a Sigma embed will not allow anyone to access additional data in Sigma without a Sigma account for your organization and proper permissions on the workbook.


Create an Application Embed

To create an application embed, you will need to complete a series of steps in Sigma and your non-Sigma application. This requires implementation of client and server-side code.

High Level Overview

  1. Create an embed secret in your Sigma Admin Portal.
  2. Create an embed path.
  3. Add an API to your application that generates a secure embed URL.
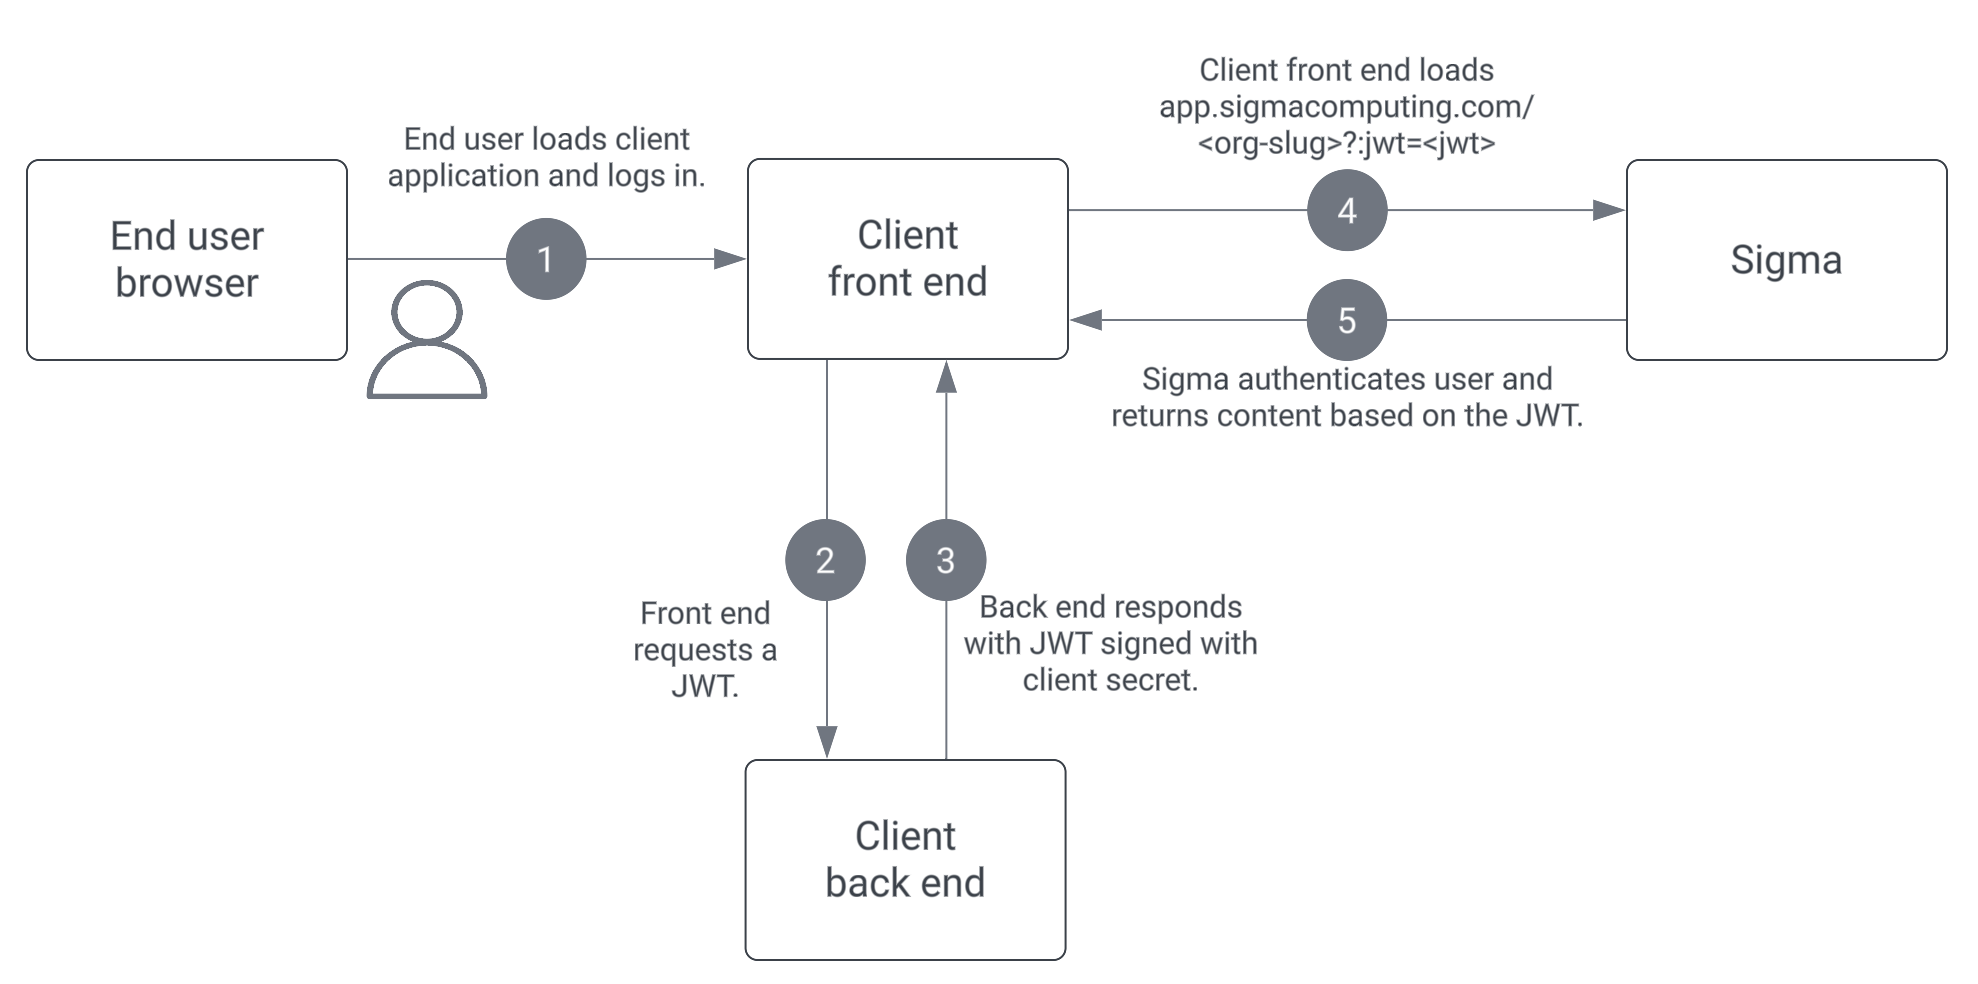
  4. Call the new API from your application’s client, sending the workbook generated embed path as a parameter. The server responds with an embed URL. This can then be passed to an iFrame element in your client’s HTML.

Generate an Embed Secret

To create an application embed, your Sigma organization will need an embed secret. This secret is encrypted in your embed URLs and used to ensure your application embed URLs are valid (see Create the Embed API).

You can't access your organizations existing embed secret after it's created. If you lose your embed secret, you can regenerate a new one at any time. However, your existing embeds will be rendered invalid until they are updated with the new secret.

There are two ways to generate an embed secret:

  • [option 1] Generate the embed secret from your Admin Portal's Account page, if you want to allow anyone with access to the URL to view the embed.
  • [option 2] Generate the embed secret from your Admin Portal's APIs & Embed Secrets page to apply user account-specific permissions to the embed. This option controls access based on user-account types. 

[Option 1] Generate an Embed Secret 

  1. Open your Admin Portal.
  2. On the Account page, scroll to the Embedding section, and click Add.

    Screen_Shot_2021-05-21_at_6.49.22_AM.png

  3. Click Copy to copy the Embed Secret from the modal. Then store it in a secure location.
    Note: You can only view this key once.

[Option 2] Generate an Embed Secret with Account-specific Permission

  1. Open your Admin Portal.
  2. Open to the APIs & Embed Secrets page.
  3. Click Create New, located in the page's top right corner.
    This opens the Create New API Token or Embed Secret modal.
  4. Under API Token or Embed Secret?, select Embed Secret.
  5. Enter a name.
  6. [optional] Enter a description.
  7. Under Owner, select an organization member with the account type you would like to associate with the embed secret. 
  8. Click Create.
  9. You will now see the newly-generated secret. Click Copy
    Then store the secret in a secure location.

    You can only view this key once.

  10. Click Close.

    Secrets created from the APIs & Embed Secrets page must be used with their associated Client ID. Each secret's Client ID is listed on the APIs & Embed Secret page.

Create the Embed Path

An embed path is a URL that points to the workbook, workbook page, or element that you are embedding. This path can be created from your workbook's Embed Workbook modal. It will later be passed to your application’s API for the generation of the embed URL (see Adding the Embed to your Application).

  1. Open the workbook. 
  2. If the workbook is in a draft state, click the Publish button.
    A workbook must be published to create or manage embeds.
  3. Click the caret (▼) icon button to the right of the workbook title in the header.

    Screen_Shot_2021-09-20_at_3.55.27_PM.png

  4. Select Embedding from the menu.
    This opens the Embedding modal.

    Screen_Shot_2021-09-20_at_3.55.46_PM.png

  5. This modal displays all available public and application embeds.
    Click to open the Application tab.

    Screen_Shot_2021-05-21_at_6.57.49_AM.png
  6. Under Generate Application Embed Path for, select your embed target.
    Options will include the entire workbook, all individual workbook pages, and all individual data elements. 
  7. The embed path will automatically be generated. Click Copy to copy this path for future use.
    Screen_Shot_2021-05-21_at_7.01.13_AM.png

Add the Embed to your Application

Create the Embed API

Once you have your organization’s embed secret, add a server-side API to your application for the purpose of generating a secure embed URL.

The generated URL has the following structure:

<workbook_embed_path>?:nonce=<random_nonce_value>&:allow_export=<allow_export_boolean>&:time=<unix_timestamp>&:session_length=<session_length>&<control_id>=<control_value>&:external_user_id=<external_user_id>&:signature=<hmac_signature>&:mode=<mode>&:<hide_tooltip>=<hide_tooltip_boolean>&:client_id=<client_Id>
  • <workbook_embed_path> is the Embed Path that is generated on the workbook, workbook page, or element you wish to embed.
  • <random_nonce_value> a random unique string (less than 255 characters). Sigma uses this to prevent application embed URLs from being shared and reused.
  • <allow_export_boolean> [optional] is a boolean (true/false) parameter that controls whether the viewer of the embed will be able to download data. If this parameter is not specified, the url will default to false, and viewers will not be able to download data.
  • <unix_timestamp> is the current time as a UNIX timestamp. Sigma uses this in combination with the <session_length> to determine if your link has expired. The URL is valid after the <unix_timestamp> and before the <session_length> expiration.
  • <session_length> is the number of seconds the embed URL should remain valid after the application embed URL was generated. After the specified number of seconds, the Application Embed will no longer display new values. The maximum session length is 2592000 seconds (30 days).
  • <control_id> and <control_value> are the ID and value of any existing workbook control you want to pass through to the workbook. You may pass multiple control IDs and values. This will allow you to customize what your viewers see. Learn more.
  • <external_user_id>  is a unique identifier for each individual user viewing the embed in your application. Sigma uses this identifier for licensing purposes.
  • <hmac_signature> is the hash-based message authentication code (HMAC) URL signed with your organization's Sigma embed secret.
  • <mode> [optional] Set `:mode=explore` to allow viewers to explore the embed in a more interactive manner. 
  • <client_id> account-specific permissions to apply to the embed.

    If the embed secret is generated from your Admin Portal's Account page, this value isn't applicable. However, secrets generated from the APIs & Embed Secrets page have a required corresponding client_id.

  • <showUnderlyingData> set to false to hide underlying data from embed users with explore access.
  • <hide_tooltip> (optional) if set to true and a user hovers over a tooltip, the tooltip is no longer displayed. This applies to vega charts (line,bar,area,etc) and map chart marks. This is also available for user-backed embeds. 
  • <hide_sheet_interactions> (optional) hides the option to modify a chart or sheet from a dropdown or right-click actions. This hides the sort dropdown on a column header or filter bar access for users of the embedded workbook.

.See Node.js Example


Call the API to Fetch and Render the Embed URL

Once the API has been added to your application, you must call it from the client. The client passes the embed path to the API, and the server responds with the secure embed URL. The client can then render this embed URL in an iFrame. See Node.js Example

Node.JS Example 

Server-side API Definition:

const crypto = require('crypto');
const uuid = require('uuid');

// :nonce - Any random string you like but cannot be repeated within the hour.
let searchParams = `?:nonce=${uuid.v4()}`;

// :allow_export - true to allow export/download on visualizations
searchParams += '&:allow_export=true';

// :session_length - The number of seconds the user should be allowed to view the embed
searchParams += '&:session_length=3600';

// :time - Current Time as UNIX Timestamp
searchParams += `&:time=${Math.floor(new Date().getTime() / 1000)}`;

// :external_user_id - a unique JSON string identifying the viewer
searchParams += `&:external_user_id=${user_id}`;

// `Control Id` is a control id from your workbook, and `controlValue` is the value you wish to pass to that control.
searchParams += `&${encodeURIComponent('Control Id')}=${encodeURIComponent(controlValue)}`;

// :client_id - [optional]
searchParams += `&:client_id=${client_id}`;

// EMBED_PATH - Generated on your workbook
const URL_WITH_SEARCH_PARAMS = process.env.EMBED_PATH + searchParams;

// EMBED_SECRET - Sigma Embed Secret generated in your admin portal
const SIGNATURE = crypto
    .createHmac('sha256', Buffer.from(process.env.EMBED_SECRET, 'utf8'))
    .update(Buffer.from(URL_WITH_SEARCH_PARAMS, 'utf8'))
    .digest('hex');

const URL_TO_SEND = `${URL_WITH_SEARCH_PARAMS}&:signature=${SIGNATURE}`

res.status(200).send(URL_TO_SEND);


Client-side IFrame Creation:

// YOUR_API_URL will be the URL the API defined in the server-side code 

const resp = await fetch(YOUR_API_URL, {
  method: 'POST',
  headers: {
    'Content-Type': 'application/json',
    'Authorization': token,
  },
  body: {}
});

const embedUrl = resp.data;
<iframe
  title="your-signed-embed"
  style={{
    display: "block",
    height: "100%",
    width: "100%"
  }}
  frameBorder="0"
  src={embedUrl}
/>

Workbook Controls in Embeds

If your workbook contains workbook controls, you may want to consider how they can impact your embedded analytics.

Hidden Controls

Controls can be hidden from viewers. To hide one more controls, create a new hidden page in the workbook. Housing your controls here will hide them from anyone without Can Edit permission on the workbook (including your embed viewers). Learn more.

Controls in a Workbook URL

When you create an embed, you may choose to include control values in the embed URL yourself. For application embedding, initial control values should be injected into the URL during the server-side URL generation process using <control_id> and <control_value>.

Learn about controls in the URL.


JavaScript Events

After the embed URL is generated,  your application’s client can interact with its iFrame through JavaScript actions and events. Events will allow the client to listen for variable updates that it can then use to take actions, such as passing control values to different embeds or from one of your application’s widgets to an embed.

Accessing Events in JavaScript

Example of listening for JavaScript events from Sigma:

window.addEventListener('message', function (event) {
if (
event.source === document.getElementById('sigma-iframe').contentWindow &&
event.origin === "https://app.sigmacomputing.com"
) {
console.log(event.data);
}
});

Events

Currently Sigma has two types of events:

workbook:loaded

This event is created when a workbook has finished loading the metadata but has not started evaluating the workbook elements.

{
type: 'workbook:loaded',
workbook: { variables: encodedVariables },
}

workbook:variables:onchange

This event is triggered whenever a control/variable has been updated within Sigma’s iFrame through User interaction.

{
type: 'workbook:variables:onchange',
workbook: {
variables: {'Variable1': 'value1', 'Variable 2': 'value2' }
},
}

Attribute


Format


Description

 
workbook.variables Object

The variables applied to the workbook with the format

{ ‘Variable Name’: ‘value1’, ‘Variable Name2’: ‘value2’ }

Note that the values are URL encoded. Please see Workbook Controls in the URL for examples on how the values are encoded for the URL.


Updating Controls within Sigma

You can update controls within an iFrame by posting a message to the iFrame contentWindow.

const sigma_iframe = document.getElementById('sigma-iframe');
sigma_iframe.contentWindow.postMessage(
{
type: 'workbook:variables:update',
variables: { 'Variable1': 'value1', 'Variable 2': 'value2' },
},
'https://app.sigmacomputing.com',
);


Actions

workbook:variables:update

This action updates the current control values within the iFrame’s workbook. It is not available for hidden controls.

{
type: 'workbook:variables:update',
variables: { 'Variable1': 'value1', 'Variable 2': 'value2' },
}

Related Resources 

Workbook Embedding: An Overview
Public Embedding
Private Embedding
Workbook Controls in the URL
Hidden Controls in Workbooks


Was this page helpful?
Yes No