
Manage users and teams with SCIM and Okta
Configuring SCIM for your Sigma organization allows you to centralize management of users and teams through Okta. This guide provides the steps required to configure Okta Provisioning for Sigma Computing.
Requirements
- You must be assigned the Admin account type to initiate provisioning.
- Your Sigma organization must already be authenticated with Okta using SAML. See Authentication methods for your Sigma organization.
- This feature does not work with Password or "SAML or password" authentication.
Understanding SCIM
What is SCIM?
The "System for Cross-domain Identity Management", better known by its acronym SCIM, is a standard for the automation of user and group provisioning between two services.
In this case, the two services are Okta and Sigma.
SCIM with Sigma and Okta
Configuring SCIM for your organization allows you to create and manage users and groups in Okta and automatically push them to your Sigma organization as users and teams.
Once SCIM provisioning is enabled for both services, all management of users and teams must be done in Okta. Users and teams remain visible in Sigma, but not editable.
SCIM with SAML
Before you configure SCIM for your organization, you must enable SAML authentication in both Okta and Sigma.
SAML allows Single Sign On (SSO) and management of users. However, syncing new users and updates between Okta and Sigma requires the user to log in to Sigma. When you add SCIM to your SAML configuration, you gain the ability to manage Sigma teams from Okta, and both user and group/team data in Okta is automatically pushed to your Sigma organization, regardless of user login.
Features
The following provisioning features are supported:
Push New Users
- New users added to the Okta app are automatically added as members in Sigma. If a Sigma account type isn't specified in Okta, the default Lite account type is assigned.
Push User Profile Updates
- Updates made to the user's name ('given name' and 'family name') in their Okta profile are automatically pushed to Sigma.
- Updates made to a user's 'user type' (via that application Assignment page) are automatically pushed to Sigma.
Deactivate Users
- Deactivating a user through Okta deactivates the user in Sigma.
- Note: The user's profile information is maintained as an inactive user.
- Note: Ownership of any documents created by the user is transferred to the Admin performing the deactivation. Any documents located in the user’s Documents folder are automatically transferred to a folder in the Admin’s Documents folder.
Reactivate Users
- Sigma user accounts can be reactivated by reactivating the corresponding account in Okta.
- Reactivated users automatically regain their Sigma team memberships, if they were added to Sigma via an Okta group.
Push Groups / Teams
- Groups created in Okta are created as teams in Sigma.
Push Group / Team Updates
- Updates made to a group (group name and members) in Okta are pushed to the corresponding team in Sigma.
Deactivate Groups / Teams
- Deactivating a group in Okta deactivates the corresponding team in Sigma.
- Note: Any documents located in the team's workspace folder are automatically transferred to the Documents folder of the Admin performing the deletion.
Transition to SCIM
Are you considering transitioning to SCIM after already creating users and teams in Sigma? Have you already created users with SAML authentication but are new to SCIM provisioning? This section describes what to expect when you transition to SCIM.
Can I edit users and teams in Sigma?
All management of users and teams must be done through your IdP. While not directly editable in Sigma, users and teams are displayed in your Sigma Admin Portal.
What happens to my existing users?
This depends on where your users were created: in Sigma’s Admin Portal vs in Okta with SAML. Both scenarios are listed below.
If your pre-SCIM users were created in Sigma’s Admin Portal:
Existing users remain in Sigma. However, they are no longer editable through the Sigma Admin Portal.
Users: Okta allows you to link to an existing user with the same email address in Sigma. No work is lost, and Admin management of that user can then be maintained through your IdP. Alternatively, you can import users from Sigma into your IdP.
User Account Types: If you switch management of a user originally created in Sigma over to your IdP, Sigma automatically respects the account type defined in the IdP, regardless of what was originally set in Sigma.
If your pre-SCIM users were created in Okta with SAML:
Okta requires that any users already assigned to the app be removed and re-added when provisioning is switched on for an existing application. This process does not result in the loss of any user work in Sigma.
We recommend the following process for handling this situation:
- Select an off-hours time slot in which you can conduct the switch. During this time, your users are temporarily removed from the application and can't log in to Sigma.
- Create Okta groups for your users prior to removing them from your application. This is not required; users can be added individually. However, bundling users into groups is recommended for two reasons: (1) If you have a large user base, re-assigning your temporarily removed users in groups reduces the period of time that your users are locked out of their Sigma accounts. (2) These user groups can be repurposed when you push Okta groups to Sigma to create teams.
- Un-assign all users from your Sigma application in Okta. This can be done from the Assignments tab. Be sure to un-assign individuals and groups.
- Turn on provisioning.
- Re-assign all users to your application.
- Push groups to create teams.
What happens to my teams previously created in Sigma?
Existing teams remain in Sigma, but you can't edit them in Sigma.
Okta allows you to link a group in your application to an existing team in Sigma. No work is lost, and Admin management of that group/team can then be maintained through Okta. When the link is created, the team's membership is automatically updated to reflect membership of the linked Okta group.
Step-by-step configuration instructions
[Prerequisite] Set up authentication
If you have not already, connect your Okta instance to Sigma using SAML for authentication; see Single Sign-On with SAML.
Enable SCIM provisioning
Perform steps in both Sigma and Okta.
Sigma provisioning steps
In Sigma, do the following:
-
Sign in to Sigma. You must be assigned the Admin account type.
-
Navigate to your Sigma Admin Portal.
-
In the left panel, click Authentication.
If you have not yet configured SAML, do so using the "SAML or password" authentication method. See Single Sign-On with SAML.
-
If your authentication method is set to "SAML or Password", change it to SAML only.
-
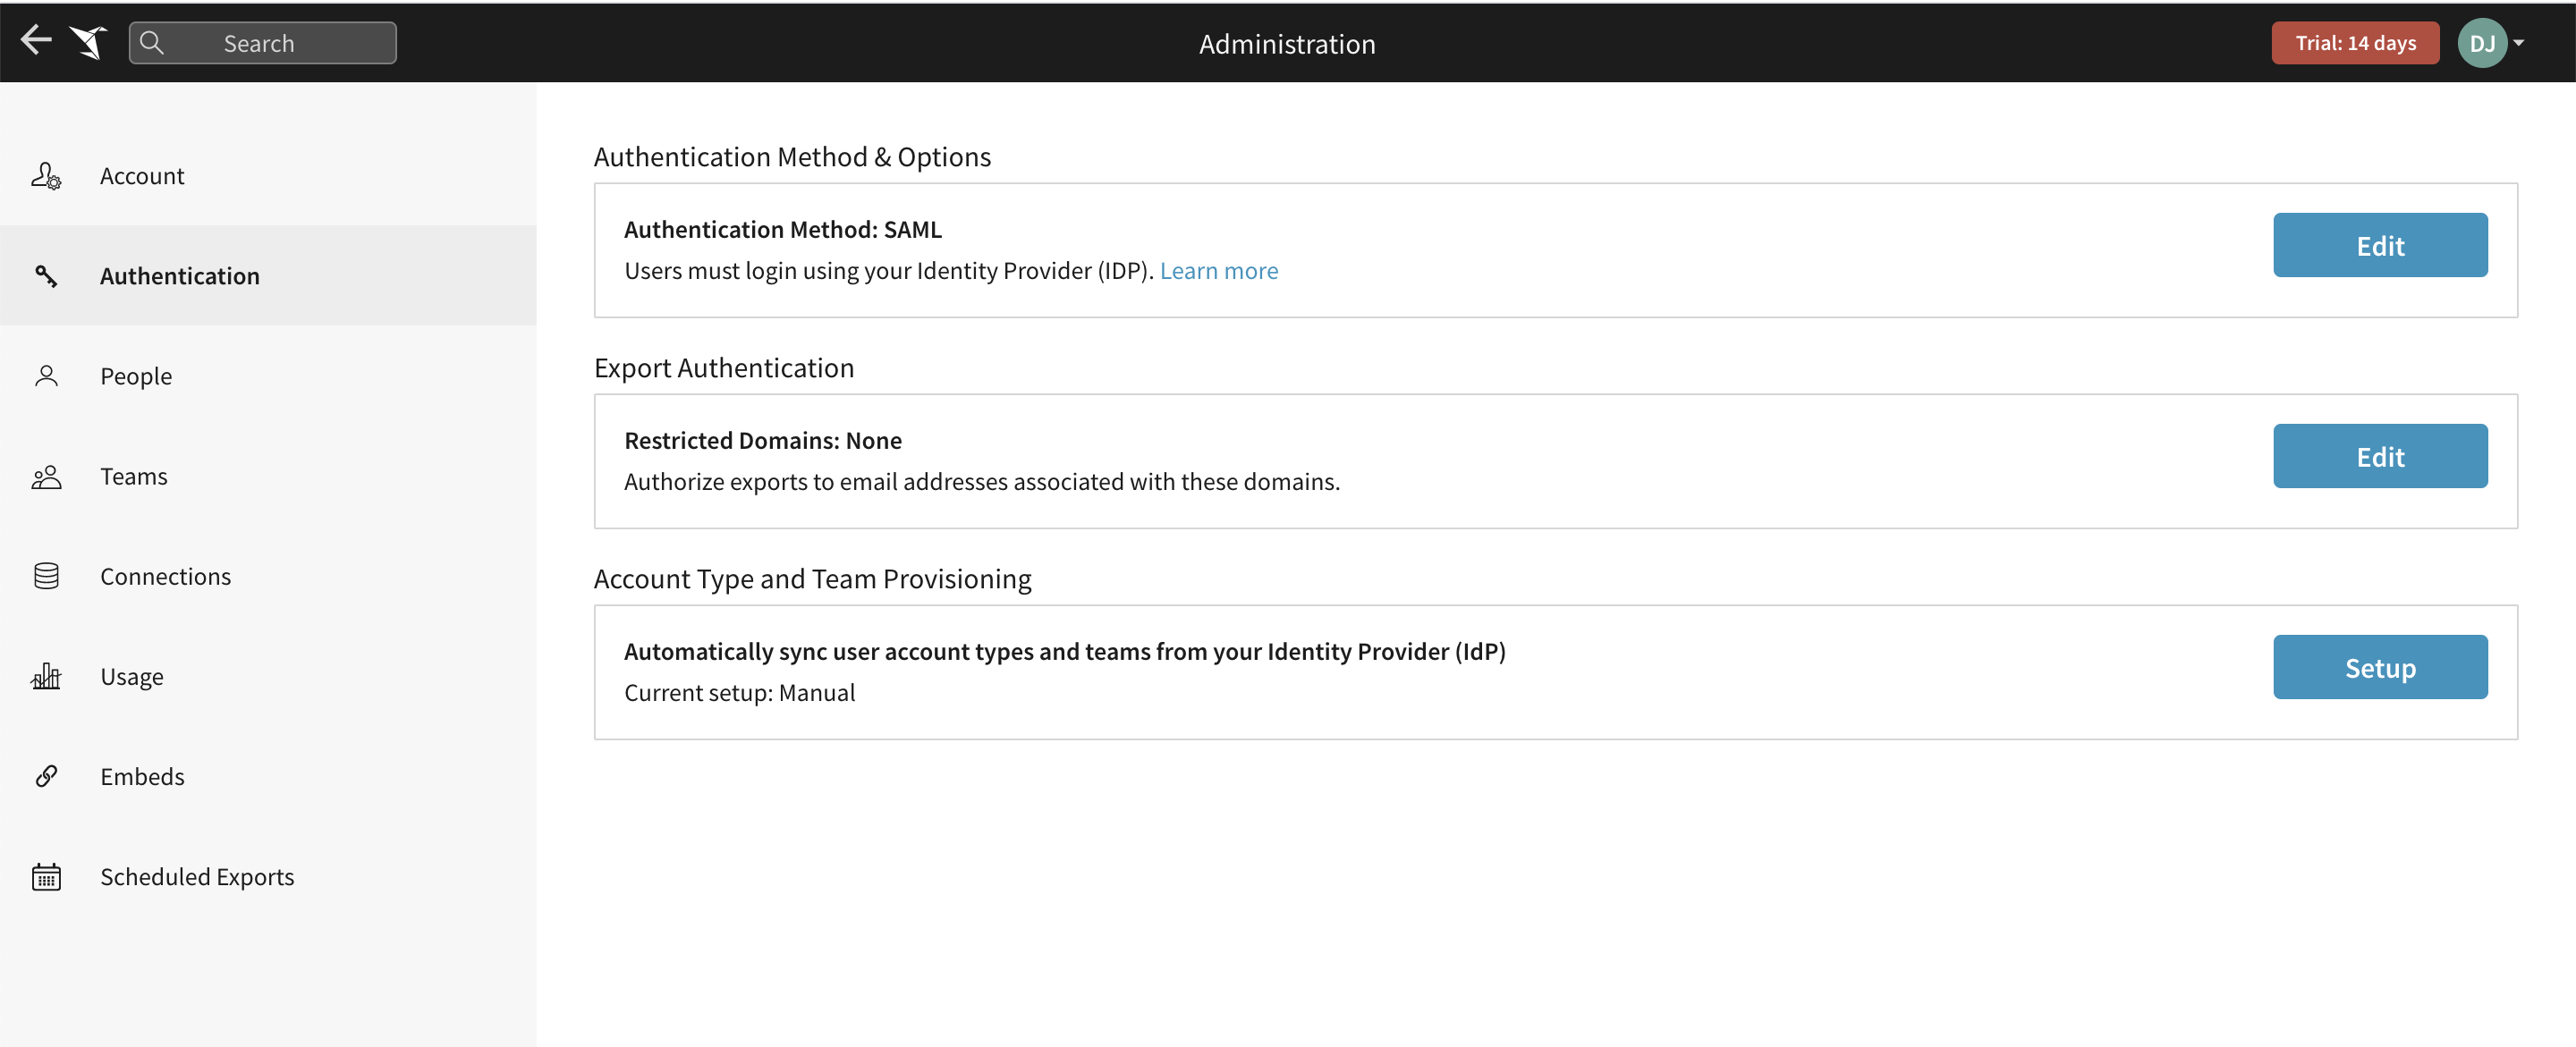
Under Account Type and Team Provisioning, click Setup to open the Provisioning modal. This section is only visible if your authentication method is SAML (not SAML or Password).
-
Review the notes provided on the getting started section of the Provisioning modal. Check the confirmation box, and click Next to continue.
-
When prompted to create a token to authenticate your integration with Okta, enter a token name. Then click Next.
-
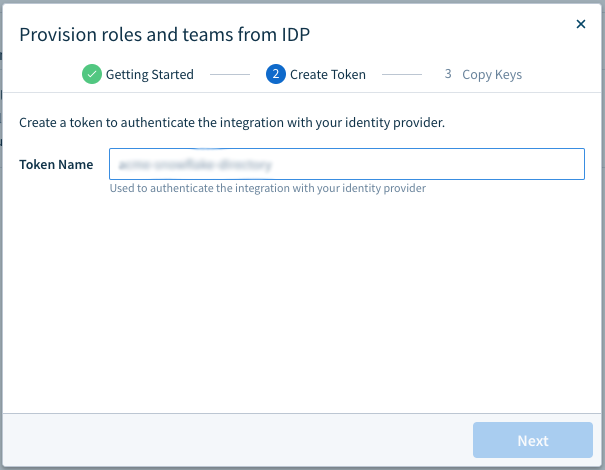
Sigma provides you with a Bearer Token. Copy and store it in a secure location. It is required to complete your integration.
If your Okta Sigma app was created before February 3, 2021, you also need the Directory Base URL.
-
Click Done. Next Steps: Enable SCIM provisioning in Okta.
Okta provisioning steps
The following instructions support SCIM enablement for Sigma applications created via Okta's marketplace. These instructions only apply to applications created after February 3, 2021. To enable SCIM and Provisioning for older applications follow instructions for SCIM for Pre-2021 applications.
-
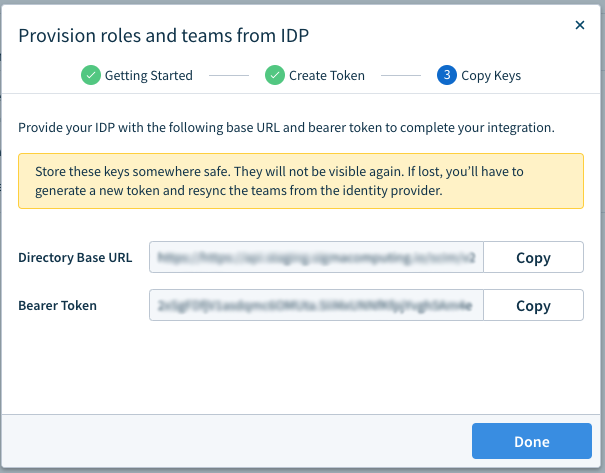
Open your Sigma application in Okta.
-
Open the application’s Provisioning tab.
-
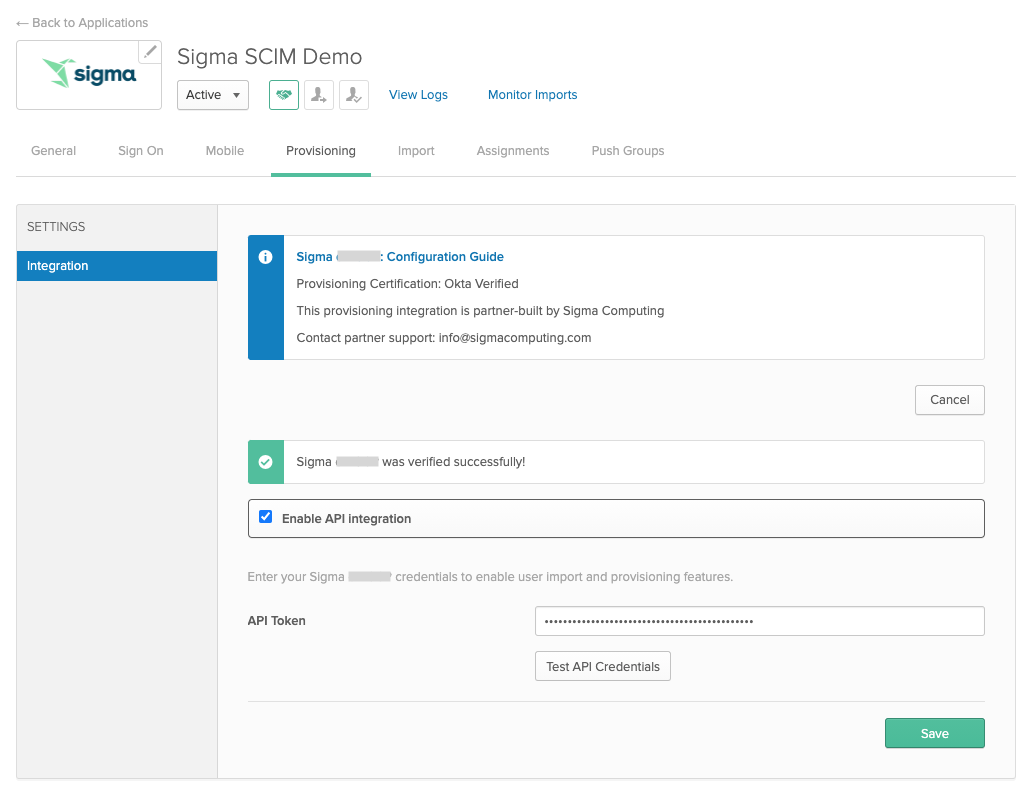
Click Configure API Integration.
-
Check Enable API Integration.
-
Under API Token, enter the Bearer Token that you received when setting up provisioning in Sigma’s Admin Portal.
-
Click Test API Credentials to verify your token.
-
After passing the configuration test, click Save.
-
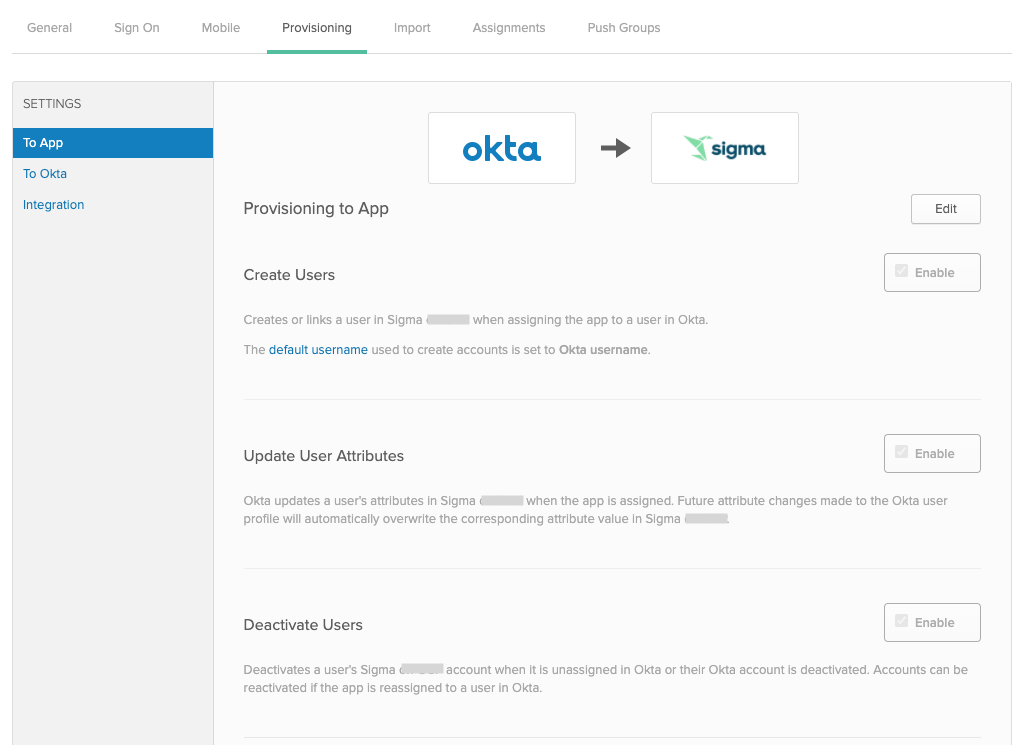
You now see Provisioning to App settings. Click Edit and check the Enable options next to Create Users,Update User Attributes, and Deactivate Users.
-
Click Save.
Next Steps: add users and add teams.
Instructions for SCIM for pre-Feb 3, 2021 applications
- Open your Sigma application in Okta.
- Open the application’s General tab.
- Click Edit.
- Under Provisioning, select SCIM.
- Click Save.
- Open the application’s Provisioning tab.
- Click Edit.
- Under SCIM connector base URL, enter the Directory Base URL that you received when setting up provisioning in Sigma’s Admin Portal. You can also find this value on the Authentication page under the header Account Type and Team Provisioning.
- Under Unique identifier field for users, enter ‘userName’.
- Select all four check boxes except Supported provisioning actions.
- Under Authentication Mode, select ‘HTTP Header’.
- Under HTTP HEADER > Authorization, enter the Bearer Token that you received when you configured provisioning.
- Click Test Connector Configuration to test your configuration.
- After passing the configuration test, click Save.
- You now see Provisioning to App settings. Click Edit and check the Enable options next to Create Users, Update User Attributes, and Deactivate Users.
- Click Save. Next Steps: add users and add teams.
Add users and assign account types
Do not use SCIM provisioning for the same user across multiple IdPs. Users should be provisioned by a maximum of one IdP to avoid conflicts in information between IdPs.
Add users individually
Follow the steps below to add individual users. If a user has a custom account type, or a user type in Okta that doesn't directly map to Sigma, see Use Custom Account Types with your IdP.
-
Open your Okta Admin console.
-
Open your Sigma application.
-
Go to the Assignments tab.
-
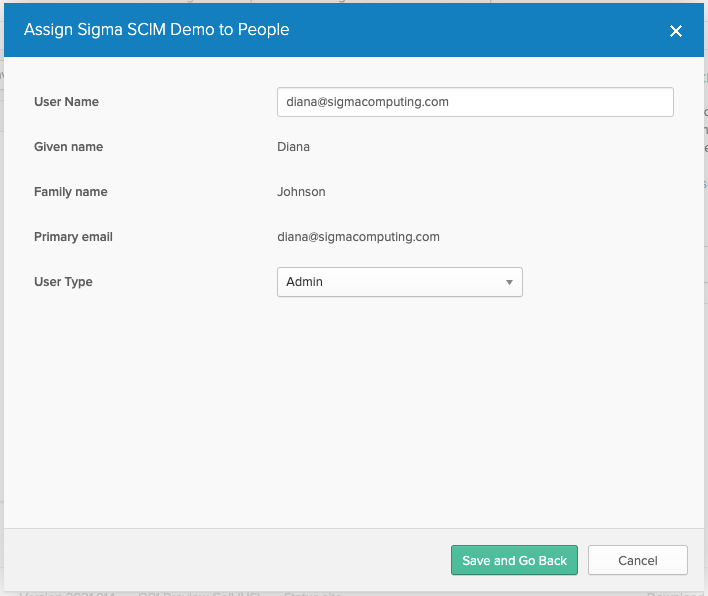
Click Assign > Assign to People.
-
Select the user(s) you would like to add to Sigma.
-
Use their email address as the User Name value.
-
Confirm that Given name and Family name are both defined. These values are pulled directly from the user’s Okta profile.
-
Select a User Type.
 The user type attribute is case-sensitive. When configuring default account types (Admin, Build, Act, Analyze, View), the value indicated should be lower case (e.g. "view"). Other account type configurations are also case-sensitive, and the value set in your IdP must match the value in Sigma exactly, or errors may occur when trying to provision users.
 -
Save your changes. They are sent from Okta to Sigma automatically.
Provisioning users and groups may take a few moments. To check on provisioning status from Okta, open your Provisioning activity log under Reports. You can also check the People page in your Sigma Admin Portal to confirm that your new user(s) have been added and assigned the appropriate account type.
Errors
If you encounter the error below, remove all existing user types in Okta. Then add the user types in Okta again, mirroring the account types found in Sigma.
Error while trying to push profile update for {email address}: Bad Request. Errors reported by remote server: Request is malformed: Error: Expecting string at 0.1.userType but instead got: null.Add users by group
Follow the instructions below to add users to Sigma in bulk. The process adds users and assigns roles; it does not trigger team creation.
-
Open your Okta Admin console.
-
If needed, update your user group(s) under Directory > Groups.
-
Go to Applications, and open your Sigma application.
-
Go to the Assignments tab.
-
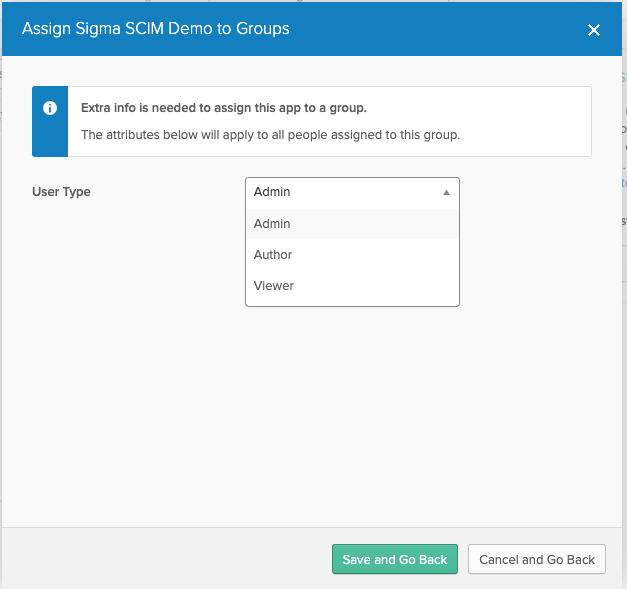
Click Assign > Assign to Groups to view your group list.
-
Locate the group that contains the users you want to add to Sigma, and click Assign.
-
Select a User Type. This user type is assigned to all users in the group.
Any users previously assigned a role individually keep their existing user role rather than inheriting their group-assigned role.
-
Save your changes. They are sent from Okta to Sigma automatically.
Provisioning users and groups may take a few moments. To check provisioning status from Okta, open the Provisioning activity log under Reports. You can also check the People page in Sigma to confirm that the new user(s) have been added and assigned the appropriate account type.
Push groups / teams
Groups in Okta are equivalent to teams in Sigma. Once you configure provisioning in Okta, you can't create new teams directly in the Sigma Admin Portal - all teams must be created as groups in Okta and pushed to Sigma.
Teams created in Sigma prior to setting up provisioning remain accessible (but not editable) from your Sigma Admin Portal. You may choose to transition management of these teams to Okta by selecting the Link Group push option listed in the instructions below.
-
Open your Okta Admin console.
-
If needed, update your user group(s) under Directory > Groups.
-
If any users in the group are not yet assigned to Sigma, please add them now. The quickest way to add new users is by group; however, you can also add users individually.
-
Go to Applications, and open your Sigma application.
-
Open the Push Groups tab.
-
Click the Push Groups button. Then select Find Groups by name from the menu.
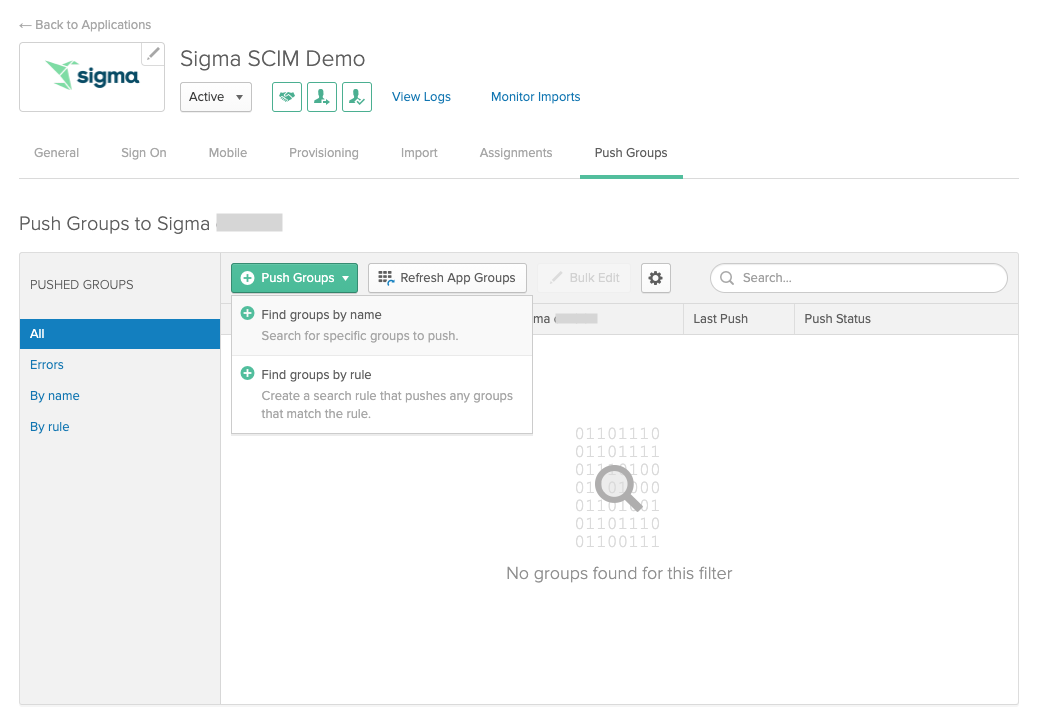
-
Search for and select your group.
-
Select your group push option. When you select a group, Okta checks whether a team with the same name exists in Sigma:
- If no team exists, Okta suggests a Create Group push option.
- If a team already exists, Okta directs you to use the Link Group option.
- You can also choose the Link Group option to link a group to an existing team in Sigma.
-
Click Save.
-
From the push groups list, you can see the push status of each group. Once marked Active, the group appears as a team in Sigma.
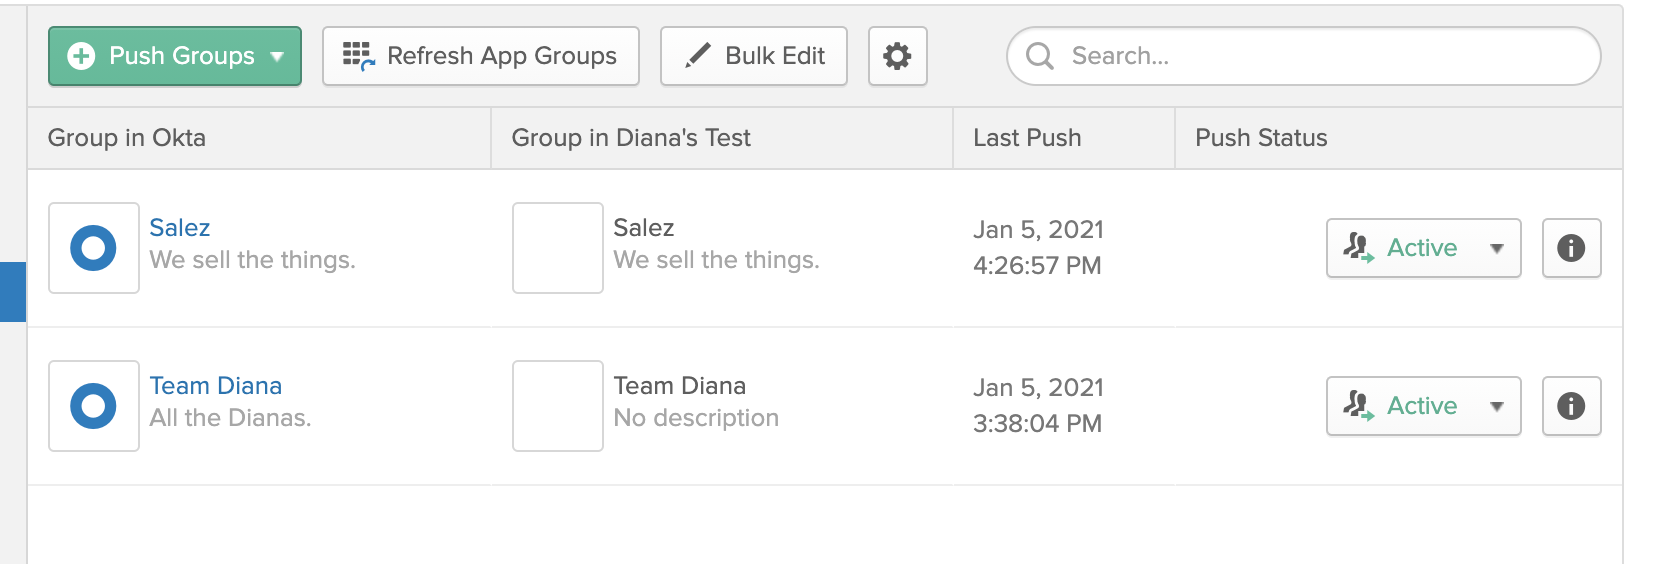
Note: Provisioning users and groups can take a few moments. To check on provisioning status from Okta, open your Provisioning activity log under Reports. You can also check the_ Teams page in your Sigma Admin Portal to confirm that your team has been created or linked.Note: To immediately push changes to a group at any time, select the Push now option from the group’s Push Status menu.
Push embed users with SCIM
You can use Okta (or other IdP) to push and sync both internal and embed users using SCIM through a custom user profile attribute in your IdP. This enables you to maintain separation of embed and internal users, while still managing them under the same IdP. Your internal users can access content from the native Sigma application or a Sigma embed, while your embed users can only access content from a Sigma embed. You must:
- Configure Sigma authentication as SAML only.
- Set up the web application hosting Sigma embed to leverage the same IdP.
- Disable automatic embed user generation.
- Generate JWTs with the
subclaim only.
- Generate JWTs with the
The following is an example using Okta to add a custom user profile attribute. To configure your user profile attributes:
-
In your Okta Admin Console access the Apps section of the Profile Editor page.
-
Select the user profile you want to apply a custom attribute for.
-
Configure these values on the custom attribute to differentiate internal and embed user:
Field Description Display name UserKind or User Kind. It's recommended that you use this as a naming convention, as it matches the fields in the Sigma API. External namespace Use this schema extension for embed users urn:sigma:scim:schemas:extension:2.0:UserEnum Select this checkbox to display and add attribute members. Attribute members Add your display names and values. Sigma expects these values to be: internalembedguest
Attribute members Select the Personal option -
Save the attribute to return to the Profile Editor page. Select the Mappings option.
-
Select the new custom attribute from the drop down menu.
-
Select the Apply mapping on user create and update option from the drop-down menu to apply the new custom attribute to the user profile.
-
Click Save Mappings.
For more information on applying new or custom account types, see Adding New Custom Account Types to Okta Using SCIM.
Troubleshooting tips and FAQ
Please reach out to Sigma Support with any questions during your configuration process.
(1) I added a new user to my Sigma application, but their account has not shown up in Sigma. What should I do?
- Was the user’s account added to Okta before you set up provisioning? If so, you must un-assign and re-assign the user to the application.
- Provisioning users and groups may take a few moments. To check on provisioning status from Okta, open your Provisioning activity log under Reports.
- In Okta, check for an error next to the user in the people’s list under the Assignments tab in your Sigma application.
- Does the user have a first name and last name listed in their Okta Profile?
(2) My Sigma organization has existing users and teams that were previously created through the Sigma Admin Portal. Will these be affected when I set up provisioning with Okta?
- No. Existing users and teams remain in Sigma; however, they are no longer editable through the Sigma Admin Portal.
- A user in Okta can be linked to an existing user with the same email address in Sigma. No work is lost, and Admin management of that user is now maintained through Okta.
- You may choose to link a group in Okta to an existing team in Sigma. No work is lost, and Admin management of that group/team is now maintained through Okta.
(3) My Sigma organization has existing users and teams that were previously created through the Sigma Admin Portal but are not part of my Okta organization. What options do I have?
- Option 1: Define the corresponding users and groups in Okta before turning on provisioning, so that Okta can link them together.
- Option 2: You can use Okta’s import feature. In the Import tab, click on Import Now. This scans for existing users and groups that are not defined in Okta but are present in Sigma. When Okta finishes scanning, it presents a list of users that it found in Sigma but not in Okta. For each user that it found, you can decide to create a new user in Okta, to link to an existing user in Okta or to ignore the user. It is suggested that you ignore the scheduler user that Sigma creates as part of your Sigma organization ([email protected]). Refer to Okta’s documentation about Import users for more information.
(4) I assigned users to my Sigma application in Okta prior to turning on provisioning. Their accounts are not appearing in Sigma. What should I do?
- Try un-assigning and reassigning these users to your Okta Sigma application.
(5) The Admin who originally set up our provisioning has left or taken on a new role (account deactivated, unassigned, or user type changed). Now we’re hitting errors when attempting to push data from Okta to Sigma. What happened?
- Provisioning is associated with the Sigma Admin who originally set up provisioning in Sigma. If you wish to remove or update this user’s account type, you must also remove and re-enable provisioning in Sigma with a new Admin user. This generates a new bearer token. Provide Okta with the updated bearer token (see enabling provisioning in Okta) and rerun any provisioning tasks that might have failed.
(6) Can I change a user’s user name?
- This action is not recommended. Changing a user’s username results in the creation of a new account in Sigma. It does not update the existing user’s username.
Limitations
- Importing groups from Sigma teams is currently unsupported. The group gets created in Okta but has no members. As a workaround, after the group is created as part of the import process which imports both users and groups, delete the group in Okta and then recreate the group with the appropriate members. Then, push the group into Sigma by creating a link with the corresponding team in Sigma.
- Importing users using the “link to an existing user in Okta” option is currently unsupported. As a workaround, please assign the Sigma app to the user you wish to link.