
Add version tags to workbooks and data models
Version tagging data models is a public beta feature that’s subject to quick, iterative changes. As a result, the latest product version may differ from the contents of this document. For more information, see Beta features.
Tagging workbook versions is generally available.
Add a tag to a workbook or data model version to create a read-only view of that version of the document. You can then share the tagged version with another team for their exclusive use, use the tagged workbook version to support an embed, or implement tagged versions for version control as part of a development lifecycle for a workbook or data model.
Tagging a workbook or data model version effectively publishes the document version at that particular point in time, but lets you continue iterating on the source document in a typical draft and publish workflow, without affecting the tagged version. For more details, see Version tagging workflow.
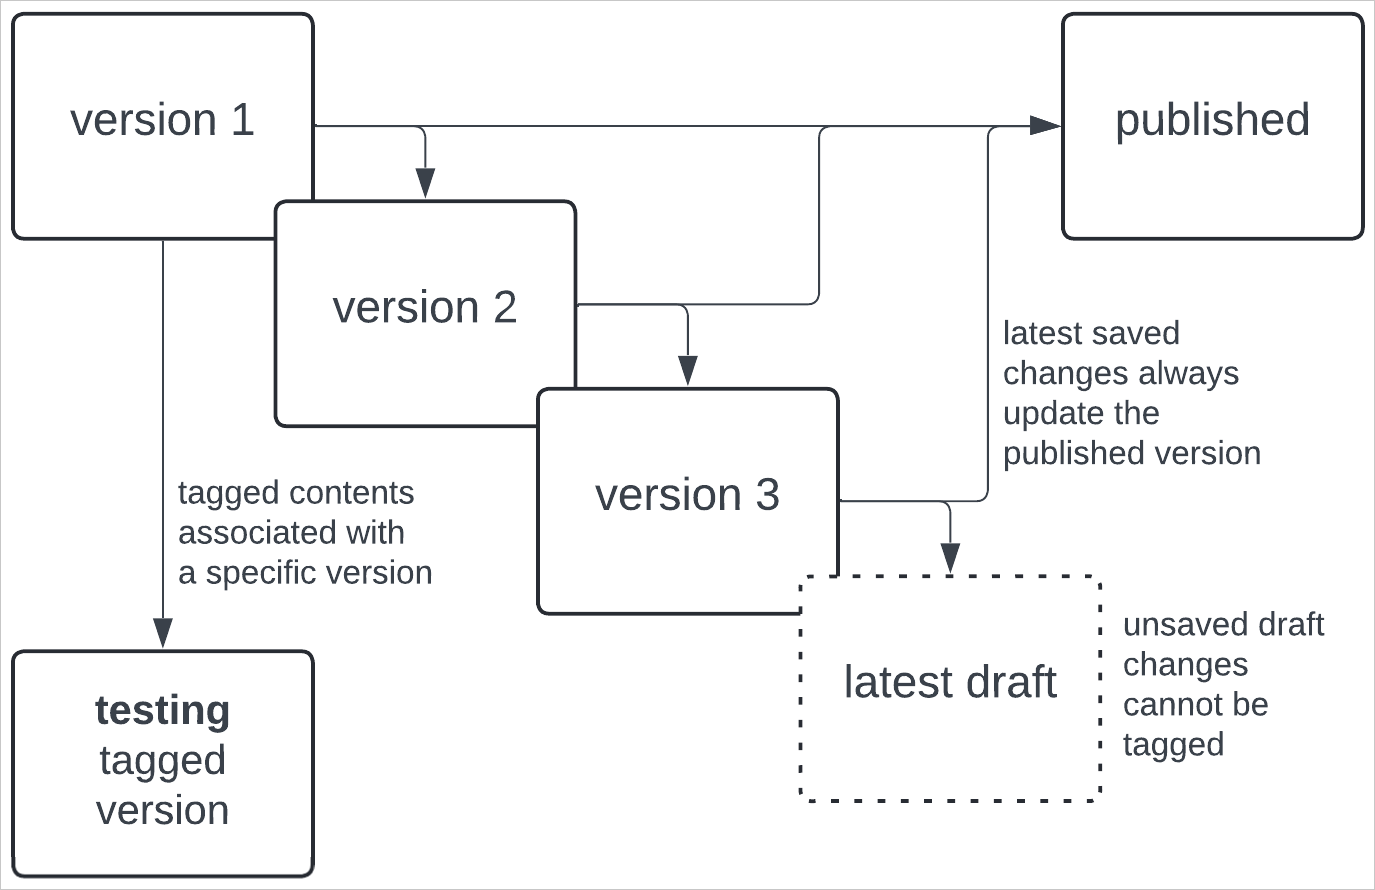
You can tag multiple versions of a workbook or data model, but you cannot have multiple versions of a document tagged with the same tag.
Admins can create and manage version tags, including creating protected tags that require an approval flow. See Create and manage version tags.
Version tagging workflow
All workbooks and data models have Draft and Published versions, and all changes made to a document are visible in the version history.
You can tag a specific document version to indicate something about the status of that document version. For example, tag a version of a workbook to indicate that the contents need to be reviewed for accuracy, or that it is ready to be used in production.
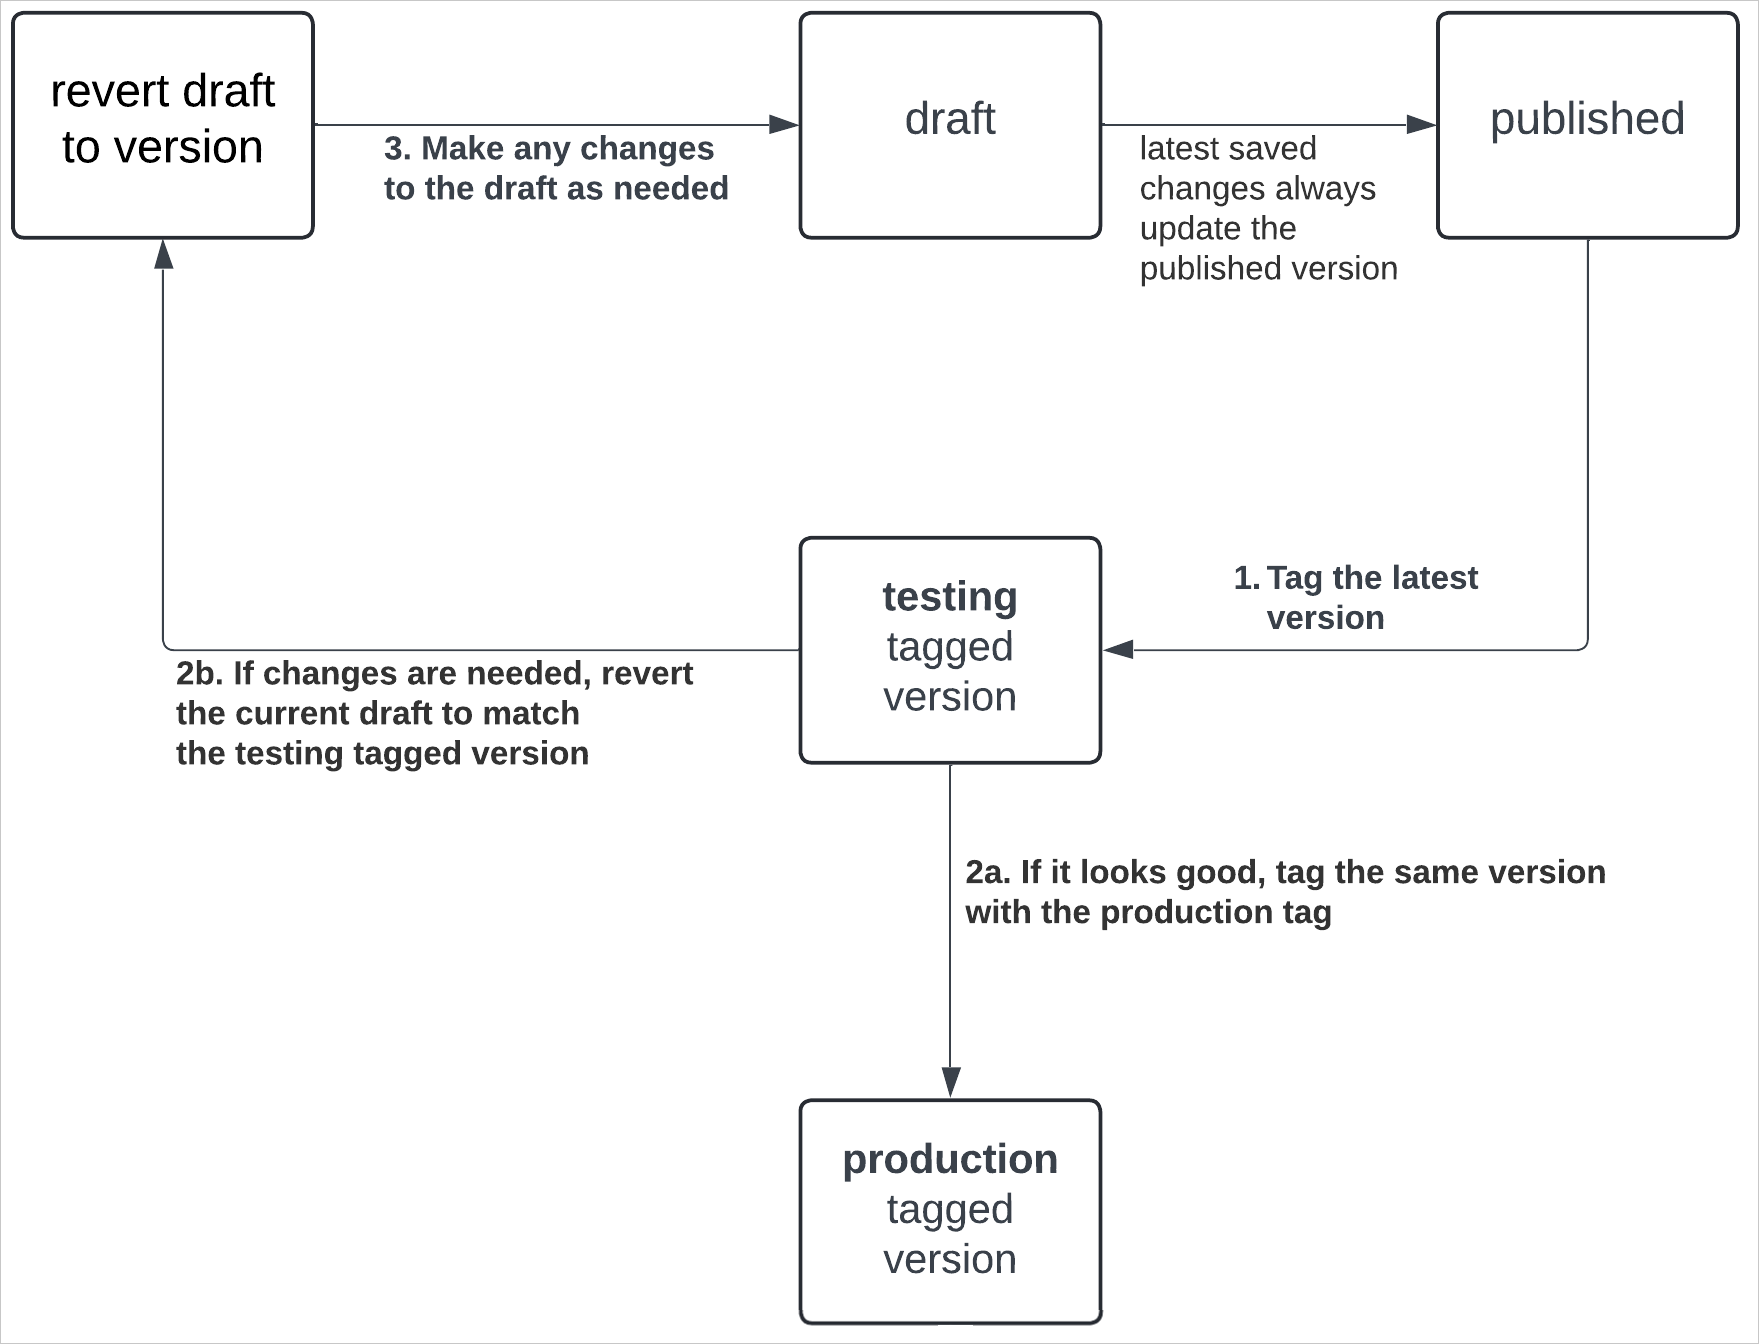
You can also version tag data model documents, and use a similar workflow to tag specific data model versions for testing or production use.
You can continue iterating on the draft version while the tagged version is being reviewed. Changes made to the untagged versions (draft and published) do not affect the tagged version. See Publish changes to a tagged workbook version for more details.
How version tagging affects datasets and data models
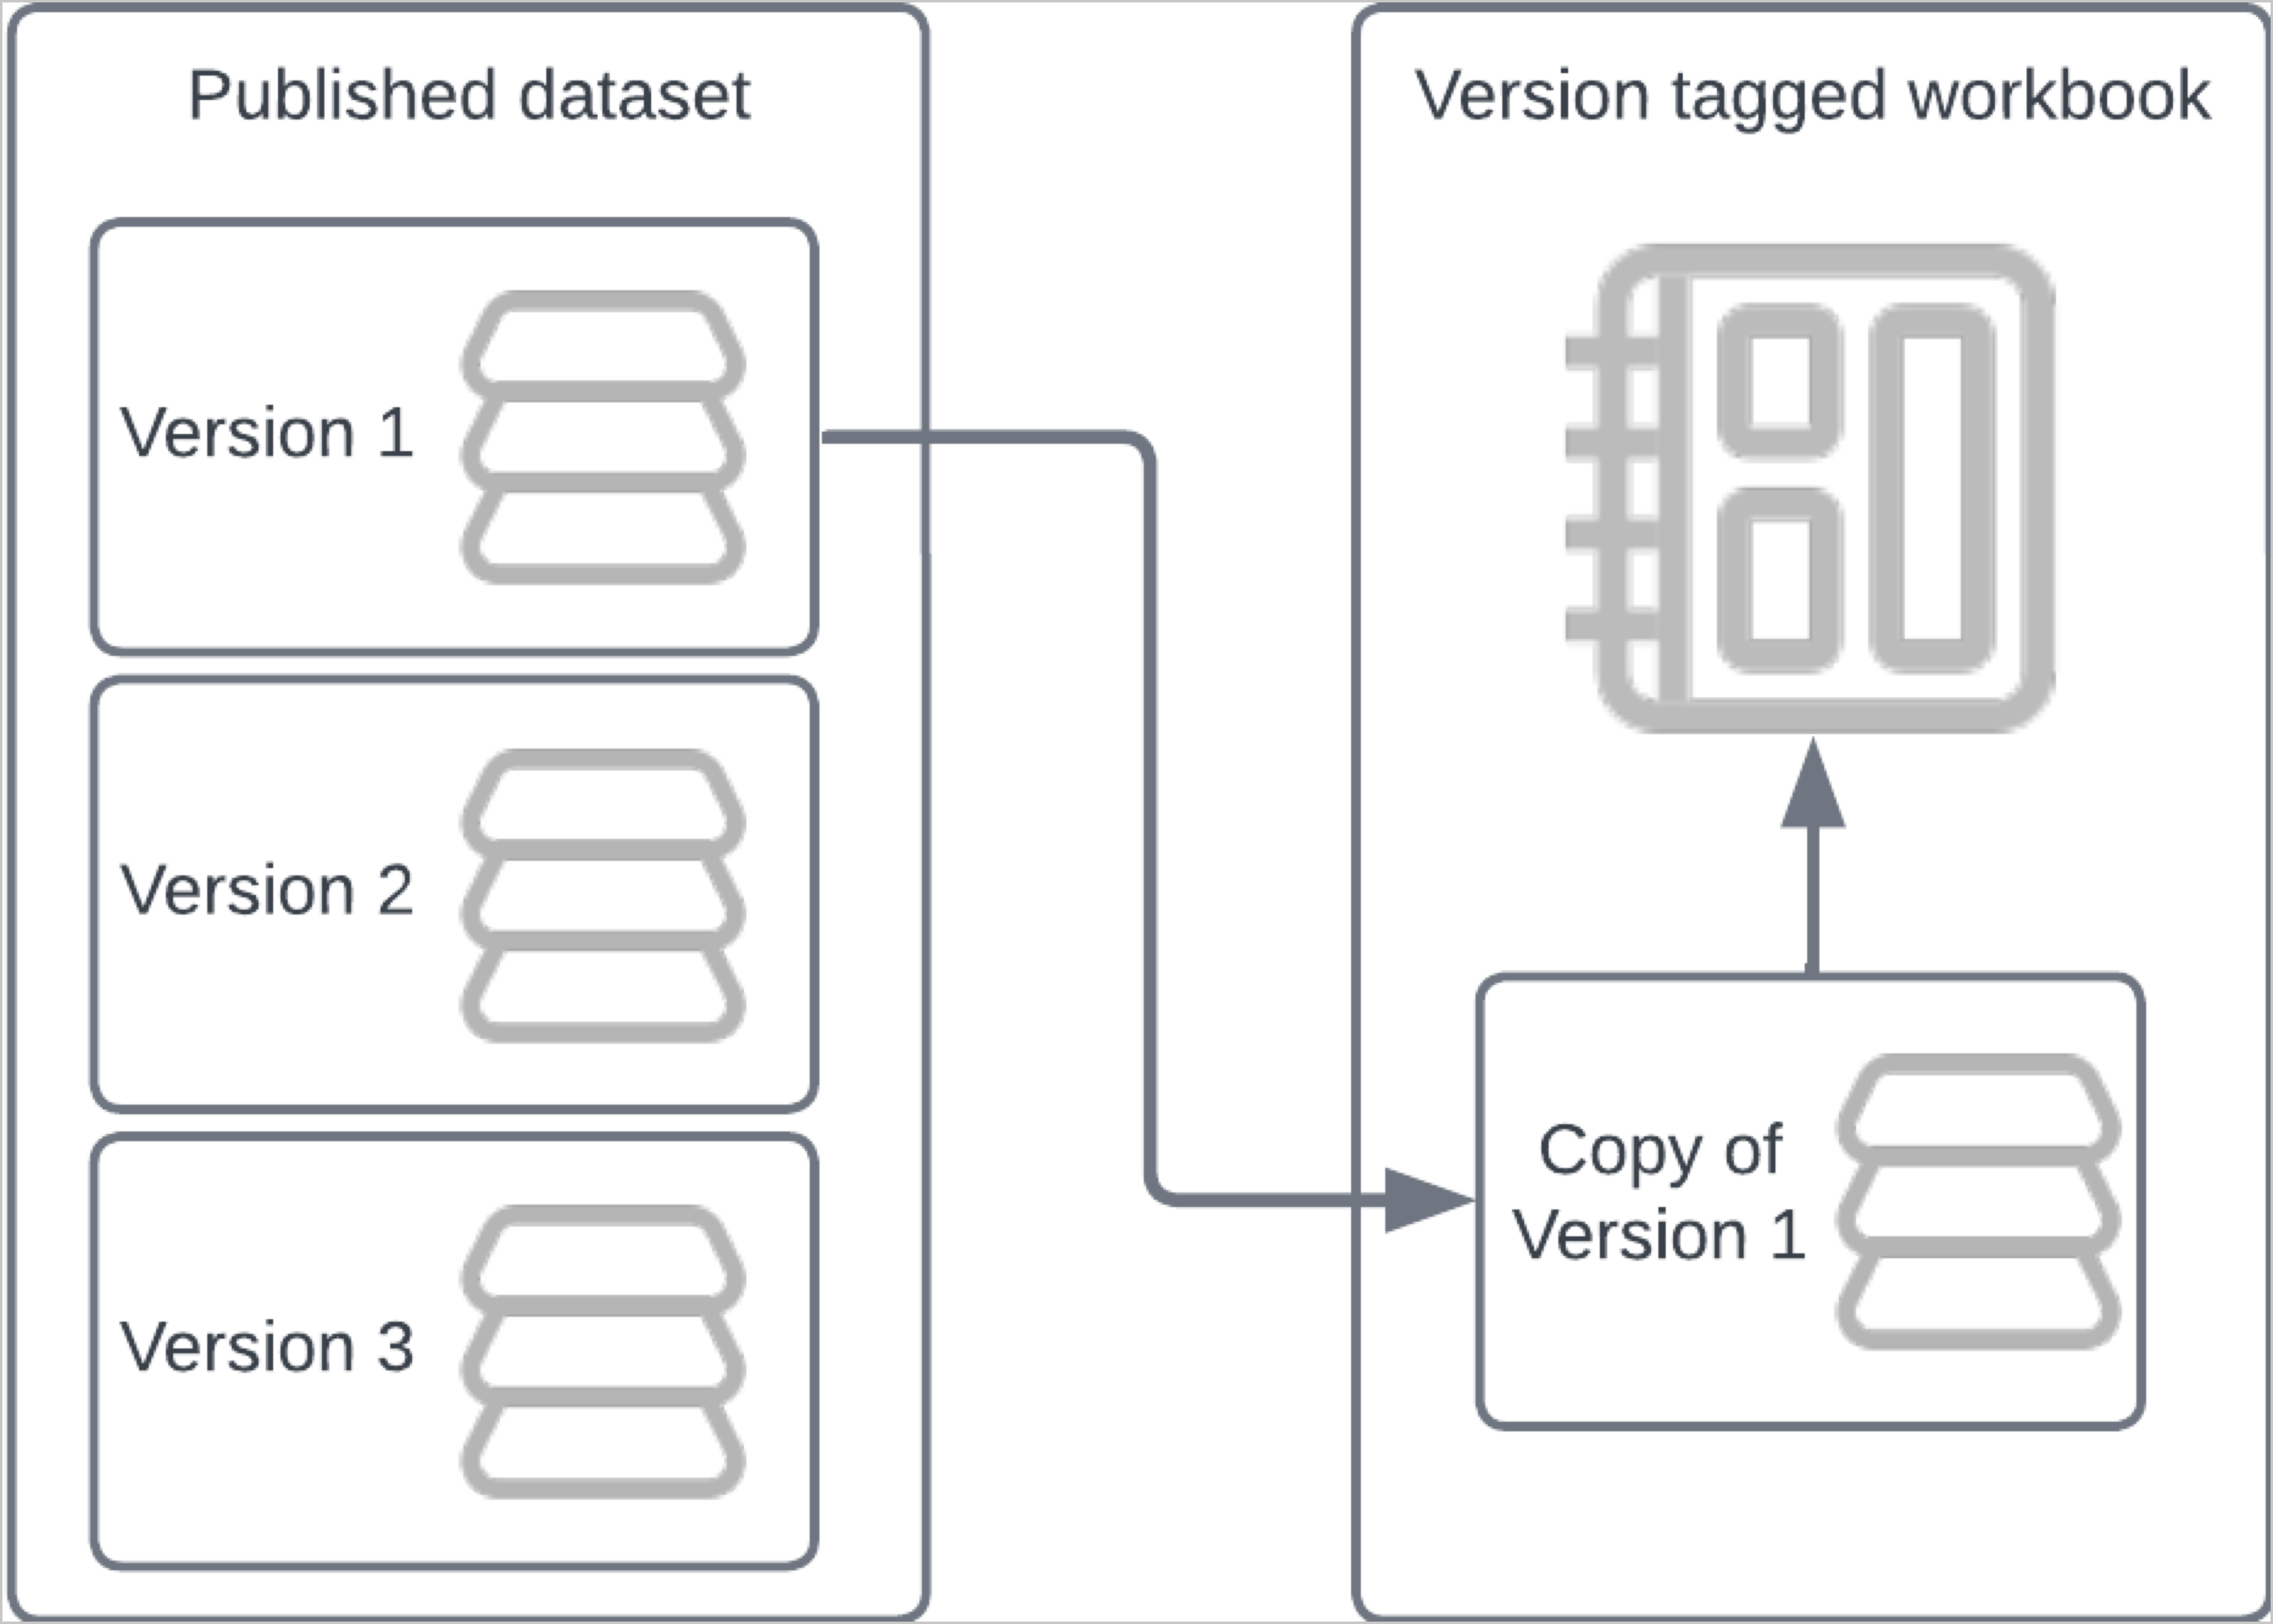
When you version tag a workbook that uses a dataset as the data source, a copy of the dataset version in use is created to use with the tagged workbook. The dataset associated with the tagged workbook no longer updates even if changes are made to the original dataset, effectively freezing the version of the dataset that was in use when the workbook version was tagged. The data source itself is not affected in any way by a version tag.
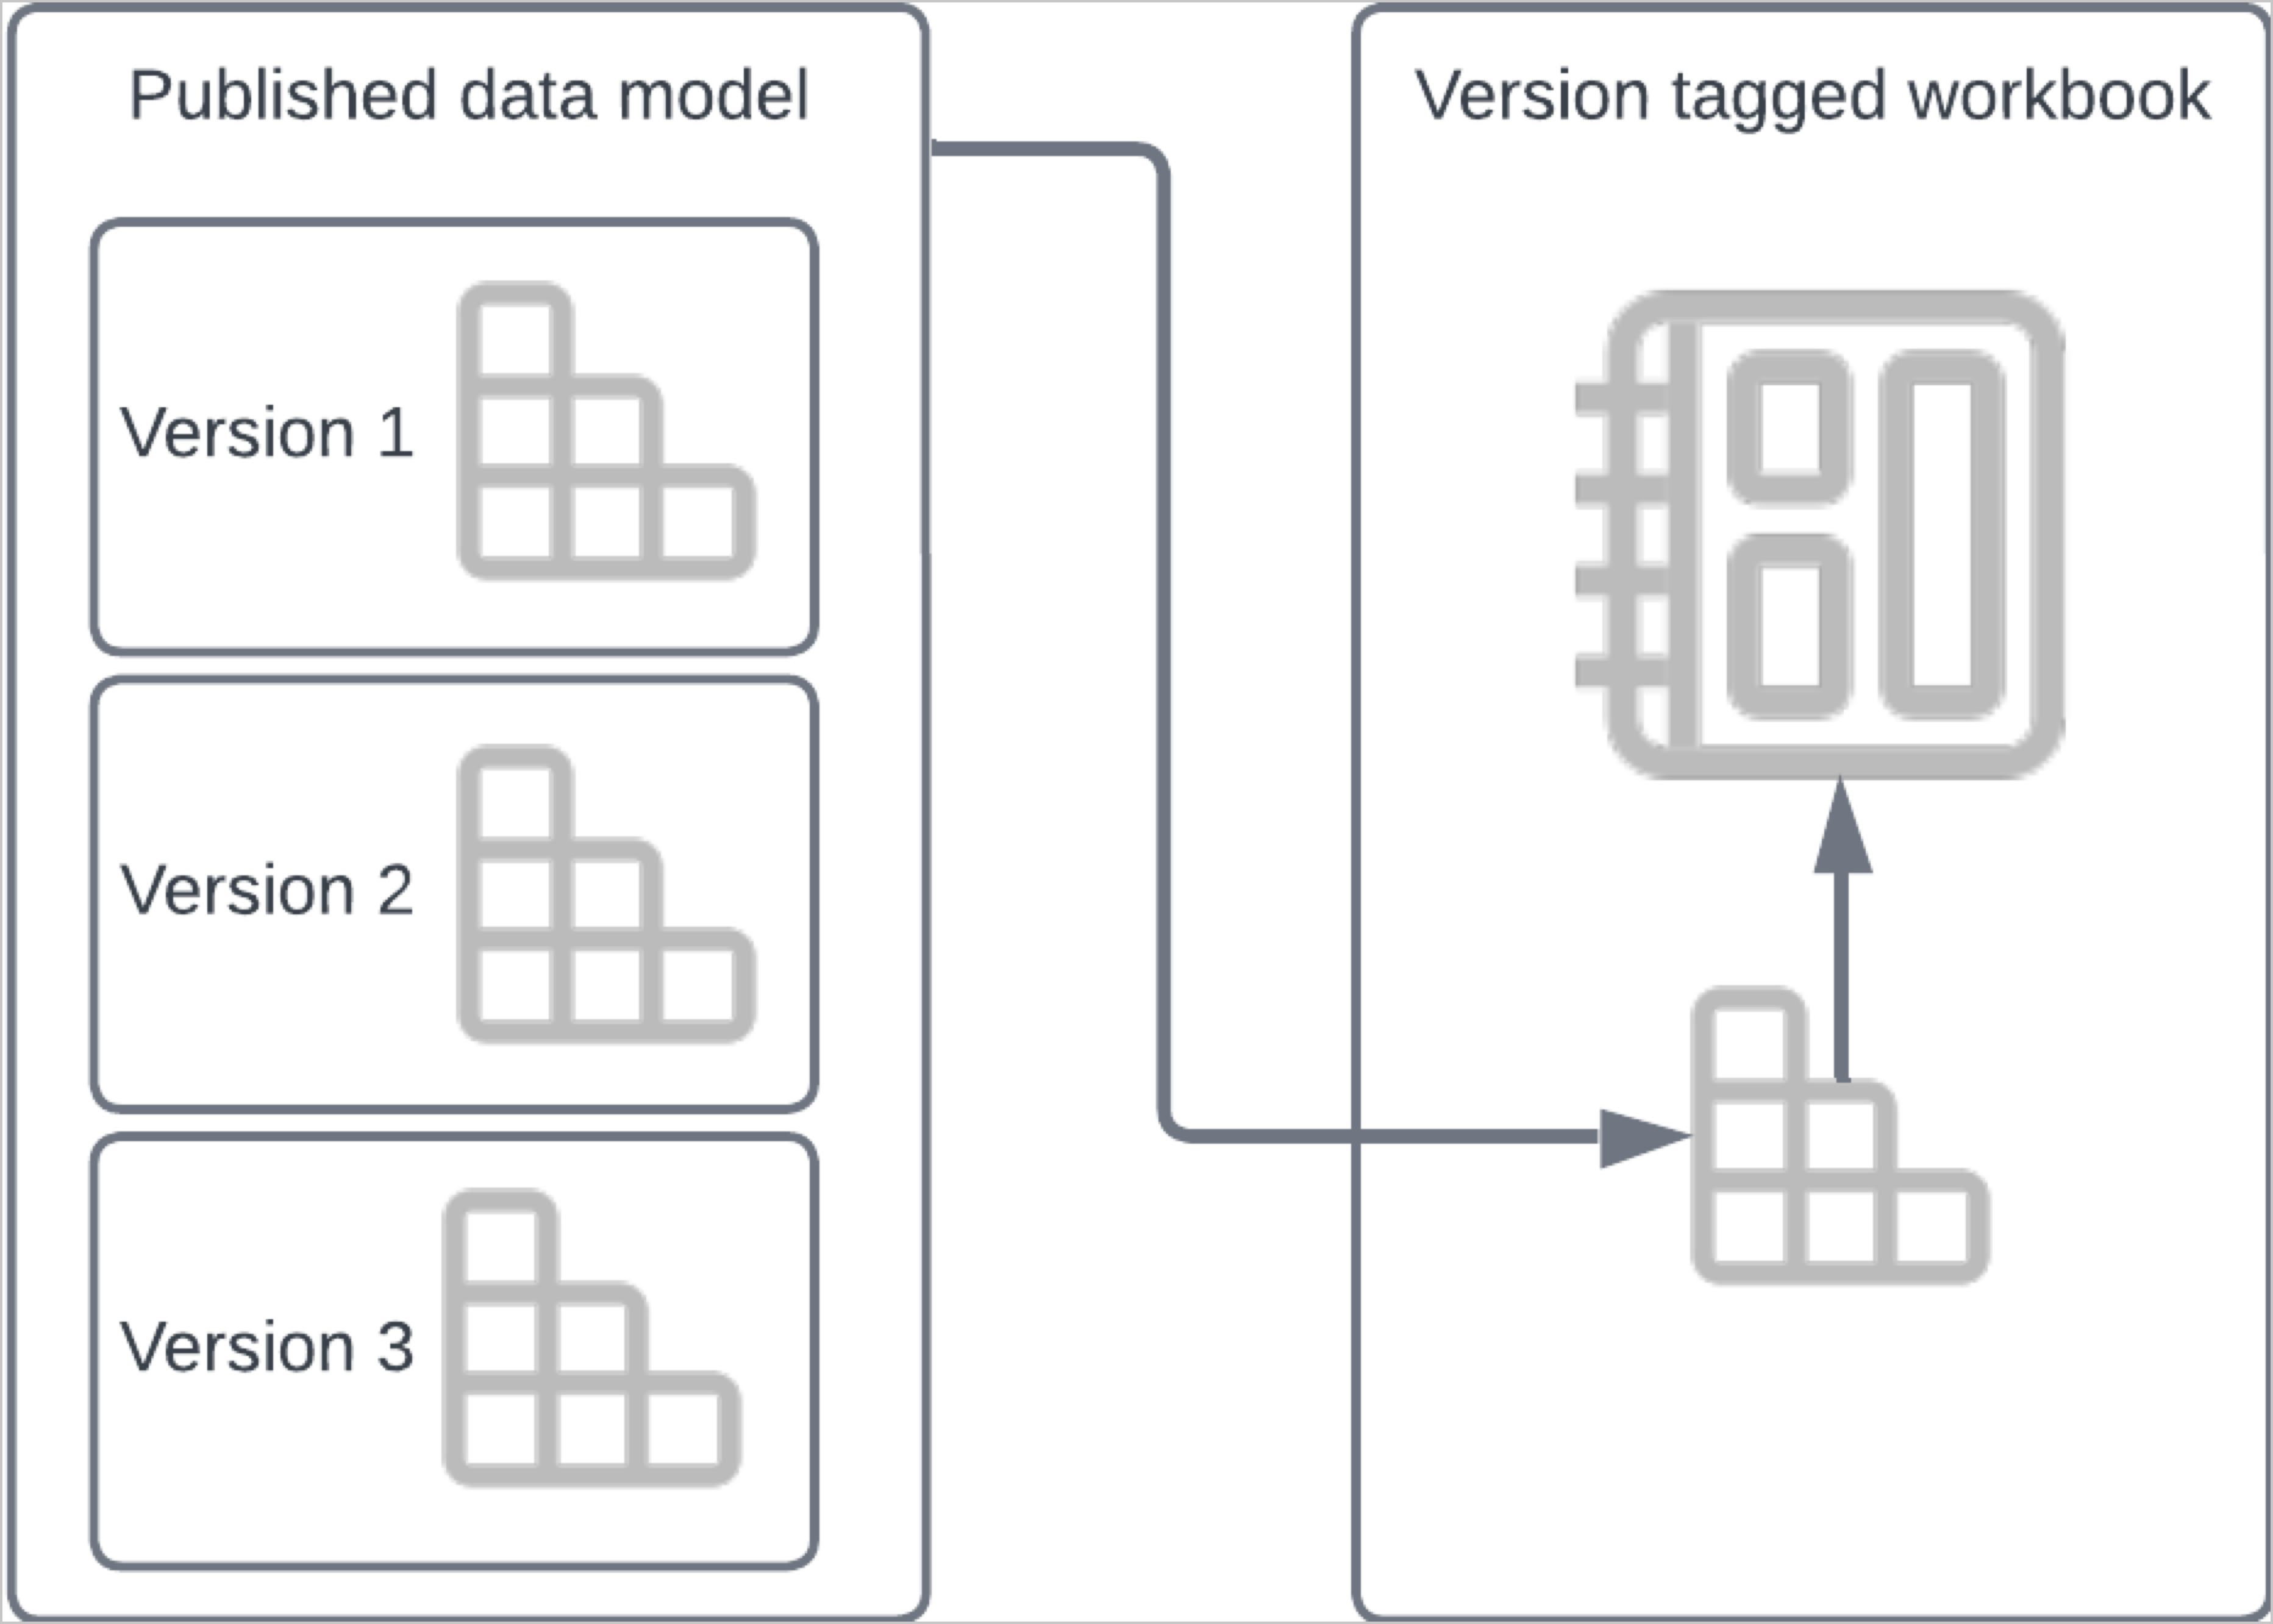
Workbooks that use a data model as the data source work differently. When you version tag a workbook that uses a data model as the data source, the workbook version is tagged but the data model version is not. Any future changes made to the data model, such as adding new columns or changing the data type of an existing column, are synced with the versions of the workbook that depend on the data model.
If you want to "freeze" the data model used as the data source of a tagged version of a workbook, you can tag both the data model and the workbook, and use the tagged data model as the data source for the tagged version of the workbook. See Swap the source of a tagged workbook version.
Version tagging embedded workbooks
If you embed your workbook, you can use version tags to manage promoting content between environments. For example, use "test" and "production" tags to help manage changes and protect the version that is used in production. You can then use a link directly to a tagged version in your embed. See Link to a tagged version of a workbook.
For more details about version tag workflows and restricting access to tagged versions of workbooks, see Publish changes to a tagged workbook and Share tagged versions of a workbook on this page.
For details about creating tags and protecting tags to enforce a request approval flow, see Create and manage version tags.
If you want to integrate version tagging in Sigma with the source control platforms already integrated with your development workflow, you can use the Sigma REST API. For a recipe, see QuickStart - Embedding 08: Version Tagging.
Version tagging and materialization
When you tag a version of your workbook that relies on a materialized data source, the tagged version might not use the materialized data source.
- Materialized dataset: The materialized dataset is not used by the tagged version of the workbook. Instead, the tagged version of the workbook relies on a copy of the dataset made when the tag was applied.
- Materialized data model: The materialized data model is used unless you use a tagged version of the data model, such as when swapping sources for the tagged workbook version. Tagged versions of data models cannot be materialized.
| Object | Is materialized version used? | Details |
|---|---|---|
| Dataset | The tagged version of the workbook uses a copy of the dataset instead of the original dataset. | |
| Data model | The tagged version of the workbook uses the data model, remaining in sync with any changes made to the data model and using the materialized results. | |
| Tagged data model | The tagged version of the workbook uses a tagged version of the data model, which cannot be materialized at this time. |
See Materialization for more details on materialization.
Tag a workbook or data model version
You can tag a version of a workbook or a data model. When you tag a document, you create a read-only version of the document that you can then share with others or embed.
User requirements
To tag a document version, the following must be true
- Your user is granted Can Edit permissions on the document.
- The account type assigned to your user is granted the Apply Tag and Create, edit, and publish workbooks permissions.
Some tags might be protected and require additional permissions to set on a document. To set a protected tag, you must also be an admin or be granted access to set the protected tag. If you do not have access to set the protected tag, you can send a request for it to be added.
Set a tag on a document
To set a tag on a document, follow these steps.
-
Open the document and locate the version that you want to tag:
- To tag the latest published version of the document, click the caret (
 ) next to the document name and select Tag this published version. If the document is in draft and has unpublished edits, you instead see Tag latest published version.
 - To tag the latest draft of the document, while editing the document, select the caret () next to the document version and select Tag this version.
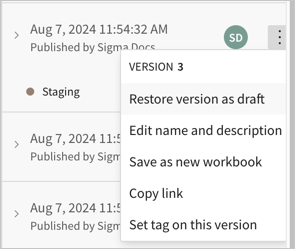
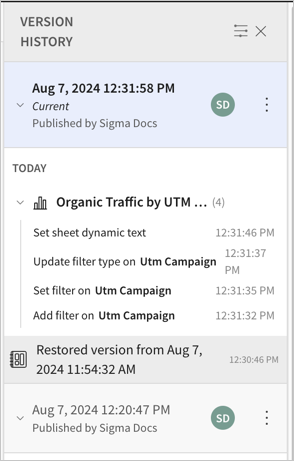
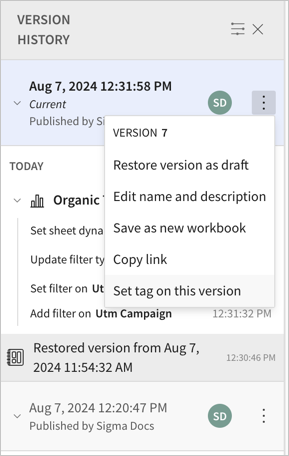
- To tag a specific version of the document, open the version history of the document by selecting the caret next to the document name > Version history, then locate the version you want to tag. Click
 More > Set tag on this version.
The Set Tag on Version modal appears.
- To tag the latest published version of the document, click the caret (
-
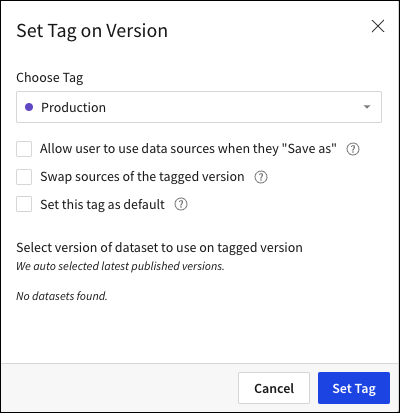
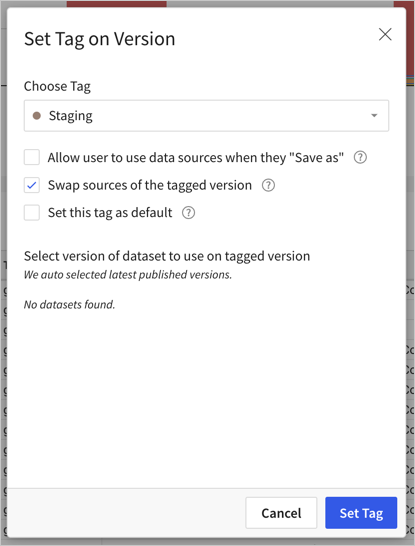
For Choose Tag, select a tag.
If you choose a protected tag that you do not have permission to apply, you're prompted to send a request to approvers for the tag:
-
For Why are you requesting to set this tag?, enter the message you want to include in the email request.
-
Click Request Tag on Version.
Sigma sends an email to members that can approve the request.
-
-
For a version tagged workbook, if you want to grant Can view permissions on the data sources used in the workbook, select the checkbox for Allow user to use data sources when they "Save as". If this checkbox is not selected, users can access the tagged version of the workbook without data.
-
If you want the tagged version of the document to use a different data source (whether a connection, database, table, or data model or dataset), select the checkbox for Swap sources of the tagged version. See Swap the source of a tagged version.
If your workbook contains input tables or tables created through CSV uploads, do not choose this option. These elements cannot be migrated across connections.
-
If you want users that only have access to the tagged version of the document to open the tagged version by default, select the checkbox for Set this tag as default.
-
Click Set Tag.
If your workbook has an input table, the tagged version of the workbook contains an empty copy of the input table that is separate from the input table in the source workbook. If you want to include the data present in the source workbook input table in the version tagged version, you must:
- Change the data entry permission for the input table to allow editing only on the published version in view/explore mode.
- Apply the version tag.
- Manually copy and paste the data into the empty table.
Set a default version tag for a document
When you apply a tag to a workbook or data model, you can set the tag as the default. The default tag determines what version of a document is displayed by default to a user who does not have access to the Published version. If a user does have access to the Published version, the Published version takes precedence over the default tag.
Workbooks that have no default tag set load the latest created tag that the user has access to, if the user does not have access to the Published version of the document.
Any user with edit access to the document can set a tag as the default.
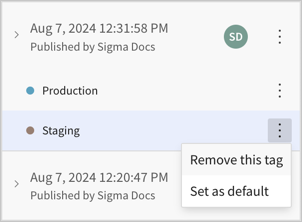
To remove a tag as default without replacing it with a different default tag, follow these steps:
- Click the caret () next to the version name.
- Click View version history.
- Next to the default version tag, select More.
- Click Remove as default.

Remove a tag from a document version
When you remove a tag from a workbook or data model version, the version is still accessible from the version history, but anyone who only has access to the tagged version of the document loses access to the document.
You might remove a tag from a document version if you tagged the wrong document version or if you want to restrict access to users that only have access to the tagged version. If you want to update a tagged version, see Publish changes to a tagged workbook version
To remove a tag from a document version:
- Open the document.
- From the document header menu, select the caret > Version history.
- [optional] To collapse the details changes for each version, select the caret next to the most recent version.
- Locate the tagged version and select More > Remove this tag. The tagged version is shown on the canvas when you remove the tag.
Swap the source of a tagged workbook version
If your workbook contains elements from multiple data sources, you cannot swap the source of the tagged workbook version.
To swap the source of a tagged workbook version, for example to use a test data connection for a workbook tagged "testing" and swap to a production data connection for a workbook tagged "production", follow these steps. The steps are different if your workbook uses a data model for the data source or not:
- Swap the data model source used by a tagged workbook version.
- Swap the dataset or connection source used by a tagged workbook version.
For more details about changing a workbook data source, see Change the data source for a workbook or element.
Swap the data model source used by a tagged workbook version
If your workbook uses a data model as the data source and you want the tagged workbook version to use a different data source than the published version, first tag the data model and swap the source of the tagged data model, then tag the workbook and use the tagged data model as the source.
If the data model used by the workbook as a data source is based on another data model, tag the source data model as well.
By swapping the data connection source based on a tagged version of the data model, instead of the tagged version of the workbook directly, you can more easily manage and control access to data sources.
Tag the data model and swap the source
-
Open the data model for editing, then choose the version to tag:
- To tag the latest published version of the document, click the caret () next to the document name and select Tag this published version. If the document is in draft and has unpublished edits, you instead see Tag latest published version.
- To tag the latest draft of the document, while editing the document, select the caret () next to the document version and select Tag this version.
- To tag a specific version of the document, open the version history of the document by selecting the caret next to the document name > Version history, then locate the version you want to tag. Click More > Set tag on this version.
The Set Tag on Version modal appears.
- To tag the latest published version of the document, click the caret (
-
For Choose Tag, choose a tag to apply to the data model. For clarity, choose the same tag that you plan to use with the workbook.
-
Select the checkbox for Swap sources of the tagged version.
-
Click Set Tag.
-
In the Modify sources modal, in Sources of tagged data model, select a new data source to use for the tagged version.
-
Select Swap and Tag.
Tag the workbook and swap the source to the tagged data model
-
Open the workbook for editing, then choose the version to tag:
- To tag the latest published version of the document, click the caret () next to the document name and select Tag this published version. If the document is in draft and has unpublished edits, you instead see Tag latest published version.
- To tag the latest draft of the document, while editing the document, select the caret () next to the document version and select Tag this version.
- To tag a specific version of the document, open the version history of the document by selecting the caret next to the document name > Version history, then locate the version you want to tag. Click More > Set tag on this version.
- To tag the latest published version of the document, click the caret (
-
For Choose Tag, choose the tag to apply to the workbook version.
-
Select the checkbox for Swap sources of the tagged version.
-
Click Set Tag.
-
In the Modify sources modal, for Sources of tagged workbook open the drop-down menu and choose the corresponding tagged version of the data model.

-
Select Swap and tag
Swap the dataset or connection source used by a tagged workbook version
To select a different connection path, database, or schema for a tagged workbook version, do the following:
-
Open the workbook for editing, then choose the version to tag:
- To tag the latest published version of the document, click the caret () next to the document name and select Tag this published version. If the document is in draft and has unpublished edits, you instead see Tag latest published version.
- To tag the latest draft of the document, while editing the document, select the caret () next to the document version and select Tag this version.
- To tag a specific version of the document, open the version history of the document by selecting the caret next to the document name > Version history, then locate the version you want to tag. Click More > Set tag on this version.
- To tag the latest published version of the document, click the caret (
-
For Choose Tag, choose the tag to apply to the workbook version.
-
Check Swap sources of the tagged version and click Set Tag.
-
In the Modify sources modal, click the dropdown under Sources of Tagged Workbook to change the data source.
-
[optional] To choose a different database or schema in the selected connection, hover over the database or schema name and select Modify to choose a different database or schema, then select Confirm.
-
Click Swap and tag.
The tagged version of the workbook is updated to use the new connection. If your workbook uses a dataset, a copy of the dataset is created on the new connection.
Publish changes to a tagged workbook version
If you want to make changes to a tagged version of a workbook, you must first return the tagged version to a draft state, then make changes and re-tag the version.
For example, if you follow a development lifecycle where you tag a workbook version with the "testing" tag before tagging a workbook with the "production" tag to indicate that it is ready to use in production, you might want to iterate on the testing tag.
To update the "testing" tagged version of the workbook, do the following:
- Open the workbook for editing.
- Open the version history for the workbook.
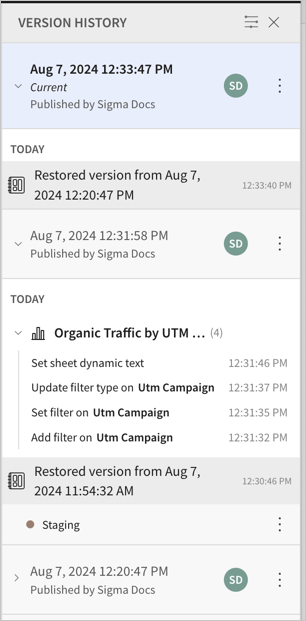
- Locate the tagged version and select the date of the associated version to open it.
- For the version, select More > Restore version as draft.
- Make your desired changes in the draft.
- When you finish making changes, publish your changes.
- In the workbook header menu, open Version history if it is no longer open.
In the version history, you see a line item for Restored version from <date>, then additional changes listed above that version. - For the current version that contains your changes, select More > Set tag on this version.
The latest version is tagged, and the contents are updated to match.
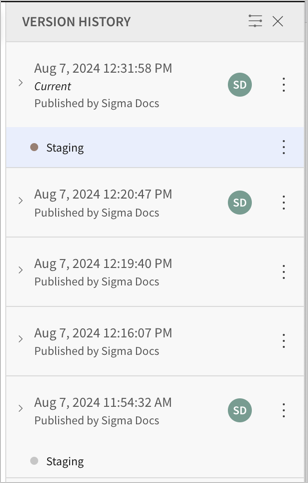
The version that was previously tagged is listed with a grayed-out version of the version tag.
- If you had other changes that you want to preserve, return to the version before you restored the tagged version as the latest draft, and select More > Restore version as draft.
Do not remove the testing tag from the previous version. If you do so, anyone that has access only to that tagged version of the workbook will lose access. If you re-tag a different version, sharing is preserved.
Update a tagged version to use another tag
For example, if you want to promote a tagged workbook version from the "staging" version tag to the "production" version tag, do the following:
- Open the workbook for editing.
- Open the version history for the workbook.
- Locate the tagged version and select the date of the associated version to open the tagged version.

- In the workbook header, select the version menu () and select Move tag to, then select the "Production" tag.
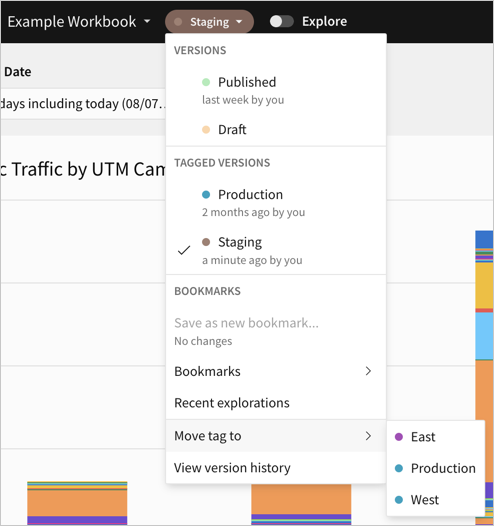
- In the Set tag on version modal, select any relevant options, then select Set Tag.
The "Production" tag is added to the version. - Next, remove the "Staging" tag from the version. In the version history, locate the "Staging" tag, then select More > Remove this tag.
- In the modal, acknowledge that users granted access only to this tagged version, or embeds that use the link to the tagged version, lose access to the tagged version after removing the tag by selecting Remove.
The version appears with a current tag of "Production" and a previous tag of "Staging".
Share tagged versions of a workbook or data model
To control what users and teams can see in a given workbook, or what version of a data model users can access, share a tagged version with a user or a team.
Tagged versions of data models are not available to Ask Sigma. If an admin chooses a data model to include in the data sources available to Ask Sigma, only the Published version of that data model is available, and only users who have access to the Published version can receive answers from Ask Sigma that reference that data model. For more information, see Configure AI features for your organization.
When you share a document with access only to a specific version tag, you effectively revoke access to the published version of the document and limit access only to the shared tagged versions. You can use tagged versions like a published version of a document for a given user or team.
For example, you can make a version of a Sales workbook that is filtered entirely on the East region, tag that version with East, then share that tagged version with the Sales - East team. They then have view (and explore) access to that version of the workbook, but cannot make any changes to the source workbook.
If the tagged version of a workbook allows users to access the data source, users with Can explore permissions on the tagged version of a workbook can select Save As and save a copy of the version tagged workbook for editing.
To share a tagged version of a workbook or data model, do the following:
To share a document, you must have Can edit access to the workbook.
- Open the document.
- In the document header, click Share (icon).
- In the Share modal, search or browse to find the team or user with whom you want to share the tagged version of the document.
- Click the Permission drop-down menu, then hover over a permission to select a tag on the workbook to which to grant access. Select All (default) to share all versions of the workbook with the user or team.
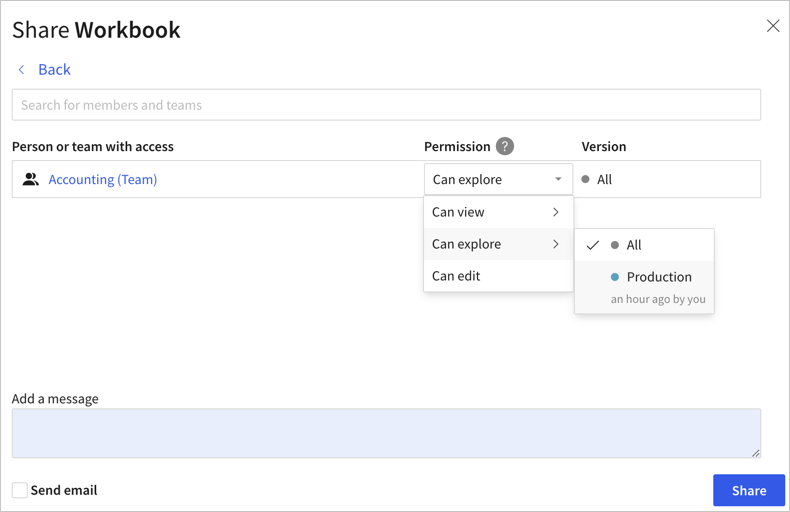
- Click Share.
If you remove a tag from a document version, users and teams with access only to that tagged version of the document lose access to the document.
For more details on sharing workbooks, see Share a Workbook.
Restrict access to a folder using a version tag
If you use version tagging to manage access to documents, you can set up a workspace or folder to manage access more easily.
You can share a workspace or folder with a user or teams, and grant those users or teams access to a specific tag. If you do so, workbooks or data models in that workspace or folder must have that tag applied to be accessible to those users or teams.
For example, if you have a sales organization that covers 5 regions, you can create a workspace for each region and grant each sales team Explore access to their workspace with a tag for their region:
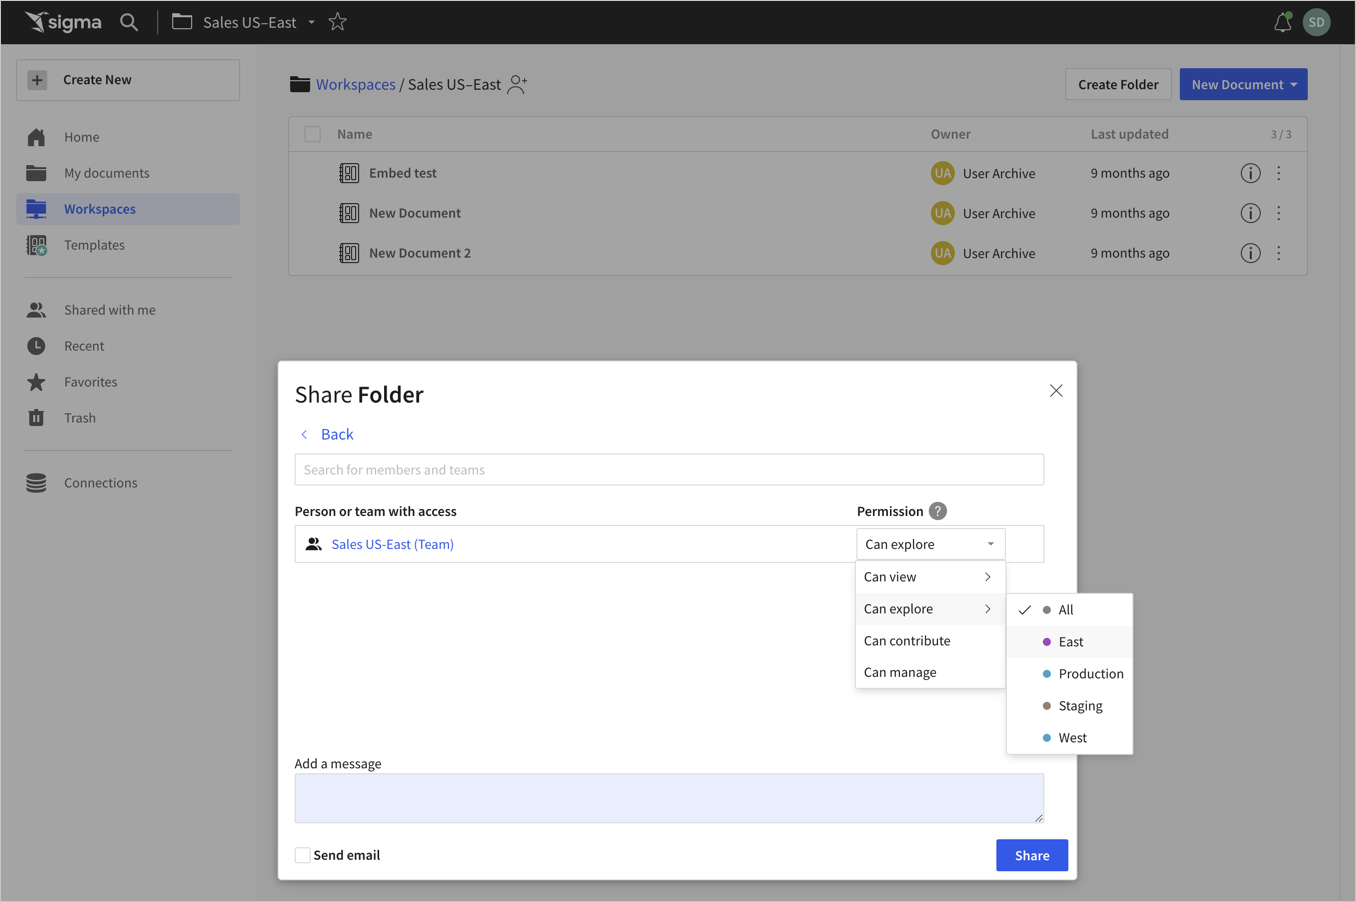
If you do so, all workbooks in the workspace must have a version tagged accordingly. In this example, all workbooks in the Sales US-East workspace must have a version tagged East so that the members of the Sales US-East team can view and explore the East versions of the workbooks.
If you grant elevated permissions on the workspace to the team members, such as Can contribute or Can manage, those team members can access all versions of documents in the workspace.
Permissions set at the workspace and folder level are inherited by the workbooks and documents in the workspace or folder. See Share a folder for more.
Link to a tagged version of a workbook
If you want to link directly to a tagged version of a workbook, for example to embed the tagged version of the workbook, reference the tag name in the URL.
For example, if you add a staging tag to a workbook, the URL for the workbook version tagged with staging contains the following:
/workbook/My-Workbook-{workbook_id}/tag/staging
The same construct applies for embeds. The staging tag is appended to the URL:
/embed/{embed_id}/tag/staging
Like other URL parameters, version tag names with a space or special characters are encoded. For example, staging%20copy for a version tag named "Staging Copy". See Embed URL parameters.
Updated 20 days ago