> For clean Markdown of any page, append .md to the page URL.
> For a complete documentation index, see https://help.sigmacomputing.com/llms.txt.
> For AI client integration (Claude Code, Cursor, etc.), connect to the MCP server at https://help.sigmacomputing.com/_mcp/server.
# Configure user attributes
> Configure user attributes in Sigma for row-level security, dynamic connection roles, and customized team and embed experiences.
Set up user attributes to manage row-level security in data models and workbooks, [dynamically assign roles used by a connection](/docs/dynamically-assign-roles-used-by-a-connection) associated with a Sigma user, or other customized experiences for Sigma teams, users, and embed users.
For details about setting up row-level security, see [Set up row-level security](/docs/set-up-row-level-security).
You can use the Sigma REST API to programmatically create and assign user attributes. See [Create a user attribute](/reference/create-user-attribute) and review the available endpoints.
## Requirements
* You must be assigned the Admin [account type](/docs/account-type-and-license-overview)
## Create a user attribute
To create a user attribute, do the following:
1. In the Sigma Admin portal, select **User Attributes**.
2. Click **Create Attribute**.
3. In the **New Attribute** section, enter a unique name in the **Name** field.
4. \[optional] In the **Description** field, describe the attribute.
5. \[optional] In the **Default Value** field, enter a default value. If no value is set for a user or team, Sigma uses the default value.
If you set a default value, the attribute is assigned to everyone in the organization.
6. Click **Create**.
## Assign user attributes
To assign a user attribute to a user or team, do the following:
1. In the Sigma Admin portal, select **User Attributes**.
2. Select the user attribute that you want to assign.
3. In the **Attribute Assignment** section, click **Assign Attribute** to assign this attribute to teams or users.
4. In the search bar, search for teams or users to assign this attribute to, then choose a user or team.
5. In the **Assigned Value** field, assign a value.
For example, for a `Region` user attribute, assign the Sales US-South team the value `South`.
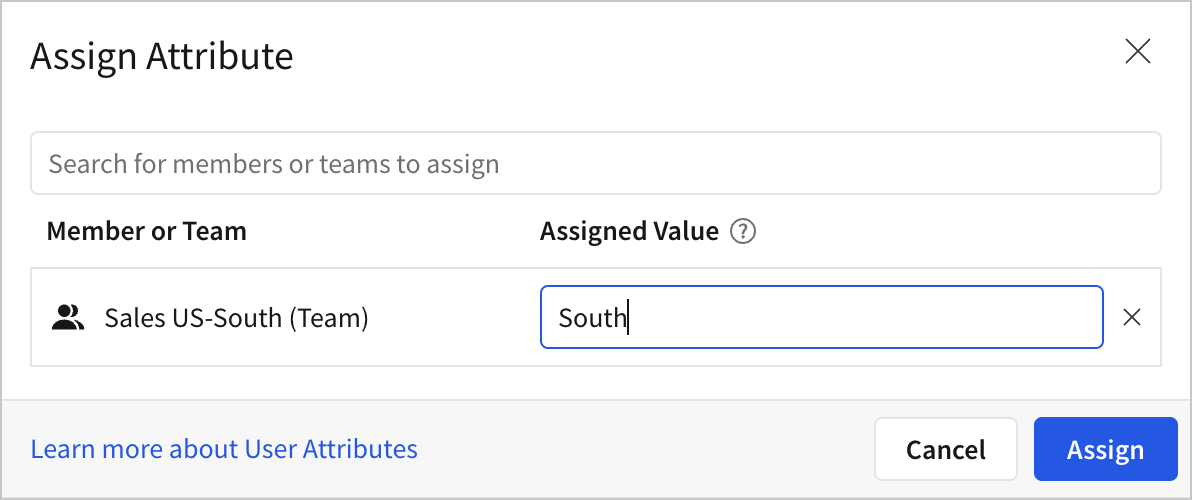
6. Click **Assign**.
The teams and users assigned user attribute values appear on the **Teams Assigned** and **Members Assigned** tabs.
## Manage user attributes
You can change the priority of assigned attributes, edit the value of an assigned attribute, unassign an attribute, or edit or delete an attribute.
### Change the priority of assigned attributes
User attributes take effect in priority order, from top to bottom of the list. If a user is a member of multiple teams, make sure that the teams are in the correct order to match the expected attribute assignment for your use case. Values assigned directly to users override values assigned to teams.
To reorder the priority of teams, do the following:
1. In the Sigma Admin portal, select **User Attributes**.
2. Select the user attribute that you want to assign.
3. In the **Attribute Assignment** section, select the **Teams Assigned** tab.
4. Locate the team that you want to reorder, then select the drag handle ( ) to drag and drop the team to the correct priority in the list.
### Edit the value of an assigned attribute
To change the value of an assigned attribute, do the following:
1. In the Sigma Admin portal, select **User Attributes**.
2. Select the user attribute that you want to unassign.
3. In the **Attribute Assignment** section, select **Teams Assigned** or **Members Assigned** and locate the user or team.
4. Select
) to drag and drop the team to the correct priority in the list.
### Edit the value of an assigned attribute
To change the value of an assigned attribute, do the following:
1. In the Sigma Admin portal, select **User Attributes**.
2. Select the user attribute that you want to unassign.
3. In the **Attribute Assignment** section, select **Teams Assigned** or **Members Assigned** and locate the user or team.
4. Select  **More**, then select **Edit value**.
5. In the modal that appears, update the value, then click **Assign**.
### Unassign an attribute
To unassign an attribute for a team or user, do the following:
1. In the Sigma Admin portal, select **User Attributes**.
2. Select the user attribute that you want to unassign.
3. In the **Attribute Assignment** section, select **Teams Assigned** or **Members Assigned** and locate the user or team.
4. Select **More**, then select **Unassign**.
The attribute is immediately unassigned.
### Edit an attribute
You can edit the name, description, or default value of a user attribute. If you change the name, existing row-level security formulas evaluate to `null`.
To edit a user attribute, do the following:
1. In the Sigma Admin portal, select **User Attributes**.
2. Select the user attribute that you want to edit.
3. To edit the user attribute, click **Edit**, then update the name, description, or default value for the attribute.
4. Click **Save**.
### Delete an attribute
You can delete a specific user attribute, or multiple. If you delete a user attribute, existing row-level security formulas evaluate to `null`.
To delete a specific user attribute:
1. In the Sigma Admin portal, select **User Attributes**.
2. Select the user attribute that you want to delete.
3. To edit the user attribute, click **Delete Attribute**.
4. Review the confirmation modal, then click **Delete**.
To delete multiple user attributes:
1. In the Sigma Admin portal, select **User Attributes**.
2. For each attribute that you want to delete, select the checkbox. To select all, select the checkbox next to **Name**.
3. Select **Delete** (
**More**, then select **Edit value**.
5. In the modal that appears, update the value, then click **Assign**.
### Unassign an attribute
To unassign an attribute for a team or user, do the following:
1. In the Sigma Admin portal, select **User Attributes**.
2. Select the user attribute that you want to unassign.
3. In the **Attribute Assignment** section, select **Teams Assigned** or **Members Assigned** and locate the user or team.
4. Select **More**, then select **Unassign**.
The attribute is immediately unassigned.
### Edit an attribute
You can edit the name, description, or default value of a user attribute. If you change the name, existing row-level security formulas evaluate to `null`.
To edit a user attribute, do the following:
1. In the Sigma Admin portal, select **User Attributes**.
2. Select the user attribute that you want to edit.
3. To edit the user attribute, click **Edit**, then update the name, description, or default value for the attribute.
4. Click **Save**.
### Delete an attribute
You can delete a specific user attribute, or multiple. If you delete a user attribute, existing row-level security formulas evaluate to `null`.
To delete a specific user attribute:
1. In the Sigma Admin portal, select **User Attributes**.
2. Select the user attribute that you want to delete.
3. To edit the user attribute, click **Delete Attribute**.
4. Review the confirmation modal, then click **Delete**.
To delete multiple user attributes:
1. In the Sigma Admin portal, select **User Attributes**.
2. For each attribute that you want to delete, select the checkbox. To select all, select the checkbox next to **Name**.
3. Select **Delete** ( ) to delete the selected attributes.
4. Review the confirmation modal, then click **Confirm**.
## Related resources
* [Dataset Row-Level Security](/docs/dataset-row-level-security)
) to delete the selected attributes.
4. Review the confirmation modal, then click **Confirm**.
## Related resources
* [Dataset Row-Level Security](/docs/dataset-row-level-security)