> For clean Markdown of any page, append .md to the page URL.
> For a complete documentation index, see https://help.sigmacomputing.com/llms.txt.
> For AI client integration (Claude Code, Cursor, etc.), connect to the MCP server at https://help.sigmacomputing.com/_mcp/server.
# Use modals to create focused content views
Modals help simplify workbook design and allow you to build a streamlined, app-like experience. An open modal overlays and obscures a workbook page to provide a focused view of the modal content. This reduces visual clutter and allows you to present form fields, provide customized drilldowns, display controls and filters in a dedicated container, etc.
Modals are a [layout element](/docs/intro-to-layout-elements), allowing you to guide users and create focused interfaces as you build [AI apps](/docs/ai-apps) in Sigma.
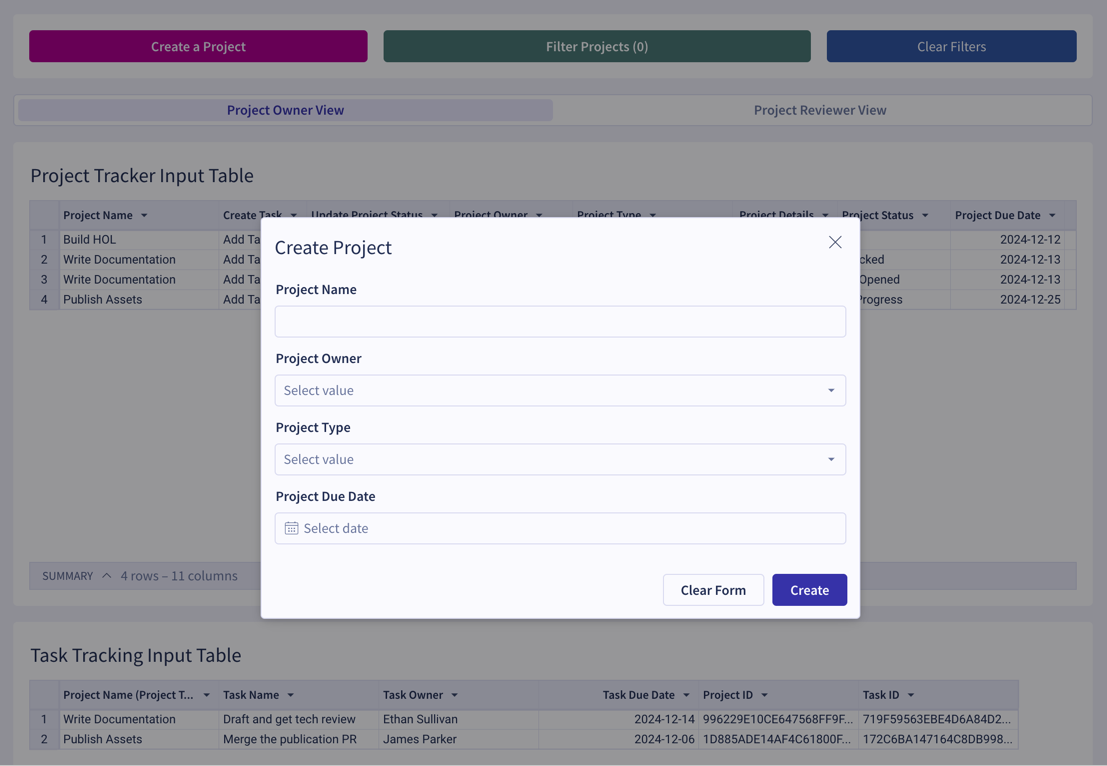
Use modals when you want to:
* Spotlight a particular element or set of elements.
* Add elements to a dashboard without creating an additional page.
* Provide an app-like experience for user data entry.
This document explains how to create and customize modals. To incorporate a modal into a workbook, you must configure an **Open modal** action. For more information about using this action, see [Create actions that navigate to destinations](/docs/create-actions-that-navigate-to-destinations).
## User requirements
The ability to create and modify modals requires the following:
* To use this feature, you must have **Can edit** or **Can explore** [access](/docs/folder-and-document-permissions) to the individual workbook.
* You must be in **Edit** or **Explore** mode for the workbook. See [workbook modes overview](/docs/workbook-modes-overview).
## Add a modal to your workbook
There are several ways to add a modal to a workbook, including the following:
* In the **Add element bar**, select **Layout** and then select **Modal**.
* In the workbook footer, select the down arrow ( ), then select **Add modal**.
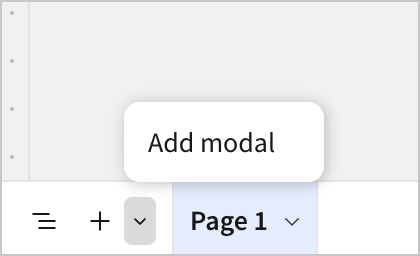
* Create a new modal while moving an existing element. In the element toolbar, select
), then select **Add modal**.

* Create a new modal while moving an existing element. In the element toolbar, select  **More**, then select **Move to** > **New modal** from the dropdown.
* [Create a workbook action to open a modal](/docs/create-actions-that-navigate-to-destinations#open-or-close-a-modal). In the **Select modal** field, choose **New modal**.
A modal appears as a new hidden page tab for the workbook, with a predefined size. Add elements and customize the modal just like a workbook page. All element types are supported, but consider the modal size and layout when adding elements.
By default, a modal includes a default title and primary and secondary buttons. To customize the appearance of the modal, see [Customize a modal](#customize-a-modal).
You can optionally rename the modal to keep your workbook organized. In the modal page tab, select the down arrow (), then select **Rename** or double-click the modal tab to rename it. The modal name is separate from the title that appears on the modal.
## Customize a modal
Customize the appearance of a modal to match the use case. For example, a modal that displays documentation might not need buttons, and a modal that modifies a workbook page might benefit from dynamic text formatting in the title.
By default, a modal includes a header with a title and a close icon, and a footer with two buttons. You cannot place additional elements in the header or footer, but you can customize the display and hide both the header and the footer, including the buttons.
To customize the appearance and feature of a modal, see the following sections:
* [Customize modal appearance](#customize-modal-appearance)
* [Add a title to the modal](#add-a-title-to-the-modal)
* [Customize the footer and buttons on the modal](#customize-the-footer-and-buttons-on-the-modal)
### Customize modal appearance
You can customize the width of the modal and the spacing of elements on the modal. You can also choose to show padding and a gap between elements. If desired, add a background color to the modal. The background color does not apply to the footer of the modal.
To customize the width of the modal:
1. Select the modal on the workbook page.
2. In the editor panel, select a **Width**. By default, the modal width is **Small**. Choose between **Extra small**, **Small**, **Medium**, **Large**, and **Extra large**.
To customize the appearance of the modal, including elements added to it:
1. Select the modal on the workbook page
2. In the editor panel, select **Format**.
3. Click **Modal style** to expand the section and view the style options:
| Style | Details |
| :------------------- | :-------------------------------------------------------------------------------------------------------------------------------- |
| **Spacing** | Manage the space around the outside of the modal and between rows. Choose between **Small**, **Medium** (default), and **Large**. |
| **Padding** | Adds padding to the modal. Selected by default. Turn off the toggle to remove padding between elements and the modal. |
| **Background color** | Select a background color for the modal. Does not apply to the footer. |
| **Element gap** | Adds padding between elements. Selected by default. Turn off the toggle to remove all space between elements. |
### Add a title to the modal
By default, a modal includes a header with a default title, **New Modal**, and a close icon. To hide or modify the title or close icon for the modal:
1. Select the modal on the workbook page.
2. In the editor panel, select **Format**.
3. Click **Header** to expand the header formatting options.
4. (Optional) Turn off **Show title** to hide the title. **Show title** is enabled by default.
5. If the title is shown, use the text box to add or update the title. Enter an equals sign (=) to use a dynamic text formula. See [Add dynamic text based on your data](/docs/text-elements#add-dynamic-text-based-on-your-data).
6. (Optional) To change the title text's formatting, use the formatting tools to add bold, change the text color, or change the text size.
7. (Optional) To hide or show the close icon, turn **Show close icon** on or off.
Hiding both the title and the close icon hides the header.
### Customize the footer and buttons on the modal
By default there are two buttons in the footer, labeled **Primary** and **Secondary** to align with the color styling. You can also add custom buttons to the modal outside of the footer using the **Add element bar**.
To customize the primary or secondary buttons:
1. Select the modal on the workbook page.
2. In the editor tab, select **Format**.
3. Click **Footer** to expand the footer formatting options.
4. (Optional) To hide the primary button, turn off **Show primary button**.
5. For **Text**, use the text box to update the placeholder text to a specific call to action. For example, **Submit** or **Acknowledge**.
6. (Optional) To hide the secondary button, turn off **Show secondary button**.
7. For **Text**, use the text box to update the placeholder text to a secondary call to action. For example, **Cancel** or **Clear**.
Hiding both buttons hides the footer.
## Delete a modal
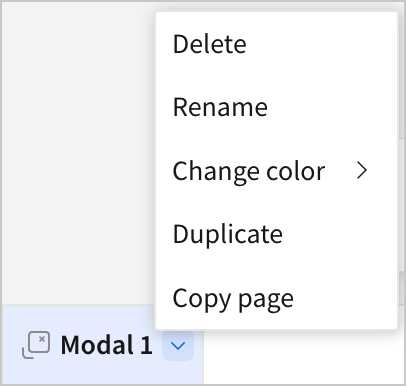
To delete a modal, click the caret () in the tab to open the modal menu, then select **Delete**.
Deleting a modal deletes all elements inside the modal.
## Related resources
* [Create actions that navigate to destinations](/docs/create-actions-that-navigate-to-destinations)
**More**, then select **Move to** > **New modal** from the dropdown.
* [Create a workbook action to open a modal](/docs/create-actions-that-navigate-to-destinations#open-or-close-a-modal). In the **Select modal** field, choose **New modal**.
A modal appears as a new hidden page tab for the workbook, with a predefined size. Add elements and customize the modal just like a workbook page. All element types are supported, but consider the modal size and layout when adding elements.
By default, a modal includes a default title and primary and secondary buttons. To customize the appearance of the modal, see [Customize a modal](#customize-a-modal).
You can optionally rename the modal to keep your workbook organized. In the modal page tab, select the down arrow (), then select **Rename** or double-click the modal tab to rename it. The modal name is separate from the title that appears on the modal.
## Customize a modal
Customize the appearance of a modal to match the use case. For example, a modal that displays documentation might not need buttons, and a modal that modifies a workbook page might benefit from dynamic text formatting in the title.
By default, a modal includes a header with a title and a close icon, and a footer with two buttons. You cannot place additional elements in the header or footer, but you can customize the display and hide both the header and the footer, including the buttons.
To customize the appearance and feature of a modal, see the following sections:
* [Customize modal appearance](#customize-modal-appearance)
* [Add a title to the modal](#add-a-title-to-the-modal)
* [Customize the footer and buttons on the modal](#customize-the-footer-and-buttons-on-the-modal)
### Customize modal appearance
You can customize the width of the modal and the spacing of elements on the modal. You can also choose to show padding and a gap between elements. If desired, add a background color to the modal. The background color does not apply to the footer of the modal.
To customize the width of the modal:
1. Select the modal on the workbook page.
2. In the editor panel, select a **Width**. By default, the modal width is **Small**. Choose between **Extra small**, **Small**, **Medium**, **Large**, and **Extra large**.
To customize the appearance of the modal, including elements added to it:
1. Select the modal on the workbook page
2. In the editor panel, select **Format**.
3. Click **Modal style** to expand the section and view the style options:
| Style | Details |
| :------------------- | :-------------------------------------------------------------------------------------------------------------------------------- |
| **Spacing** | Manage the space around the outside of the modal and between rows. Choose between **Small**, **Medium** (default), and **Large**. |
| **Padding** | Adds padding to the modal. Selected by default. Turn off the toggle to remove padding between elements and the modal. |
| **Background color** | Select a background color for the modal. Does not apply to the footer. |
| **Element gap** | Adds padding between elements. Selected by default. Turn off the toggle to remove all space between elements. |
### Add a title to the modal
By default, a modal includes a header with a default title, **New Modal**, and a close icon. To hide or modify the title or close icon for the modal:
1. Select the modal on the workbook page.
2. In the editor panel, select **Format**.
3. Click **Header** to expand the header formatting options.
4. (Optional) Turn off **Show title** to hide the title. **Show title** is enabled by default.
5. If the title is shown, use the text box to add or update the title. Enter an equals sign (=) to use a dynamic text formula. See [Add dynamic text based on your data](/docs/text-elements#add-dynamic-text-based-on-your-data).
6. (Optional) To change the title text's formatting, use the formatting tools to add bold, change the text color, or change the text size.
7. (Optional) To hide or show the close icon, turn **Show close icon** on or off.
Hiding both the title and the close icon hides the header.
### Customize the footer and buttons on the modal
By default there are two buttons in the footer, labeled **Primary** and **Secondary** to align with the color styling. You can also add custom buttons to the modal outside of the footer using the **Add element bar**.
To customize the primary or secondary buttons:
1. Select the modal on the workbook page.
2. In the editor tab, select **Format**.
3. Click **Footer** to expand the footer formatting options.
4. (Optional) To hide the primary button, turn off **Show primary button**.
5. For **Text**, use the text box to update the placeholder text to a specific call to action. For example, **Submit** or **Acknowledge**.
6. (Optional) To hide the secondary button, turn off **Show secondary button**.
7. For **Text**, use the text box to update the placeholder text to a secondary call to action. For example, **Cancel** or **Clear**.
Hiding both buttons hides the footer.
## Delete a modal
To delete a modal, click the caret () in the tab to open the modal menu, then select **Delete**.
Deleting a modal deletes all elements inside the modal.

## Related resources
* [Create actions that navigate to destinations](/docs/create-actions-that-navigate-to-destinations)