| Document access | Minimum required account type permission | Description |
|---|---|---|
| **Can view** | **View workbooks** or **View data models** | The user can view and interact with workbook elements in **View** mode. The user can view and interact with the [data model overview](/docs/navigate-data-models#data-model-overview-page) . |
| **Can explore** | **Full explore** | Workbooks only. In addition to **Can view** capabilities, the user can modify workbook elements to create custom views of the workbook in **Explore** mode. |
| **Can edit** | **Create, edit, and publish workbooks** or **Create, edit, and publish data models** |
In addition to **Can view** and **Can explore** capabilities, the user can manage the document (rename, move, or delete), view hidden pages, and update the published version. If the **Share documents** account type permission is enabled, the user can also share the workbook with other organization members. |
 ) to open the **Share Workbook** or **Share Data model** modal. You can also share a document from the document menu.
2. In the search bar, enter the team or organization member with whom you want to share the workbook or data model.
3. For each team or user, select a **Permission** from the dropdown. If the document has tagged versions, you can also limit the permission to a specific version tag. See [Share tagged versions of a document](#share-tagged-versions-of-a-document).
4. Repeat as needed for additional teams or members.
5. (Optional) Add a message to be included in an email message to the users gaining access to the document.
6. By default, the Sigma service sends an email message. Deselect the checkbox if you don't want to send an email.
7. Click **Share**.
### Share tagged versions of a document
To control what users and teams can see in a given workbook, or what version of a data model users can access, share a tagged version with a user or a team.
When you share a document with access only to a specific version tag, you effectively revoke access to the published version of the document and limit access only to the shared tagged versions. You can use tagged versions like a published version of a document for a given user or team.
For example, you can make a version of a Sales workbook that is filtered entirely on the East region, tag that version with East, then share that tagged version with the Sales - East team. Members of the Sales - East team then have view (and explore) access to that version of the workbook, but cannot make any changes to the source workbook.
If the tagged version of a workbook allows users to access the data source, users with **Can explore** permissions on the tagged version of a workbook can select **Save As** and save a copy of the version tagged workbook for editing.
To share a tagged version of a workbook or data model, do the following:
1. In the document header, click **Share** () to open the **Share Workbook** or **Share Data model** modal. You can also share a document from the document menu.
2. In the search bar, enter the team or organization member with whom you want to share the tagged version of the workbook or data model.
3. For each team or user, select a **Permission** from the dropdown, then hover over the permission to select a tag on the document to grant access to. Select **All** (default) to share all versions of the workbook with the user or team.\
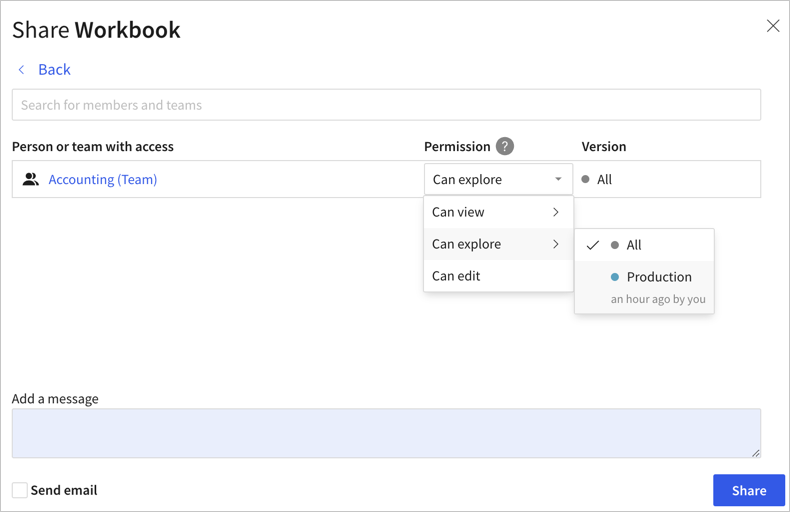
4. Click **Share**.
If you [remove a tag from a document version](/docs/tag-a-document-version#remove-a-tag-from-a-document-version), users and teams with access only to that tagged version of the document lose access to the document.
## Share a workbook with your organization
You can copy a link to the workbook and share it with users in your organization with the link. Guest users and external users cannot access a workbook shared with your organization.
1. In the workbook header, click **Share** () to open the **Share Workbook** modal. You can also share a workbook from the document menu.
2. At the bottom of the modal, in the **General access link** section, toggle **Allow sharing by link**.
3. For **All members of your organization**, choose from the available permissions. The following permissions are available:
* Can view
* Can explore
* Can edit
For more information, see [About sharing with users, teams, and all organization members](#about-sharing-with-users-teams-and-all-organization-members) on this page.
After you set the permission, the workbook can be shared.
4. Click **Copy Link** to copy the link to the workbook to share with others, then close the modal.
## Transfer ownership of a document
You can change the owner of a workbook, data model, or report from one user to another using the Sigma UI or the [Sigma REST API](#transfer-ownership-of-documents-programmatically).
Before you transfer ownership of a document, either grant the new owner access to the folder or workspace that contains the document, or move the document to a folder or workspace that the new owner can access.
You must be assigned the Admin [account type](/docs/account-type-and-license-overview) to transfer ownership.
To transfer ownership of a document in the Sigma UI, share the document with the user to whom you want to transfer ownership and then assign them as the owner:
1. In the document header, click **Share** () to open the **Share workbook** or **Share data model** modal. You can also share a document from the document menu.
2. In the search bar, enter the user to whom you want to transfer ownership.
3. Grant the user any permission level.
4. Click **Share**.
5. In the document header, click **Share** () to reopen the **Share workbook** or **Share data model** modal.
6. Locate the user to whom you want to transfer ownership.
7. In the permissions dropdown menu for the user, select **Owner**.
The changes save automatically.
When you deactivate a user, you can transfer ownership of all of their documents to another user. See [Deactivate a user](/docs/deactivate-users).
### Transfer ownership of documents programmatically
To change the owner of a document programmatically, use the Sigma REST API. You must have [API credentials](/reference/get-started-sigma-api) to use the API.
To transfer ownership of a workbook, data model, or a report programmatically:
1. Retrieve the **inodeID** of the document by calling [List files](/reference/list-files) (`GET /v2/files`) and using the **id** in the response for the document.
2. Retrieve the user ID for the new owner by calling [List members](/reference/list-members) (`GET /v2/members`) and using the **memberId** in the response.
3. Call [Update a file](/reference/update-file) (`PATCH /v2/files/{inodeId}`) with a path parameter that includes the **inodeId** of the relevant document and a request body that sets **ownerId** to the **memberId** of the user to whom you want to transfer ownership.
For full request and response details, see the [Update a file](/reference/update-file) API reference.
For example scripts, see the following recipes:
* [Workbooks - Update owner](/recipes/workbooks-update-owner-javascript) (single workbook)
* [Workbook: Reassign Ownership by Email](/recipes/workbook-reassign-ownership-by-email) (bulk transfer by email)
## Share a custom view of a workbook
If you customize a workbook and create a custom view, you can share the custom view with others using a link:
1. In the document header, click **Share and export** > **Share**.
2. In the **Share Workbook** modal, confirm the checkbox to **Link to current custom view** is selected.
* To share the link to the custom view with anyone, toggle **Allow general sharing by link**, select a permission, and copy the link.
* To share the link to the custom view with other users that already have access to the workbook, select **Copy link**.

If you make changes to the custom view, you must create a new link to share the changes.
## Share an exploration
If you have not yet saved your workbook, you can still share the exploration. In the header, click **Share** (), then turn on **Allow access by link**.

## Limit access to workbook contents by hiding pages
You can hide pages in a workbook from users with only **Can Explore** and **Can View** permissions on a workbook. To hide a page, see [Manage workbook page visibility](/docs/manage-workbook-page-visibility).
## Respond to requests for access to content
As a workbook owner, if a user attempts to access your content and doesn't have permission to do so, they can request access through the error page blocking their immediate access. Access requests are emailed to the document owner.
To respond to a request to access the document, do the following:
1. Open the email notification, then click **Respond to the Request**.
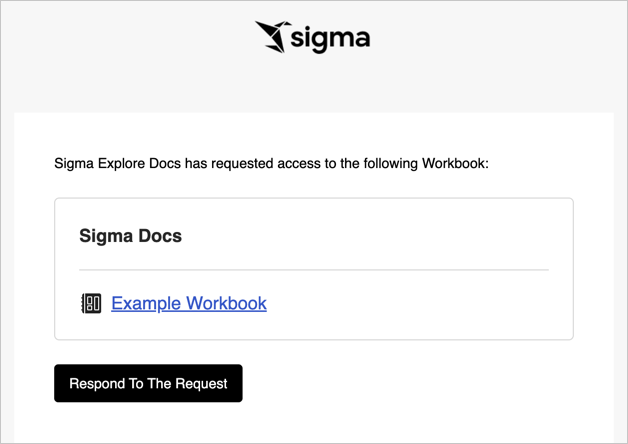
A web browser window opens to the Sigma service. After logging in, the **Share Workbook** modal opens. You can see and respond to the access request.
2. (Optional) For the requesting user, click the permission dropdown menu to select the appropriate level of access. For a version tagged workbook, you can choose a specific permission and version tag combination to grant the user access to view or explore a specific tagged version of the workbook.
The user can't be granted access higher than what their account type allows.
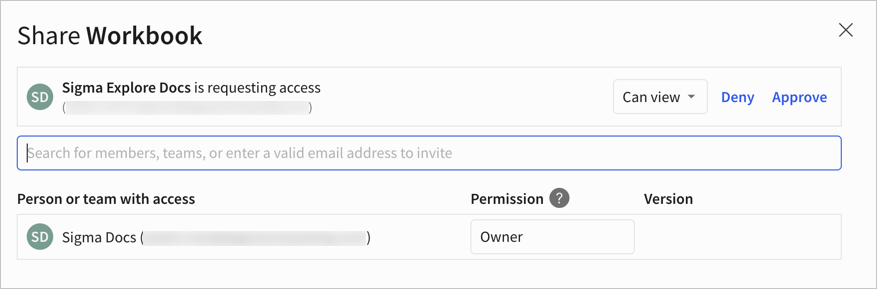
3. To approve the request, click **Approve**.
The user is granted access to view the workbook and immediately shows up in the list of people and teams with access.
To deny the request, click **Deny**.
Access to the workbook remains unchanged and the request is removed from the **Share Workbook** modal.
4. Click **Save**.
## Access shared content
When another user shares a document directly with you, it appears in the **Shared with you** section of the [Sigma home page](/docs/get-around-in-sigma#sigma-home-page).
Documents shared with all users in a Sigma organization do not appear in **Shared with you**.
* To access a data model shared with all users in a Sigma organization, search for it by name.
* To access a workbook shared with all users in a Sigma organization via a link, search the **Recents** section of the Sigma home page or access it via the link.
## Related resources
* [Folder and document access](/docs/folder-and-document-permissions)
* [Send and schedule exports from workbooks](/docs/send-and-schedule-exports-from-workbooks)
* [Workbook embedding: an overview](/docs/workbook-embedding-an-overview)
* [Manage workbook page visibility](/docs/manage-workbook-page-visibility)
) to open the **Share Workbook** or **Share Data model** modal. You can also share a document from the document menu.
2. In the search bar, enter the team or organization member with whom you want to share the workbook or data model.
3. For each team or user, select a **Permission** from the dropdown. If the document has tagged versions, you can also limit the permission to a specific version tag. See [Share tagged versions of a document](#share-tagged-versions-of-a-document).
4. Repeat as needed for additional teams or members.
5. (Optional) Add a message to be included in an email message to the users gaining access to the document.
6. By default, the Sigma service sends an email message. Deselect the checkbox if you don't want to send an email.
7. Click **Share**.
### Share tagged versions of a document
To control what users and teams can see in a given workbook, or what version of a data model users can access, share a tagged version with a user or a team.
When you share a document with access only to a specific version tag, you effectively revoke access to the published version of the document and limit access only to the shared tagged versions. You can use tagged versions like a published version of a document for a given user or team.
For example, you can make a version of a Sales workbook that is filtered entirely on the East region, tag that version with East, then share that tagged version with the Sales - East team. Members of the Sales - East team then have view (and explore) access to that version of the workbook, but cannot make any changes to the source workbook.
If the tagged version of a workbook allows users to access the data source, users with **Can explore** permissions on the tagged version of a workbook can select **Save As** and save a copy of the version tagged workbook for editing.
To share a tagged version of a workbook or data model, do the following:
1. In the document header, click **Share** () to open the **Share Workbook** or **Share Data model** modal. You can also share a document from the document menu.
2. In the search bar, enter the team or organization member with whom you want to share the tagged version of the workbook or data model.
3. For each team or user, select a **Permission** from the dropdown, then hover over the permission to select a tag on the document to grant access to. Select **All** (default) to share all versions of the workbook with the user or team.\

4. Click **Share**.
If you [remove a tag from a document version](/docs/tag-a-document-version#remove-a-tag-from-a-document-version), users and teams with access only to that tagged version of the document lose access to the document.
## Share a workbook with your organization
You can copy a link to the workbook and share it with users in your organization with the link. Guest users and external users cannot access a workbook shared with your organization.
1. In the workbook header, click **Share** () to open the **Share Workbook** modal. You can also share a workbook from the document menu.
2. At the bottom of the modal, in the **General access link** section, toggle **Allow sharing by link**.
3. For **All members of your organization**, choose from the available permissions. The following permissions are available:
* Can view
* Can explore
* Can edit
For more information, see [About sharing with users, teams, and all organization members](#about-sharing-with-users-teams-and-all-organization-members) on this page.
After you set the permission, the workbook can be shared.
4. Click **Copy Link** to copy the link to the workbook to share with others, then close the modal.
## Transfer ownership of a document
You can change the owner of a workbook, data model, or report from one user to another using the Sigma UI or the [Sigma REST API](#transfer-ownership-of-documents-programmatically).
Before you transfer ownership of a document, either grant the new owner access to the folder or workspace that contains the document, or move the document to a folder or workspace that the new owner can access.
You must be assigned the Admin [account type](/docs/account-type-and-license-overview) to transfer ownership.
To transfer ownership of a document in the Sigma UI, share the document with the user to whom you want to transfer ownership and then assign them as the owner:
1. In the document header, click **Share** () to open the **Share workbook** or **Share data model** modal. You can also share a document from the document menu.
2. In the search bar, enter the user to whom you want to transfer ownership.
3. Grant the user any permission level.
4. Click **Share**.
5. In the document header, click **Share** () to reopen the **Share workbook** or **Share data model** modal.
6. Locate the user to whom you want to transfer ownership.
7. In the permissions dropdown menu for the user, select **Owner**.
The changes save automatically.
When you deactivate a user, you can transfer ownership of all of their documents to another user. See [Deactivate a user](/docs/deactivate-users).
### Transfer ownership of documents programmatically
To change the owner of a document programmatically, use the Sigma REST API. You must have [API credentials](/reference/get-started-sigma-api) to use the API.
To transfer ownership of a workbook, data model, or a report programmatically:
1. Retrieve the **inodeID** of the document by calling [List files](/reference/list-files) (`GET /v2/files`) and using the **id** in the response for the document.
2. Retrieve the user ID for the new owner by calling [List members](/reference/list-members) (`GET /v2/members`) and using the **memberId** in the response.
3. Call [Update a file](/reference/update-file) (`PATCH /v2/files/{inodeId}`) with a path parameter that includes the **inodeId** of the relevant document and a request body that sets **ownerId** to the **memberId** of the user to whom you want to transfer ownership.
For full request and response details, see the [Update a file](/reference/update-file) API reference.
For example scripts, see the following recipes:
* [Workbooks - Update owner](/recipes/workbooks-update-owner-javascript) (single workbook)
* [Workbook: Reassign Ownership by Email](/recipes/workbook-reassign-ownership-by-email) (bulk transfer by email)
## Share a custom view of a workbook
If you customize a workbook and create a custom view, you can share the custom view with others using a link:
1. In the document header, click **Share and export** > **Share**.
2. In the **Share Workbook** modal, confirm the checkbox to **Link to current custom view** is selected.
* To share the link to the custom view with anyone, toggle **Allow general sharing by link**, select a permission, and copy the link.
* To share the link to the custom view with other users that already have access to the workbook, select **Copy link**.

If you make changes to the custom view, you must create a new link to share the changes.
## Share an exploration
If you have not yet saved your workbook, you can still share the exploration. In the header, click **Share** (), then turn on **Allow access by link**.

## Limit access to workbook contents by hiding pages
You can hide pages in a workbook from users with only **Can Explore** and **Can View** permissions on a workbook. To hide a page, see [Manage workbook page visibility](/docs/manage-workbook-page-visibility).
## Respond to requests for access to content
As a workbook owner, if a user attempts to access your content and doesn't have permission to do so, they can request access through the error page blocking their immediate access. Access requests are emailed to the document owner.
To respond to a request to access the document, do the following:
1. Open the email notification, then click **Respond to the Request**.

A web browser window opens to the Sigma service. After logging in, the **Share Workbook** modal opens. You can see and respond to the access request.
2. (Optional) For the requesting user, click the permission dropdown menu to select the appropriate level of access. For a version tagged workbook, you can choose a specific permission and version tag combination to grant the user access to view or explore a specific tagged version of the workbook.
The user can't be granted access higher than what their account type allows.

3. To approve the request, click **Approve**.
The user is granted access to view the workbook and immediately shows up in the list of people and teams with access.
To deny the request, click **Deny**.
Access to the workbook remains unchanged and the request is removed from the **Share Workbook** modal.
4. Click **Save**.
## Access shared content
When another user shares a document directly with you, it appears in the **Shared with you** section of the [Sigma home page](/docs/get-around-in-sigma#sigma-home-page).
Documents shared with all users in a Sigma organization do not appear in **Shared with you**.
* To access a data model shared with all users in a Sigma organization, search for it by name.
* To access a workbook shared with all users in a Sigma organization via a link, search the **Recents** section of the Sigma home page or access it via the link.
## Related resources
* [Folder and document access](/docs/folder-and-document-permissions)
* [Send and schedule exports from workbooks](/docs/send-and-schedule-exports-from-workbooks)
* [Workbook embedding: an overview](/docs/workbook-embedding-an-overview)
* [Manage workbook page visibility](/docs/manage-workbook-page-visibility)