 ) and select the relevant option:
| Option | What to expect | When to use |
| --------------------------------- | --------------------------------------------------------------------------------------------------------------------------------------------------------------------------------------------------------------------------------------------------------------------------------------------------------------------------------------------------------------------------------------------------------------------------------------------------------------------------------------------------------------------------------------------------------------------------------------------------------------------------- | -------------------------------------------------------------------------------------------------------------------------------------------------------------------------------------------------------------------------- |
| **Download** | This option appears if no organization-level translation file exists. The resulting JSON-formatted file contains all key-value pairs for custom strings in the workbook. | Choose this option to define translations for your user-added text when your admin has not defined any translations that apply to the entire organization. |
| **Download untranslated strings** | If an organization-level translation file exists, this option allows you to download a JSON-formatted file that contains only the key-value pairs for custom strings in the workbook that do not match keys in the organization-level translation file. Translations that exist in an organization-level translation file are omitted. Keys that are not translated in the organization-level file are shown with either the English values (if no custom translation has been provided) or the previously defined translations for this workbook. | Choose this option when you want to avoid overwriting any values defined at the organization-level. |
| **Download all strings** | If an organization-level translation file exists, this option allows you to download a JSON-formatted file that contains all key-value pairs for custom strings in the workbook. Any keys that are translated in the organization-level file show the values defined in that file. Any keys that are not translated in an organization-level file show the translations defined for this workbook, if any, or show the English values if no translation has yet been provided. Any keys that are translated in both an organization-level file and the workbook-level file show the translations defined for this workbook. | Choose this option when you want to see all translations that apply to the custom strings in this workbook, or if you want to overwrite any organization-level translations with different translations for this workbook. |
### Add user-added text translations to your workbook
To add user-added text translations to your workbook, do the following
1. Open the downloaded file.
2. In the JSON-formatted [list of key-value pairs](https://en.wikipedia.org/wiki/JSON#Syntax), update the values to the appropriate translations.
Do not edit any of the keys.
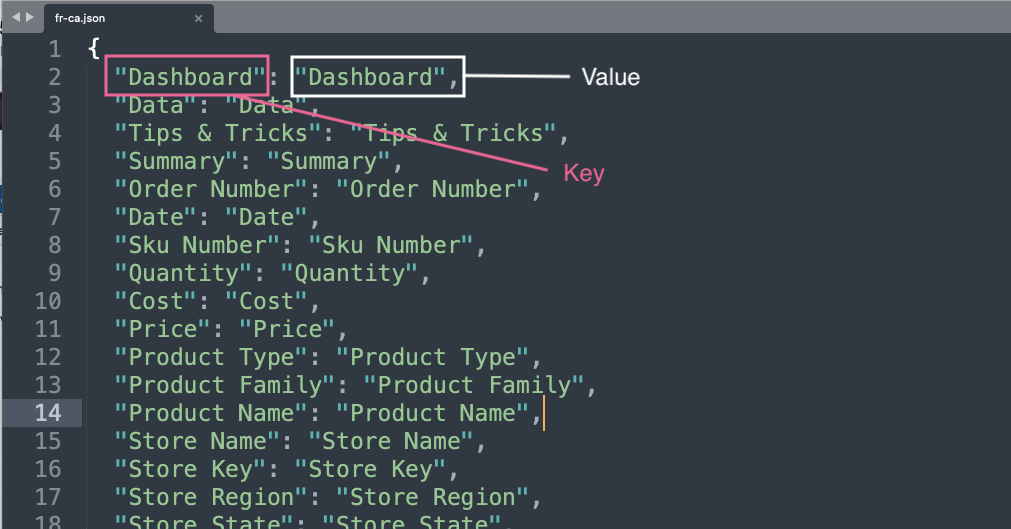
3. Save your file. Do not change the filename.
4. Return to your workbook in Sigma, and open it for editing.
5. In the editor panel, select **Workbook settings** and click **Manage locales**.
6. For the locale and language for which you want to add a custom translation, click **More** (), then click **Upload**.
7. In the file browser, select your updated JSON-formatted file.
8. After uploading, select **More** (), then click **Preview** to open a workbook preview with translated text in a new tab.
## Update a workbook translation
To keep your custom workbook translations updated, each time you publish text changes to your workbook you must download, add or update translations, and upload a new JSON-formatted locale file.
Newly added strings appear at the bottom of the JSON-formatted file.
Follow the steps in [Add a translation for user-added text in your workbook](#add-a-translation-for-user-added-text-in-your-workbook) to update the translations.
## Add a custom translation for a language
You can maintain multiple separate translations for a given language. A custom translation for a language is also referred to as a language variant. For example, if you want to translate the strings in your workbook differently for different consumers of embedded charts, add a custom translation.
You can also inherit custom translations from organization-level files added by a Sigma admin.
To add a custom translation for a language:
1. Open the workbook for editing.
2. In the editor panel with no elements selected, click **Workbook settings**.
3. Click **Manage locales**.
4. To add a new language, click **Add new locale** (**+**).
5. In the dropdown menu, select **Add custom translations**.
6. Select either **Create new locale** (to create a new custom translation) or **Select from organization locales** (to use an existing [organization locale](/docs/manage-organization-locale)).
7. If you selected **Create new locale**:
1. Enter a name for your custom translation file.
2. Select a **Base language** to specify the language to use for all standard Sigma interface text, such as menu labels and modal text.
To inherit a custom set of organization-level translations for this language, use the **Select from organization locales** option and select the desired locale. Alternatively, enter the same name and base language as the custom organization-level translation file.
8. If you selected **Select from organization locales**, select your desired organization locale from the **Choose locale** dropdown.
9. Click **Add**.
To add custom translations for this newly-added language that translate the user-added text in your workbook, follow the steps in [Add a translation for user-added text in your workbook](#add-translations-for-user-added-text-in-your-workbook) for the language variant.
## Translations for version tagged workbooks
When you tag a workbook version, any workbook-level translations that exist when you tag the workbook are used for the tagged version. If a workbook-level translation does not exist, the latest organization-level translation file is used.
## Use Markdown and dynamic text in a translation file
To support rich text in your translations, you can use Markdown and add dynamic text formula to your JSON values.
To add rich text, apply formatting to the text in your workbook, then download the user-added text strings. Based on the Markdown syntax in the user-added text strings, modify the formatting for the translated text that you add as needed. Not all user-added text supports rich text formatting.
) and select the relevant option:
| Option | What to expect | When to use |
| --------------------------------- | --------------------------------------------------------------------------------------------------------------------------------------------------------------------------------------------------------------------------------------------------------------------------------------------------------------------------------------------------------------------------------------------------------------------------------------------------------------------------------------------------------------------------------------------------------------------------------------------------------------------------- | -------------------------------------------------------------------------------------------------------------------------------------------------------------------------------------------------------------------------- |
| **Download** | This option appears if no organization-level translation file exists. The resulting JSON-formatted file contains all key-value pairs for custom strings in the workbook. | Choose this option to define translations for your user-added text when your admin has not defined any translations that apply to the entire organization. |
| **Download untranslated strings** | If an organization-level translation file exists, this option allows you to download a JSON-formatted file that contains only the key-value pairs for custom strings in the workbook that do not match keys in the organization-level translation file. Translations that exist in an organization-level translation file are omitted. Keys that are not translated in the organization-level file are shown with either the English values (if no custom translation has been provided) or the previously defined translations for this workbook. | Choose this option when you want to avoid overwriting any values defined at the organization-level. |
| **Download all strings** | If an organization-level translation file exists, this option allows you to download a JSON-formatted file that contains all key-value pairs for custom strings in the workbook. Any keys that are translated in the organization-level file show the values defined in that file. Any keys that are not translated in an organization-level file show the translations defined for this workbook, if any, or show the English values if no translation has yet been provided. Any keys that are translated in both an organization-level file and the workbook-level file show the translations defined for this workbook. | Choose this option when you want to see all translations that apply to the custom strings in this workbook, or if you want to overwrite any organization-level translations with different translations for this workbook. |
### Add user-added text translations to your workbook
To add user-added text translations to your workbook, do the following
1. Open the downloaded file.
2. In the JSON-formatted [list of key-value pairs](https://en.wikipedia.org/wiki/JSON#Syntax), update the values to the appropriate translations.
Do not edit any of the keys.

3. Save your file. Do not change the filename.
4. Return to your workbook in Sigma, and open it for editing.
5. In the editor panel, select **Workbook settings** and click **Manage locales**.
6. For the locale and language for which you want to add a custom translation, click **More** (), then click **Upload**.
7. In the file browser, select your updated JSON-formatted file.
8. After uploading, select **More** (), then click **Preview** to open a workbook preview with translated text in a new tab.
## Update a workbook translation
To keep your custom workbook translations updated, each time you publish text changes to your workbook you must download, add or update translations, and upload a new JSON-formatted locale file.
Newly added strings appear at the bottom of the JSON-formatted file.
Follow the steps in [Add a translation for user-added text in your workbook](#add-a-translation-for-user-added-text-in-your-workbook) to update the translations.
## Add a custom translation for a language
You can maintain multiple separate translations for a given language. A custom translation for a language is also referred to as a language variant. For example, if you want to translate the strings in your workbook differently for different consumers of embedded charts, add a custom translation.
You can also inherit custom translations from organization-level files added by a Sigma admin.
To add a custom translation for a language:
1. Open the workbook for editing.
2. In the editor panel with no elements selected, click **Workbook settings**.
3. Click **Manage locales**.
4. To add a new language, click **Add new locale** (**+**).
5. In the dropdown menu, select **Add custom translations**.
6. Select either **Create new locale** (to create a new custom translation) or **Select from organization locales** (to use an existing [organization locale](/docs/manage-organization-locale)).
7. If you selected **Create new locale**:
1. Enter a name for your custom translation file.
2. Select a **Base language** to specify the language to use for all standard Sigma interface text, such as menu labels and modal text.
To inherit a custom set of organization-level translations for this language, use the **Select from organization locales** option and select the desired locale. Alternatively, enter the same name and base language as the custom organization-level translation file.
8. If you selected **Select from organization locales**, select your desired organization locale from the **Choose locale** dropdown.
9. Click **Add**.
To add custom translations for this newly-added language that translate the user-added text in your workbook, follow the steps in [Add a translation for user-added text in your workbook](#add-translations-for-user-added-text-in-your-workbook) for the language variant.
## Translations for version tagged workbooks
When you tag a workbook version, any workbook-level translations that exist when you tag the workbook are used for the tagged version. If a workbook-level translation does not exist, the latest organization-level translation file is used.
## Use Markdown and dynamic text in a translation file
To support rich text in your translations, you can use Markdown and add dynamic text formula to your JSON values.
To add rich text, apply formatting to the text in your workbook, then download the user-added text strings. Based on the Markdown syntax in the user-added text strings, modify the formatting for the translated text that you add as needed. Not all user-added text supports rich text formatting.
| Displayed | Markdown syntax |
|---|---|
| I love bold text. | I love **bold** text. |
| Italics are great too. | *Italics* are great too. |
| Visit the Sigma documentation . | Visit the [Sigma documentation]( [https://help.sigmacomputing.com](https://help.sigmacomputing.com) ). |
|
\* Bullet points
\* Make bulleted lists |
|
1\. Numbers
2\. Make numbered lists |