> For clean Markdown of any page, append .md to the page URL.
> For a complete documentation index, see https://help.sigmacomputing.com/llms.txt.
> For AI client integration (Claude Code, Cursor, etc.), connect to the MCP server at https://help.sigmacomputing.com/_mcp/server.
# Export to email
You can send workbooks, their pages, and individual elements to email recipients on a set schedule or as-needed basis. For example, you can email an executive team member a PDF file of the team's KPIs on a regular basis.
You can set multiple export schedules for a workbook. Each email that you send can include multiple attachments as long as the total attachment size is below the [export limit](#export-limit).
Sigma generates exports from the workbook's latest published version. Changes you make to a workbook draft, custom view, or exploration cannot be exported unless you save or publish the changes. Depending on your export destination, you can also choose to export a saved view or tagged version of the workbook. If you are exporting elements that are only on a saved view, you must open the export modal from the saved view.
For a matrix of supported file formats and saved view/version tag export support, see [Available export destinations and formats](/docs/send-or-schedule-workbook-exports#available-export-destinations-and-formats).
## User requirements
* To export data to email, you must be assigned an [account type](/docs/account-type-and-license-overview) with the **Export to email** permission enabled.
* To set up an email export to run queries as the recipients, your account type must also have the **Run exports as recipient** permission enabled.
* To send a version-tagged workbook, the version tag must exist and be applied to the workbook. Admins can create a version tag, and workbook creators can tag a version of a workbook. For more information, see [Version tagging](/docs/create-and-manage-version-tags).
If your organization restricts email traffic sent from specific IP addresses, add `198.37.153.185` and `134.128.103.81` to the allowlist. Alternatively, you can configure a custom SMTP server to use instead. See [Custom SMTP server](/docs/customize-welcome-and-invite-emails#custom-smtp-server).
## Export limit
The size limit for emailed exports is 30MB. This is the total limit for all attachments when combined.
If an export exceeds this limit, the entire export fails and the owner of the scheduled export is notified. Scheduled exports that repeatedly exceed this limit are automatically paused and their owner notified.
See [Download, export, and upload limitations](/docs/download-export-and-upload-limitations).
## Export to email as needed
To send an ad hoc email export:
1. From the workbook menu ( ), select **Share and export> Export...**.
If the export to email option is not available, the workbook is in **Edit** mode. Either publish your draft or return to the latest published or tagged version of the workbook before attempting to export to email.
2. Select **Email**.
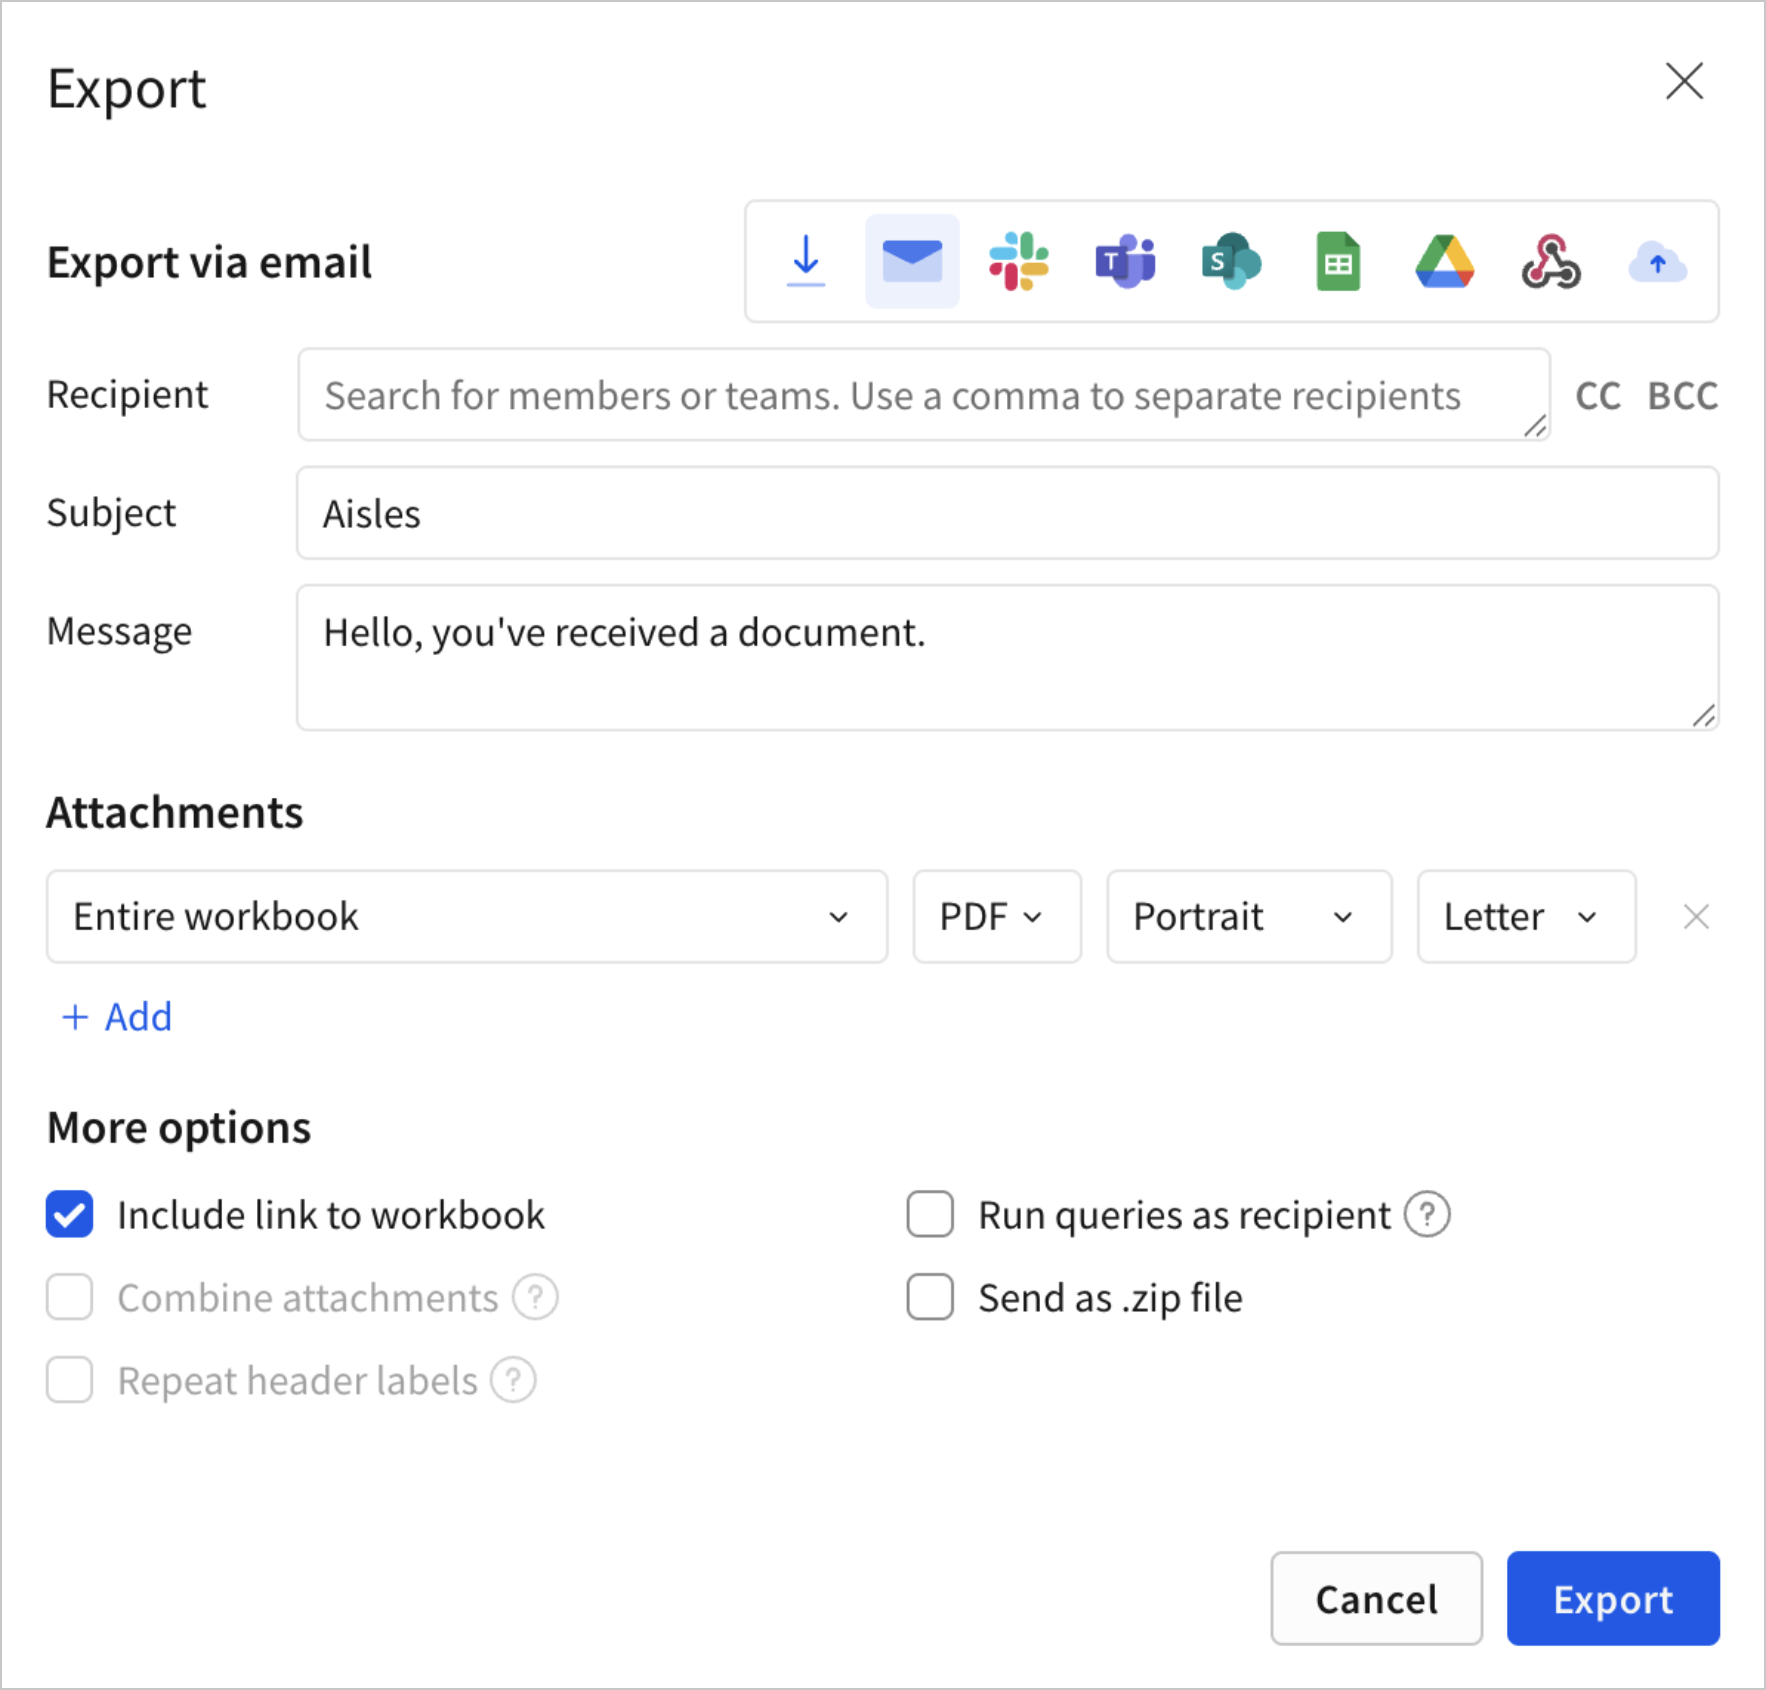
3. In the **Recipient** field, enter one or more comma-separated Sigma teams, Sigma users, or email addresses. You can email up to 1,000 recipients unless you use the **Run queries as recipient** setting.
If export authentication is configured for your organization, you can only send the export to email addresses associated with an authorized domain. When you attempt to send the export, Sigma notifies you if an email address contains a domain that is not allowed. An admin can change this setting. See [Restrict export recipients](/docs/restrict-export-recipients).
4. (Optional) To add Cc or Bcc recipients to the export, select **Cc** and/or **Bcc** and enter either the email addresses of your desired recipients, or a team name. If you are entering multiple emails or teams, each email address and team name should be separated by commas. If **Run queries as recipient** is enabled, either as an [organization requirement](/docs/restrict-export-recipients#require-email-exports-to-run-queries-as-recipient) or for this specific export, only users that have been added to the [Cc/Bcc allowlist](/docs/restrict-export-recipients#add-recipients-to-ccbcc-allowlist-when-run-as-recipient-is-enabled) can be added as Cc/Bcc recipients.
If a recipient is added to the both Cc and Bcc fields, they only receive the email as a Cc recipient. This applies to both Bcc recipients specified in the **Exports** modal, and global Bcc recipients configured by an admin. See [Customize email branding](/docs/custom-email-branding) for more information on setting up global Bcc recipients.
5. (Optional) In the **Subject** field, enter a subject line. To use [dynamic text](/docs/text-elements#add-dynamic-text-based-on-your-data) in your subject line, press **=** and enter your desired formula.
6. (Optional) In the **Message** field, enter a message. To use [dynamic text](/docs/text-elements#add-dynamic-text-based-on-your-data) in your subject line, press **=** and enter your desired formula. To format your message with HTML, see [Format an email message](/docs/format-an-email-message).
7. If the workbook has version tags or bookmarks, select which one you want to send.
8. In the **Attachment** section, choose what you want to export as an attachment. You can export:
* An **Entire workbook** and export all workbook pages.
* A specific workbook page, by navigating to the workbook page and choosing **Entire page**.
* An element on a specific workbook page, by navigating to the workbook page and choosing the name of the element.
Select **+ Add** to add more attachments.
9. For each attachment, select a supported file format. For a matrix of supported file formats, see [Available export destinations and formats](/docs/send-or-schedule-workbook-exports#available-export-destinations-and-formats).
10. (Optional) By default, Sigma includes a link to the workbook in the email body. If you don't want to include a link, deselect the **Include link to workbook** checkbox.
11. (Optional) By default, an export captures data accessible to the export creator. To limit the export to only what the recipient has permission to access, select the checkbox for **Run queries as recipient**. If you do not see the checkbox, your account type might not be assigned the **Run exports as recipient** permission.
**Run queries as recipient** only succeeds if you email 300 or fewer recipients and all of the recipients are Sigma users. If you enable this option and not all recipients are Sigma users, the email fails to send. The sender of the export receives a failure notification email with the error message: "No users found in organization for the provided email recipients".
When an export is run as recipient, each query runs separately per recipient. Larger recipient lists result in more queries sent to the database and longer processing times.
12. (Optional) Depending on the attachment formats that you select, you can configure more options like combining attachments, sending attachments in a zip file, and more, See [Configure additional options for exports](/docs/configure-additional-options-for-exports).
13. Click **Export**.
## Schedule an emailed export
Scheduled emails send the latest published version of the workbook, unless you select a tagged version.
To schedule an emailed report:
1. From the workbook menu (), select **Share and export> Schedule exports…**.
2. If this is the first schedule for the workbook, click **Add schedule**, otherwise click **+ New schedule**.
3. In the **Recipient** field, enter one or more comma-separated Sigma teams, Sigma users, or email addresses. You can email up to 1,000 recipients unless you use the **Run queries as recipient** option.
If export authentication is configured for your organization, you can only send the export to email addresses associated with an authorized domain. When you attempt to create the schedule, Sigma notifies you if an email address contains a domain that's not allowed. An admin can change this setting. See [Restrict export recipients](/docs/restrict-export-recipients).
4. (Optional) To add CC or BCC recipients to the scheduled export, select **CC** and/or **BCC** and enter either the email addresses of your desired recipients, or a team name. If you are entering multiple emails or teams, each email address and team name should be separated by commas. If **Run queries as recipient** is enabled, either as an [organization requirement](/docs/restrict-export-recipients#require-email-exports-to-run-queries-as-recipient) or for this specific export, only users that have been added to the [Cc/Bcc allowlist](/docs/restrict-export-recipients#add-recipients-to-ccbcc-allowlist-when-run-as-recipient-is-enabled) can be added as Cc/Bcc recipients.
If a recipient is added to the both CC and BCC fields, they only receive the email as a CC recipient. This applies to both BCC recipients specified in the **Schedule exports** modal, and global BCC recipients configured by an admin. See [Customize email branding](/docs/custom-email-branding) for more information on setting up global BCC recipients.
5. (Optional) In the **Subject** field, enter a subject line. To use [dynamic text](/docs/text-elements#add-dynamic-text-based-on-your-data) in your subject line, press **=** and enter your desired formula.
6. (Optional) In the **Message** field, enter a message. To use [dynamic text](/docs/text-elements#add-dynamic-text-based-on-your-data) in your subject line, press **=** and enter your desired formula. To format your message with HTML, see [Format an email message](/docs/format-an-email-message).
7. If the workbook has tagged versions or bookmarks, select which one you want to send.
8. In the **Attachments** section, choose what you want to export as an attachment. You can export:
* An **Entire workbook** and export all workbook pages.
* A specific workbook page, by navigating to the workbook page and choosing **Entire page**.
* An element on a specific workbook page, by navigating to the workbook page and choosing the name of the element.
Select **+ Add** to add more attachments.
9. For each attachment, select a supported file format. For a matrix of supported file formats, see [Available export destinations and formats](/docs/send-or-schedule-workbook-exports#available-export-destinations-and-formats).
Exercise caution when exporting or downloading workbook content that uses controls to filter sensitive data. If you request or schedule a download or export of any data, reports, workbooks, logs, or other assets (“**Exported Content**”) from the Sigma Platform to destinations or recipients selected by you (“**Export**”), you agree and understand that (i) Sigma may store the Exported Content for up to 24 hours to complete your Export, (ii) Sigma may store applicable control values as URL parameters in trace logs used for debugging and troubleshooting purposes, when Exporting to to PDF or PNG formats, and (iii) Sigma may process, store, and transfer (including transfers to regions outside region where the Export originates) the Exported Content (including any personal data therein) for the purposes of completing your Export.
10. In the **Frequency** section, set the delivery schedule:
* (Optional) Select the dropdown for **Daily** and select **Weekly**, **Monthly**, or **Custom**.
* For **Daily**, select **Once a day** or **Multiple times**.
* For **Weekly**, select which days of the week to send an email, and choose between **Once a day** or **Multiple times**.
* For **Monthly**, select which day of the month to send an email, and the time of day.
* For **Custom**, specify a schedule using cron syntax. See [Set up a custom delivery schedule](/docs/configure-additional-options-for-exports#set-up-a-custom-delivery-schedule).
If you select **Multiple times**, specify the frequency. For example, every 2 hours on the :15 of the hour between 9 AM and 6 PM.
If you don't have the option to set a specific frequency, export frequency might be restricted for your organization. For more details, see [Restrict export recipients and frequency](/docs/restrict-export-recipients).
* (Optional) Adjust the default schedule time zone using the dropdown menu.
* (Optional) Choose how often to send the export: **Always** or only **If a condition is met**. See [Schedule a conditional export or alert](/docs/schedule-a-conditional-export-or-alert).
* (Optional) If you choose to send an export only **If a condition is met**, you can turn on the switch to stop notifying after a set number of occurrences per day, week, or in total.
11. (Optional) By default, Sigma includes a link to the workbook in the email body. If you don't want to include a link, deselect the checkbox for **Include link to workbook**.
12. (Optional) By default, an export captures data accessible to the export creator. To limit the export to only what the recipient has permission to access, select the checkbox for **Run queries as recipient**. If you do not see the checkbox, your account type might not be assigned the **Run exports as recipient** permission.
**Run queries as recipient** only succeeds if you email 300 or fewer recipients and all of the recipients are Sigma users. If you enable this option and not all recipients are Sigma users, the email fails to send. The sender of the export receives a failure notification email with the error message: "No users found in organization for the provided email recipients".
When an export is run as recipient, each query runs separately per recipient. Larger recipient lists result in more queries sent to the database and longer processing times.
13. (Optional) Depending on the attachment formats that you select, you can configure more options like combining attachments, sending attachments in a zip file, and more, See [Configure additional options for exports](/docs/configure-additional-options-for-exports).
14. (Optional) Select the checkbox for **Customize control values** to filter the exported data according to the value of one or more workbook controls. See [Configure additional options for exports](/docs/configure-additional-options-for-exports).
15. Click **Create**.
## Related resources
* [Manage Your Schedules](/docs/manage-your-schedules)
* [Send a workbook export to email recipients](/docs/send-a-workbook-export-to-email-recipients)
* [Send Slack notifications](/docs/send-slack-notifications)
* [Schedule a conditional export or alert](/docs/schedule-a-conditional-export-or-alert)
* [Apply control values to scheduled exports](/docs/apply-control-values-to-scheduled-exports)
), select **Share and export> Export...**.
If the export to email option is not available, the workbook is in **Edit** mode. Either publish your draft or return to the latest published or tagged version of the workbook before attempting to export to email.
2. Select **Email**.

3. In the **Recipient** field, enter one or more comma-separated Sigma teams, Sigma users, or email addresses. You can email up to 1,000 recipients unless you use the **Run queries as recipient** setting.
If export authentication is configured for your organization, you can only send the export to email addresses associated with an authorized domain. When you attempt to send the export, Sigma notifies you if an email address contains a domain that is not allowed. An admin can change this setting. See [Restrict export recipients](/docs/restrict-export-recipients).
4. (Optional) To add Cc or Bcc recipients to the export, select **Cc** and/or **Bcc** and enter either the email addresses of your desired recipients, or a team name. If you are entering multiple emails or teams, each email address and team name should be separated by commas. If **Run queries as recipient** is enabled, either as an [organization requirement](/docs/restrict-export-recipients#require-email-exports-to-run-queries-as-recipient) or for this specific export, only users that have been added to the [Cc/Bcc allowlist](/docs/restrict-export-recipients#add-recipients-to-ccbcc-allowlist-when-run-as-recipient-is-enabled) can be added as Cc/Bcc recipients.
If a recipient is added to the both Cc and Bcc fields, they only receive the email as a Cc recipient. This applies to both Bcc recipients specified in the **Exports** modal, and global Bcc recipients configured by an admin. See [Customize email branding](/docs/custom-email-branding) for more information on setting up global Bcc recipients.
5. (Optional) In the **Subject** field, enter a subject line. To use [dynamic text](/docs/text-elements#add-dynamic-text-based-on-your-data) in your subject line, press **=** and enter your desired formula.
6. (Optional) In the **Message** field, enter a message. To use [dynamic text](/docs/text-elements#add-dynamic-text-based-on-your-data) in your subject line, press **=** and enter your desired formula. To format your message with HTML, see [Format an email message](/docs/format-an-email-message).
7. If the workbook has version tags or bookmarks, select which one you want to send.
8. In the **Attachment** section, choose what you want to export as an attachment. You can export:
* An **Entire workbook** and export all workbook pages.
* A specific workbook page, by navigating to the workbook page and choosing **Entire page**.
* An element on a specific workbook page, by navigating to the workbook page and choosing the name of the element.
Select **+ Add** to add more attachments.
9. For each attachment, select a supported file format. For a matrix of supported file formats, see [Available export destinations and formats](/docs/send-or-schedule-workbook-exports#available-export-destinations-and-formats).
10. (Optional) By default, Sigma includes a link to the workbook in the email body. If you don't want to include a link, deselect the **Include link to workbook** checkbox.
11. (Optional) By default, an export captures data accessible to the export creator. To limit the export to only what the recipient has permission to access, select the checkbox for **Run queries as recipient**. If you do not see the checkbox, your account type might not be assigned the **Run exports as recipient** permission.
**Run queries as recipient** only succeeds if you email 300 or fewer recipients and all of the recipients are Sigma users. If you enable this option and not all recipients are Sigma users, the email fails to send. The sender of the export receives a failure notification email with the error message: "No users found in organization for the provided email recipients".
When an export is run as recipient, each query runs separately per recipient. Larger recipient lists result in more queries sent to the database and longer processing times.
12. (Optional) Depending on the attachment formats that you select, you can configure more options like combining attachments, sending attachments in a zip file, and more, See [Configure additional options for exports](/docs/configure-additional-options-for-exports).
13. Click **Export**.
## Schedule an emailed export
Scheduled emails send the latest published version of the workbook, unless you select a tagged version.
To schedule an emailed report:
1. From the workbook menu (), select **Share and export> Schedule exports…**.
2. If this is the first schedule for the workbook, click **Add schedule**, otherwise click **+ New schedule**.
3. In the **Recipient** field, enter one or more comma-separated Sigma teams, Sigma users, or email addresses. You can email up to 1,000 recipients unless you use the **Run queries as recipient** option.
If export authentication is configured for your organization, you can only send the export to email addresses associated with an authorized domain. When you attempt to create the schedule, Sigma notifies you if an email address contains a domain that's not allowed. An admin can change this setting. See [Restrict export recipients](/docs/restrict-export-recipients).
4. (Optional) To add CC or BCC recipients to the scheduled export, select **CC** and/or **BCC** and enter either the email addresses of your desired recipients, or a team name. If you are entering multiple emails or teams, each email address and team name should be separated by commas. If **Run queries as recipient** is enabled, either as an [organization requirement](/docs/restrict-export-recipients#require-email-exports-to-run-queries-as-recipient) or for this specific export, only users that have been added to the [Cc/Bcc allowlist](/docs/restrict-export-recipients#add-recipients-to-ccbcc-allowlist-when-run-as-recipient-is-enabled) can be added as Cc/Bcc recipients.
If a recipient is added to the both CC and BCC fields, they only receive the email as a CC recipient. This applies to both BCC recipients specified in the **Schedule exports** modal, and global BCC recipients configured by an admin. See [Customize email branding](/docs/custom-email-branding) for more information on setting up global BCC recipients.
5. (Optional) In the **Subject** field, enter a subject line. To use [dynamic text](/docs/text-elements#add-dynamic-text-based-on-your-data) in your subject line, press **=** and enter your desired formula.
6. (Optional) In the **Message** field, enter a message. To use [dynamic text](/docs/text-elements#add-dynamic-text-based-on-your-data) in your subject line, press **=** and enter your desired formula. To format your message with HTML, see [Format an email message](/docs/format-an-email-message).
7. If the workbook has tagged versions or bookmarks, select which one you want to send.
8. In the **Attachments** section, choose what you want to export as an attachment. You can export:
* An **Entire workbook** and export all workbook pages.
* A specific workbook page, by navigating to the workbook page and choosing **Entire page**.
* An element on a specific workbook page, by navigating to the workbook page and choosing the name of the element.
Select **+ Add** to add more attachments.
9. For each attachment, select a supported file format. For a matrix of supported file formats, see [Available export destinations and formats](/docs/send-or-schedule-workbook-exports#available-export-destinations-and-formats).
Exercise caution when exporting or downloading workbook content that uses controls to filter sensitive data. If you request or schedule a download or export of any data, reports, workbooks, logs, or other assets (“**Exported Content**”) from the Sigma Platform to destinations or recipients selected by you (“**Export**”), you agree and understand that (i) Sigma may store the Exported Content for up to 24 hours to complete your Export, (ii) Sigma may store applicable control values as URL parameters in trace logs used for debugging and troubleshooting purposes, when Exporting to to PDF or PNG formats, and (iii) Sigma may process, store, and transfer (including transfers to regions outside region where the Export originates) the Exported Content (including any personal data therein) for the purposes of completing your Export.
10. In the **Frequency** section, set the delivery schedule:
* (Optional) Select the dropdown for **Daily** and select **Weekly**, **Monthly**, or **Custom**.
* For **Daily**, select **Once a day** or **Multiple times**.
* For **Weekly**, select which days of the week to send an email, and choose between **Once a day** or **Multiple times**.
* For **Monthly**, select which day of the month to send an email, and the time of day.
* For **Custom**, specify a schedule using cron syntax. See [Set up a custom delivery schedule](/docs/configure-additional-options-for-exports#set-up-a-custom-delivery-schedule).
If you select **Multiple times**, specify the frequency. For example, every 2 hours on the :15 of the hour between 9 AM and 6 PM.
If you don't have the option to set a specific frequency, export frequency might be restricted for your organization. For more details, see [Restrict export recipients and frequency](/docs/restrict-export-recipients).
* (Optional) Adjust the default schedule time zone using the dropdown menu.
* (Optional) Choose how often to send the export: **Always** or only **If a condition is met**. See [Schedule a conditional export or alert](/docs/schedule-a-conditional-export-or-alert).
* (Optional) If you choose to send an export only **If a condition is met**, you can turn on the switch to stop notifying after a set number of occurrences per day, week, or in total.
11. (Optional) By default, Sigma includes a link to the workbook in the email body. If you don't want to include a link, deselect the checkbox for **Include link to workbook**.
12. (Optional) By default, an export captures data accessible to the export creator. To limit the export to only what the recipient has permission to access, select the checkbox for **Run queries as recipient**. If you do not see the checkbox, your account type might not be assigned the **Run exports as recipient** permission.
**Run queries as recipient** only succeeds if you email 300 or fewer recipients and all of the recipients are Sigma users. If you enable this option and not all recipients are Sigma users, the email fails to send. The sender of the export receives a failure notification email with the error message: "No users found in organization for the provided email recipients".
When an export is run as recipient, each query runs separately per recipient. Larger recipient lists result in more queries sent to the database and longer processing times.
13. (Optional) Depending on the attachment formats that you select, you can configure more options like combining attachments, sending attachments in a zip file, and more, See [Configure additional options for exports](/docs/configure-additional-options-for-exports).
14. (Optional) Select the checkbox for **Customize control values** to filter the exported data according to the value of one or more workbook controls. See [Configure additional options for exports](/docs/configure-additional-options-for-exports).
15. Click **Create**.
## Related resources
* [Manage Your Schedules](/docs/manage-your-schedules)
* [Send a workbook export to email recipients](/docs/send-a-workbook-export-to-email-recipients)
* [Send Slack notifications](/docs/send-slack-notifications)
* [Schedule a conditional export or alert](/docs/schedule-a-conditional-export-or-alert)
* [Apply control values to scheduled exports](/docs/apply-control-values-to-scheduled-exports)