> For clean Markdown of any page, append .md to the page URL.
> For a complete documentation index, see https://help.sigmacomputing.com/llms.txt.
> For AI client integration (Claude Code, Cursor, etc.), connect to the MCP server at https://help.sigmacomputing.com/_mcp/server.
# Create custom context menu actions
Add custom context menu items in tables, pivot tables, input tables, and charts to provide clear, discoverable triggers for actions relevant to selected cells and data points. You can add standalone menu items or create nested submenus that execute any action effect, including [calling stored procedures](/docs/create-actions-that-call-stored-procedures), [generating iframe events](/docs/create-actions-that-trigger-embed-iframe-events), and [opening modals](/docs/create-actions-that-navigate-to-destinations#open-or-close-a-modal).
This document explains how to add custom context menu items and define them as action triggers.
## User requirements
The ability to add custom context menu items and define them as action triggers requires the following:
* You must be assigned an [account type](/docs/account-type-and-license-overview) with the **Full explore** or **Create, edit, and publish workbooks** permission enabled.
* You must be the workbook owner or have **Can explore** or **Can edit** [workbook access](/docs/folder-and-document-permissions). *If you have**Can explore** access, you can create and configure custom context menu items in custom views only.*
## Add custom context menu items
Add standalone menu items or create nested submenus to supplement existing cell or data point context menus.
1. Select the element you want to customize.
2. In the editor panel, open the **Format** tab.
3. Expand the **Custom context menu** section and click **+ Add an option** for each menu item you want to add.
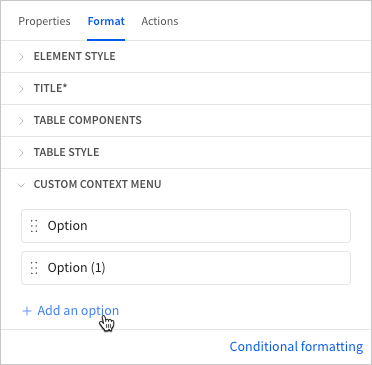
4. In each menu item card, double-click the "Option" placeholder text and enter the label to display in the menu. You can also click  **More** and select **Rename** to edit the text.
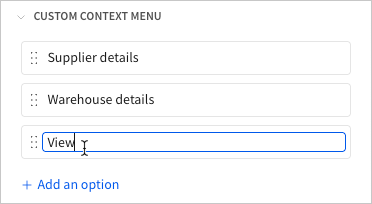
5. \[optional] To reorder the menu items, click and hold any card's drag handle (
**More** and select **Rename** to edit the text.

5. \[optional] To reorder the menu items, click and hold any card's drag handle ( ), then move it to the desired position.
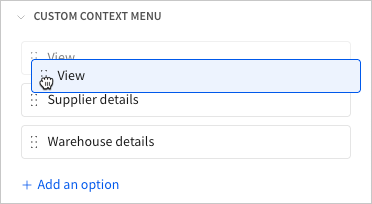
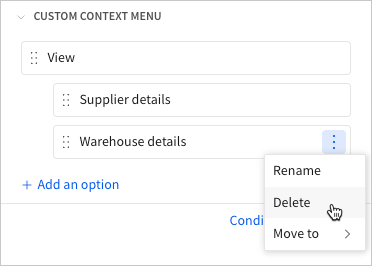
6. \[optional] To create a nested submenu, click and hold a card's drag handle (), then drag it below the parent menu item and slightly to the right. You can also click **More**, then hover over **Move to** and select the name of the parent menu item.
When a menu item is successfully nested in a submenu, it displays as an indented card below the parent menu item.
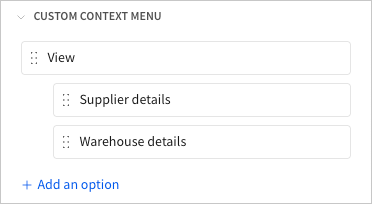
With nested submenus, you can only configure actions on child menu items. Parent menu items cannot trigger actions.
7. \[optional] To delete a menu item, hover over the card, then click **More** and select **Delete**. When you delete a parent menu item, any child menu items are also deleted.
## Define custom context menu items as action triggers
Configure action sequences with custom context menu items as the triggers.
1. Select the element containing custom context menu items.
2. In the editor panel, open the **Actions** tab.
3. Click
), then move it to the desired position.

6. \[optional] To create a nested submenu, click and hold a card's drag handle (), then drag it below the parent menu item and slightly to the right. You can also click **More**, then hover over **Move to** and select the name of the parent menu item.
When a menu item is successfully nested in a submenu, it displays as an indented card below the parent menu item.

With nested submenus, you can only configure actions on child menu items. Parent menu items cannot trigger actions.
7. \[optional] To delete a menu item, hover over the card, then click **More** and select **Delete**. When you delete a parent menu item, any child menu items are also deleted.

## Define custom context menu items as action triggers
Configure action sequences with custom context menu items as the triggers.
1. Select the element containing custom context menu items.
2. In the editor panel, open the **Actions** tab.
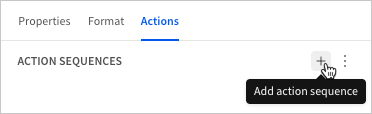
3. Click  **Add action sequence** to create a new sequence, or apply the following steps to the default empty sequence. Each menu item requires a separate sequence.
4. In the sequence, configure the menu item as the action trigger:
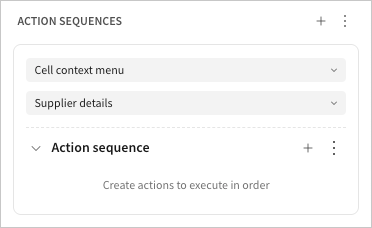
1. Click the trigger type field (upper field) and select **Cell context menu**.
2. Click the trigger target field (lower field) and select the name of a specific menu item.
5. Configure the remaining logic on the menu item. See [Action effects](/docs/intro-to-actions#action-effects) for information about available effects and links to corresponding configuration steps.
6. Repeat steps 3 through 5 for all single menu items and nested child menu items.
**Add action sequence** to create a new sequence, or apply the following steps to the default empty sequence. Each menu item requires a separate sequence.

4. In the sequence, configure the menu item as the action trigger:
1. Click the trigger type field (upper field) and select **Cell context menu**.
2. Click the trigger target field (lower field) and select the name of a specific menu item.

5. Configure the remaining logic on the menu item. See [Action effects](/docs/intro-to-actions#action-effects) for information about available effects and links to corresponding configuration steps.
6. Repeat steps 3 through 5 for all single menu items and nested child menu items.