> For clean Markdown of any page, append .md to the page URL.
> For a complete documentation index, see https://help.sigmacomputing.com/llms.txt.
> For AI client integration (Claude Code, Cursor, etc.), connect to the MCP server at https://help.sigmacomputing.com/_mcp/server.
# Create and manage data models
Build a data model to create a collection of table and input table elements that you can reference as data sources in workbooks and other data models across your organization. The familiar workbook-style format allows you to easily transform and analyze your data while streamlining data model permissions.
This document explains how to create and manage data models. For information about data model concepts, see [Get started with data modeling](/docs/get-started-with-data-modeling). If you plan to use data models with Sigma Assistant and other AI tools, see [Data modeling best practices](/docs/data-modeling-best-practices).
After you [create your data model](#create-a-data-model), you can customize it and extend the functionality further to enable analysts and business users:
* [Pass values from a workbook to a data model using a parameter](/docs/create-and-manage-a-control-element#pass-a-value-from-a-workbook-control-to-a-data-model-control)
* [Define relationships in data models](/docs/define-relationships-in-data-models)
* [Create and manage metrics](/docs/create-and-manage-metrics)
* [Configure column-level security](/docs/column-level-security)
[Datasets](/docs/datasets) are deprecated:
* Starting June 2, 2026, you will no longer be able to create datasets or edit existing datasets.
* Starting September 15, 2026, you will no longer be able to use datasets as a data source or view datasets in Sigma.
Migrate your datasets to data models and update any documents that use datasets as a data source to use a different source. See [Migrate a dataset to a data model](/docs/migrate-a-dataset-to-a-data-model).
## User requirements
The ability to create or manage a data model requires the following:
* You must be assigned an [account type](/docs/account-type-and-license-overview) with the **Create, edit, and publish data models** permissions enabled.
* You must be the data model owner or be granted **Can edit** [access](/docs/folder-and-document-permissions) to the data model.
## Create a data model
To create a data model, do the following:
1. Go to your **Home** page.
2. Click  **Create New** and select **Data Model** from the menu.
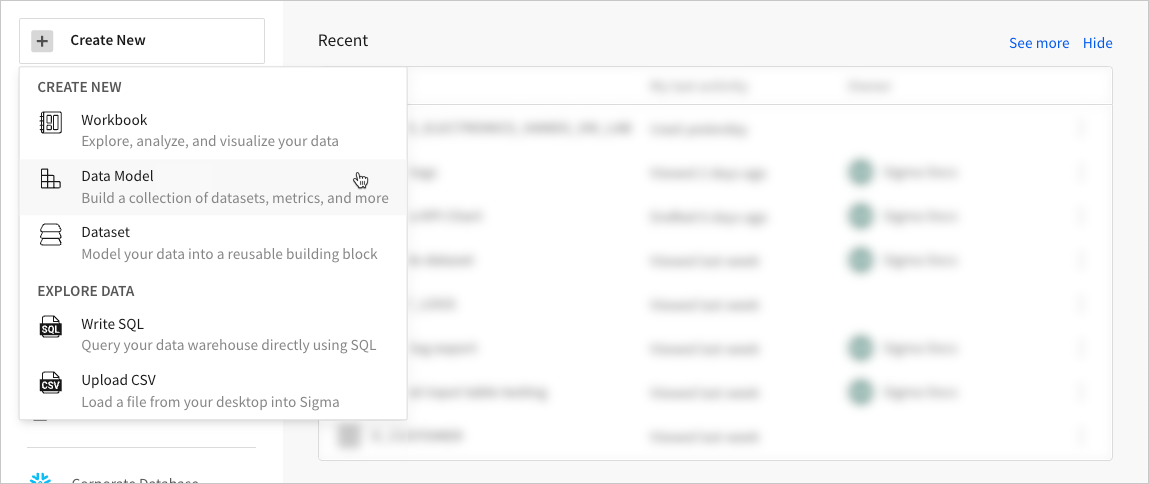
3. A new data model opens to the [workbook page](/docs/navigate-data-models#data-model-workbook-page). Use one of the following methods to add data:
* In the **Add element** bar, select a **Data > Table** or **Input**, then choose an input table element.
If you select a table or a linked input table, choose the element’s data source. The data source can be data from your data platform, a CSV upload, custom SQL, or an existing element from any data model.
Future data-level changes applied to the source can be reflected in the data model. Some changes, like filters, are automatically inherited. For other changes, like added or removed columns, Sigma displays a prompt when you reopen the data model workbook page. For those other changes, you can follow the prompt to either ignore the changes or update the reusable element. Display-level changes, like hidden columns or column groupings, are not inherited.
* Copy and paste a table or input table element from an existing workbook or data model. For more information, see [Copy and paste elements](/docs/copy-and-paste-elements).
Reusable elements created from copy/paste are not synced with the original copied element and do not reflect future changes applied to the original element.
4. \[optional] Create additional reusable elements and transform the data as needed. You can group columns, aggregate values, create child elements, add control elements, and more, just like in a workbook.
5. To save the new reusable elements, click **Publish**.
When the data model saves successfully, the [overview page](/docs/navigate-data-models#data-model-overview-page) opens. You can then preview each reusable element and [continue managing the data model](#manage-an-existing-data-model).
### Create a data model from a workbook table
You can also create a data model from a table in a workbook. For example, if you uploaded a CSV-formatted file to a workbook directly and now want to reuse the data from the file in another workbook, you can create a data model from the table element with the CSV-formatted file as a data source.
1. Open the workbook that has the table element you want to convert to a data model.
2. Right-click on the element, or hover over the element and click
**Create New** and select **Data Model** from the menu.

3. A new data model opens to the [workbook page](/docs/navigate-data-models#data-model-workbook-page). Use one of the following methods to add data:
* In the **Add element** bar, select a **Data > Table** or **Input**, then choose an input table element.
If you select a table or a linked input table, choose the element’s data source. The data source can be data from your data platform, a CSV upload, custom SQL, or an existing element from any data model.
Future data-level changes applied to the source can be reflected in the data model. Some changes, like filters, are automatically inherited. For other changes, like added or removed columns, Sigma displays a prompt when you reopen the data model workbook page. For those other changes, you can follow the prompt to either ignore the changes or update the reusable element. Display-level changes, like hidden columns or column groupings, are not inherited.
* Copy and paste a table or input table element from an existing workbook or data model. For more information, see [Copy and paste elements](/docs/copy-and-paste-elements).
Reusable elements created from copy/paste are not synced with the original copied element and do not reflect future changes applied to the original element.
4. \[optional] Create additional reusable elements and transform the data as needed. You can group columns, aggregate values, create child elements, add control elements, and more, just like in a workbook.
5. To save the new reusable elements, click **Publish**.
When the data model saves successfully, the [overview page](/docs/navigate-data-models#data-model-overview-page) opens. You can then preview each reusable element and [continue managing the data model](#manage-an-existing-data-model).
### Create a data model from a workbook table
You can also create a data model from a table in a workbook. For example, if you uploaded a CSV-formatted file to a workbook directly and now want to reuse the data from the file in another workbook, you can create a data model from the table element with the CSV-formatted file as a data source.
1. Open the workbook that has the table element you want to convert to a data model.
2. Right-click on the element, or hover over the element and click  **More**.
3. Select **Advanced options > Create data model...**.
4. In the **Create data model** modal that appears, click **Next**.
5. In the **Add to a new data model** modal, type a name for the data model and choose a destination location to organize the data model.
6. Click **Create**. The data model opens in a new tab.
## Manage an existing data model
You can make changes to data model metadata, share a data model with others, or make changes to the data sources in the data model. You can also delete data models and recover deleted data models.
### Edit a data model name
Choose a unique name to make it easy for members to search for and identify the data model.
1. Open the data model you want to edit.
2. In the data model header, select the document name and choose **File > Rename**.
The document name becomes editable.
3. Rename the data model, then press Enter or click anywhere to apply the change.
4. Publish the data model to make the name change available downstream.
### Edit a data model description
Enter a description to provide additional information about the data model and its elements to make it easier for users and Sigma Assistant to search for and identify the data model.
When using Sigma Assistant with a data model as a source, you can also add specific context to be included along with the prompt to the AI provider, which can further improve accuracy. See [Manage AI context for a data model](/docs/manage-ai-context-for-data-models).
1. Open the data model.
2. On the [overview page](/docs/navigate-data-models#data-model-overview-page), in the **About the data model** section of the sidebar, click the description field and update the text.
Sigma immediately applies the change.
### Add a description to a column in a data model
Add a description to specific columns to provide additional context for Sigma Assistant, analysts, and other users who work with the data. If you use the data model as a data source in a document, the document inherits the column descriptions configured in the data model.
1. Open the data model.
2. In the data model header, select **Edit**.
3. For the column you want to add a description to, click the down arrow (
**More**.
3. Select **Advanced options > Create data model...**.
4. In the **Create data model** modal that appears, click **Next**.
5. In the **Add to a new data model** modal, type a name for the data model and choose a destination location to organize the data model.
6. Click **Create**. The data model opens in a new tab.
## Manage an existing data model
You can make changes to data model metadata, share a data model with others, or make changes to the data sources in the data model. You can also delete data models and recover deleted data models.
### Edit a data model name
Choose a unique name to make it easy for members to search for and identify the data model.
1. Open the data model you want to edit.
2. In the data model header, select the document name and choose **File > Rename**.
The document name becomes editable.
3. Rename the data model, then press Enter or click anywhere to apply the change.
4. Publish the data model to make the name change available downstream.
### Edit a data model description
Enter a description to provide additional information about the data model and its elements to make it easier for users and Sigma Assistant to search for and identify the data model.
When using Sigma Assistant with a data model as a source, you can also add specific context to be included along with the prompt to the AI provider, which can further improve accuracy. See [Manage AI context for a data model](/docs/manage-ai-context-for-data-models).
1. Open the data model.
2. On the [overview page](/docs/navigate-data-models#data-model-overview-page), in the **About the data model** section of the sidebar, click the description field and update the text.
Sigma immediately applies the change.
### Add a description to a column in a data model
Add a description to specific columns to provide additional context for Sigma Assistant, analysts, and other users who work with the data. If you use the data model as a data source in a document, the document inherits the column descriptions configured in the data model.
1. Open the data model.
2. In the data model header, select **Edit**.
3. For the column you want to add a description to, click the down arrow ( ) to open the column menu.
4. Select **Set description**.
5. Set the description for a single column or multiple columns in the data element:
* To add a description to a single column, enter a description in the **Set column description** modal and press **Save**.
* To add a description for multiple columns in the data element, select **Edit all descriptions** and enter descriptions for the desired columns.
If a column does not have a description set in the data model, the description from the data catalog is used. If a description is not set for the column in the data catalog, the description from the data platform or dbt is used, if one exists. See [Review and manage your data catalog](/docs/manage-data-catalog#add-column-descriptions) and [Manage a dbt integration](/docs/manage-dbt-integration#dbt-data).
### Share the data model
Share a data model to allow members of your organization to use the elements as data sources. Users who are not granted access to use a specific data model cannot view or select its elements as data sources in workbooks and other data models.
1. Open the data model that you want to share.
2. In the data model header, select the document name to open the document menu, then select **Share**.
3. In the **Share Data Model** modal, search for and select an organization member, team, or email address.
4. In the **Permission** field, select an option:
| | |
| :----------- | :---------------------------------------------------------------------------- |
| **Can view** | Allows selected users to view and use the data model and its elements. |
| **Can edit** | Allows selected users to view, use, and edit the data model and its elements. |
5. Click **Share** to save the permissions.
### Enable or disable an element as a data source
By default, elements in a data model are visible as data sources in workbooks and other data models. You can enable or disable an element as a data source at any time. Elements disabled as a source are available on the page of a data model but are hidden from the data model overview, and thus also hidden from viewers of the data model.
You can create a relationship between elements disabled as sources. For the related columns to be available for use in other data models or workbooks, the primary source in a relationship (or the highest level primary source in a hierarchy of relationships) must be enabled as a data source. See [Define relationships in data models](/docs/define-relationships-in-data-models).
1. Open the data model containing the element you want to edit.
2. In the data model header, click **Edit**.
3. Locate and select the element in the **ERD** or the [workbook page](/docs/navigate-data-models#data-model-workbook-page), then in the editor panel, select the **Modeling** tab.
4. In **Source visibility** section, turn on or turn off the **Visible as source** toggle. By default, the toggle is turned on to make the table available as a data source to workbooks and other data models.
When an element is disabled as a data source, existing documents that use the element as a data source continue to use the element as a data source.
### Edit an element
Edit an element in a data model as you might in a Sigma workbook.
1. Open the data model containing the element you want to edit.
2. In the data model header, click **Edit** to open the [workbook page](/docs/navigate-data-models#data-model-workbook-page).
3. Locate the element you want to edit, then modify it as needed.
If you make changes to the element that might cause columns to be unavailable to documents that use the element as a data source, when you publish the data model you are prompted to perform content validation. See [Validate content in a data model](/docs/validate-content-data-model).
### Delete an element
Delete an element to permanently remove it from the data model.
1. Open the data model containing the element you want to delete.
2. In the data model header, click **Edit** to open the [workbook page](/docs/navigate-data-models#data-model-workbook-page).
3. Hover over or select the element you want to delete, then click **More** and select **Delete element** from the menu.
After you delete an element, when you publish the data model you are prompted to perform content validation. See [Validate content in a data model](/docs/validate-content-data-model).
### Delete a data model
To delete a data model you must be the owner of the data model, have **Can edit** access to it, or have the **Admin** account type.
1. Select the data model name to open the document menu, then select **File > Delete...**.
2. On the **Confirm Deletion** modal, click **Delete**.
### Recover a deleted data model
To recover a data model that has been deleted, you must be the owner of the data model or have the **Admin** account type.
1. Go to your
) to open the column menu.
4. Select **Set description**.
5. Set the description for a single column or multiple columns in the data element:
* To add a description to a single column, enter a description in the **Set column description** modal and press **Save**.
* To add a description for multiple columns in the data element, select **Edit all descriptions** and enter descriptions for the desired columns.
If a column does not have a description set in the data model, the description from the data catalog is used. If a description is not set for the column in the data catalog, the description from the data platform or dbt is used, if one exists. See [Review and manage your data catalog](/docs/manage-data-catalog#add-column-descriptions) and [Manage a dbt integration](/docs/manage-dbt-integration#dbt-data).
### Share the data model
Share a data model to allow members of your organization to use the elements as data sources. Users who are not granted access to use a specific data model cannot view or select its elements as data sources in workbooks and other data models.
1. Open the data model that you want to share.
2. In the data model header, select the document name to open the document menu, then select **Share**.
3. In the **Share Data Model** modal, search for and select an organization member, team, or email address.
4. In the **Permission** field, select an option:
| | |
| :----------- | :---------------------------------------------------------------------------- |
| **Can view** | Allows selected users to view and use the data model and its elements. |
| **Can edit** | Allows selected users to view, use, and edit the data model and its elements. |
5. Click **Share** to save the permissions.
### Enable or disable an element as a data source
By default, elements in a data model are visible as data sources in workbooks and other data models. You can enable or disable an element as a data source at any time. Elements disabled as a source are available on the page of a data model but are hidden from the data model overview, and thus also hidden from viewers of the data model.
You can create a relationship between elements disabled as sources. For the related columns to be available for use in other data models or workbooks, the primary source in a relationship (or the highest level primary source in a hierarchy of relationships) must be enabled as a data source. See [Define relationships in data models](/docs/define-relationships-in-data-models).
1. Open the data model containing the element you want to edit.
2. In the data model header, click **Edit**.
3. Locate and select the element in the **ERD** or the [workbook page](/docs/navigate-data-models#data-model-workbook-page), then in the editor panel, select the **Modeling** tab.
4. In **Source visibility** section, turn on or turn off the **Visible as source** toggle. By default, the toggle is turned on to make the table available as a data source to workbooks and other data models.
When an element is disabled as a data source, existing documents that use the element as a data source continue to use the element as a data source.
### Edit an element
Edit an element in a data model as you might in a Sigma workbook.
1. Open the data model containing the element you want to edit.
2. In the data model header, click **Edit** to open the [workbook page](/docs/navigate-data-models#data-model-workbook-page).
3. Locate the element you want to edit, then modify it as needed.
If you make changes to the element that might cause columns to be unavailable to documents that use the element as a data source, when you publish the data model you are prompted to perform content validation. See [Validate content in a data model](/docs/validate-content-data-model).
### Delete an element
Delete an element to permanently remove it from the data model.
1. Open the data model containing the element you want to delete.
2. In the data model header, click **Edit** to open the [workbook page](/docs/navigate-data-models#data-model-workbook-page).
3. Hover over or select the element you want to delete, then click **More** and select **Delete element** from the menu.
After you delete an element, when you publish the data model you are prompted to perform content validation. See [Validate content in a data model](/docs/validate-content-data-model).
### Delete a data model
To delete a data model you must be the owner of the data model, have **Can edit** access to it, or have the **Admin** account type.
1. Select the data model name to open the document menu, then select **File > Delete...**.
2. On the **Confirm Deletion** modal, click **Delete**.
### Recover a deleted data model
To recover a data model that has been deleted, you must be the owner of the data model or have the **Admin** account type.
1. Go to your  **Home** page.
2. In the navigation menu, select
**Home** page.
2. In the navigation menu, select  **Trash**.
3. In the **Trash** page, search the list of deleted documents and click the one you want to recover. You can sort the **Name**, **Deleted on**, or **Deleted by** columns to help identify the applicable document.
4. In the **Document has been deleted** modal, click **Recover**. Sigma immediately opens the recovered document.
## Related resources
* [Get started with data modeling](/docs/get-started-with-data-modeling)
* [Navigate data models](/docs/navigate-data-models)
**Trash**.
3. In the **Trash** page, search the list of deleted documents and click the one you want to recover. You can sort the **Name**, **Deleted on**, or **Deleted by** columns to help identify the applicable document.
4. In the **Document has been deleted** modal, click **Recover**. Sigma immediately opens the recovered document.
## Related resources
* [Get started with data modeling](/docs/get-started-with-data-modeling)
* [Navigate data models](/docs/navigate-data-models)