> For clean Markdown of any page, append .md to the page URL.
> For a complete documentation index, see https://help.sigmacomputing.com/llms.txt.
> For AI client integration (Claude Code, Cursor, etc.), connect to the MCP server at https://help.sigmacomputing.com/_mcp/server.

# Create actions that send notifications and export data

You can create workbook actions that initiate direct workbook and report downloads as well as exports to email, Slack, Microsoft Teams, Microsoft SharePoint, webhooks, and cloud storage.

You can also create actions that send notifications to users and channels via email, Slack, and Microsoft Teams, independent of an export or attachment. Notifications can be sent to either specific lists of recipients or dynamic lists based on information from the workbook.

This document explains how to create actions that export content and notify users. For more information about configuring actions in Sigma, see [Intro to actions](/docs/intro-to-actions). For more information on exporting data, see [Send or schedule workbook exports](/docs/send-or-schedule-workbook-exports).

## User requirements

The following requirements apply to users who configure actions. Users who access and interact with a workbook can typically trigger all existing actions within it. Any restrictions are noted in this document.

The ability to configure actions requires the following:

* You must be assigned an [account type](/docs/account-type-and-license-overview) with the **Full explore** or **Create, edit, and publish workbooks** permission enabled.

* You must be the workbook owner or be granted **Can explore**<sup>1</sup> or **Can edit** [access to the workbook](/docs/folder-and-document-permissions).

<p class="footnote">
  1

  If you’re granted <strong>Can explore</strong> access to the workbook, you can configure actions in custom, saved, and shared views. Actions saved to views do not apply to the workbook’s published version.
</p>

## Considerations

* The **Notify and export** action cannot be triggered while editing the workbook.
* If you want to target a control with the **Pass control values** field of a **Notify and export** action, the control must exist in the published version of the workbook.

## Send notifications or export data to email

Create an action that sends an email notification to a list of selected recipients, including the option to add cc and bcc recipients. The email can optionally include an attachment, allowing you to export an entire workbook, a specific page, or an individual element.

If a recipient is added to both the **Cc** and **Bcc** fields, they only receive the email as a cc recipient.

To configure an export to email that is not managed by a workbook action, see [Export to email](/docs/export-to-email).

This action can only be configured and triggered by users assigned an account type with the **Export to email** permission enabled.

1. Open the draft, a custom view, or a saved view of a workbook. If you open a saved view, go to the workbook header and click <img src="https://sigma-docs-screenshots.s3.us-west-2.amazonaws.com/Icons/custom-view.svg" alt="" /> **Customize this view** to enable changes.

2. Select the trigger element (the element users must interact with to initiate the action).

   If the trigger element is a plugin, select the name of the plugin configuration object under **Custom plugin**. In your code editor, refresh your plugin, then test the action in the workbook. For more information, see [Configure plugins to use as trigger elements](/docs/configure-plugins-to-work-with-actions#configure-plugins-to-use-as-trigger-elements).

3. In the editor panel, open the **Actions** tab.

4. [Create a new sequence](/docs/create-and-manage-action-sequences), or locate an existing sequence that you want to modify.

5. Select the default action (if creating a new sequence), or click <img src="https://sigma-docs-screenshots.s3.us-west-2.amazonaws.com/Icons/button-add.svg" alt="" /> **Add action** to add a new action to the sequence.

6. In the modal, configure the required fields to define the response:

<table>
  <tbody>
    <tr>
      <td>
        **Action**
      </td>

      <td>
        Select 

        **Notify and export**

        .
      </td>
    </tr>

    <tr>
      <td>
        **Destination**
      </td>

      <td>
        Select 

        **Email**

        .
      </td>
    </tr>

    <tr>
      <td>
        **Recipient**
      </td>

      <td>
        For 

        **Specific users / teams**

        , enter one or more comma-separated email addresses for the recipients.

        <br />

        <br />

        For 

        **Dynamic recipients**

        , provide a list of users based on dynamic information from a control or formula. If your action is configured on a table element, repeated container, or single row container, you can also create a list of dynamic recipients from a column.
      </td>
    </tr>

    <tr>
      <td>
        **Cc**
      </td>

      <td>
        (Optional) Turn on the 

        **Cc**

         toggle to add one or more comma-separated email addresses for cc recipients.

        <br />

        <br />

        For 

        **Dynamic recipients**

        , provide a list of users based on dynamic information from a control or formula. If your action is configured on a table element, repeated container, or single row container, you can also create a list of dynamic recipients from a column.
      </td>
    </tr>

    <tr>
      <td>
        **Bcc**
      </td>

      <td>
        (Optional) Turn on the 

        **Bcc**

         toggle to add one or more comma-separated email addresses for bcc recipients.

        <br />

        <br />

        For 

        **Dynamic recipients**

        , provide a list of users based on dynamic information from a control or formula. If your action is configured on a table element, repeated container, or single row container, you can also create a list of dynamic recipients from a column.
      </td>
    </tr>

    <tr>
      <td>
        **Subject**
      </td>

      <td>
        Enter a subject line for the email notification. For dynamic text, press 

        **=**

         on your keyboard to open the formula bar and 

        [configure dynamic text](/docs/text-elements#add-dynamic-text-based-on-your-data)

        .
      </td>
    </tr>

    <tr>
      <td>
        **Message**
      </td>

      <td>
        \[optional] Enter a message to include in the email body. For dynamic text, press 

        **=**

         on your keyboard to open the formula bar and 

        [configure dynamic text](/docs/text-elements#add-dynamic-text-based-on-your-data)

        . Sigma includes basic information about the sender and workbook in the email body. For information on formatting an email message, see 

        [Format an email message](/docs/format-an-email-message)

        .
      </td>
    </tr>

    <tr>
      <td>
        **Link to workbook**
      </td>

      <td>
        \[optional] On by default. Turn on the 

        **Link to workbook**

         toggle to include a link to the workbook in the email. When the toggle is turned on, you can select whether to link to the entire workbook (top of page 1), a specific page (top of specified page), or a specific element.
      </td>
    </tr>

    <tr>
      <td>
        **Attachment**
      </td>

      <td>
        To send an email notification without an attachment, turn off the 

        **Attachment**

         toggle. To export workbook data by email, turn on the 

        **Attachment**

         toggle. Select the workbook content to export, and choose a file type.
      </td>
    </tr>

    <tr>
      <td>
        **Pass control values**
      </td>

      <td>
        To pass a value to a control when the user opens the workbook from the email, click 

        <img src="https://sigma-docs-screenshots.s3.us-west-2.amazonaws.com/Icons/add.svg" alt="" />

         to add a rule. In the rule, identify the control to update, as well as the value to pass. You can set the control using a static value, a value from a column, or a value from a formula.
      </td>
    </tr>

    <tr>
      <td>
        **More options**
      </td>

      <td>
        \[optional] Select the 

        **Run queries as recipient**

         checkbox to run workbook queries as the recipient of the email. If deselected (default), queries run as the user who performs the action. When 

        **Run queries as recipient**

         is enabled, each query runs separately per recipient. Larger list of recipients result in more queries and longer processing times. Each recipient must be a Sigma user, and the user who performs the action must have an account type with the 

        **Run exports as recipient permission**

         enabled.

        <br />

        <br />

        \[optional] Select the 

        **Send as .zip file**

         checkbox to send attachments as a compressed zip file.

        <br />

        <br />

        \[optional] If your workbook contains a pivot table and you're exporting to Excel, select 

        **Repeat header labels**

         to repeat the header labels so that each pivot table row and column header appears in its own cell.
      </td>
    </tr>
  </tbody>
</table>

## Send notifications or export data to Slack

Create an action that sends a Slack notification to a list of selected recipients. Optionally, you can include an attachment, allowing you to export an entire workbook, a specific page, or an individual element to Slack.

To create a Slack notification action, the [Slack integration](/docs/manage-slack-integration) must be enabled for your organization. If you want to send notifications to a private channel, you must also add Sigma to the private channel. See [Adding Sigma to a private Slack channel](/docs/manage-slack-integration#adding-sigma-to-a-private-slack-channel).

This action can only be configured and triggered by users assigned an account type with the **Export to Slack** permission enabled.

1. Open the draft, a custom view, or a saved view of a workbook. If you open a saved view, go to the workbook header and click <img src="https://sigma-docs-screenshots.s3.us-west-2.amazonaws.com/Icons/custom-view.svg" alt="" /> **Customize this view** to enable changes.

2. Select the trigger element (the element users must interact with to initiate the action).

   If the trigger element is a plugin, select the name of the plugin configuration object under **Custom plugin**. In your code editor, refresh your plugin, then test the action in the workbook. For more information, see [Configure plugins to use as trigger elements](/docs/configure-plugins-to-work-with-actions#configure-plugins-to-use-as-trigger-elements).

3. In the editor panel, open the **Actions** tab.

4. [Create a new sequence](/docs/create-and-manage-action-sequences), or locate an existing sequence that you want to modify.

5. Select the default action (if creating a new sequence), or click <img src="https://sigma-docs-screenshots.s3.us-west-2.amazonaws.com/Icons/button-add.svg" alt="" /> **Add action** to add a new action to the sequence.

6. In the modal, configure the required fields to define the response:

<table>
  <tbody>
    <tr>
      <td>
        **Action**
      </td>

      <td>
        Select 

        **Notify and export**

        .
      </td>
    </tr>

    <tr>
      <td>
        **Destination**
      </td>

      <td>
        Select 

        **Slack**

        .
      </td>
    </tr>

    <tr>
      <td>
        **To**
      </td>

      <td>
        For 

        **Specific users / teams**

        , enter a comma-separated list of Slack #channel-names, channel-IDs, or member-IDs.

        <br />

        <br />

        For 

        **Dynamic recipients**

        , provide a list of channel-names, channel-IDs, or member-IDs based on dynamic information from a control or formula. If your action is configured on a table element, repeated container, or single row container, you can also provide a column that contains a list of channel-names, channel-IDs, or member-IDs.
      </td>
    </tr>

    <tr>
      <td>
        **Message**
      </td>

      <td>
        \[optional] Enter a message to include in the Slack notification. For dynamic text, press 

        **=**

         on your keyboard to open the formula bar and 

        [configure dynamic text](/docs/text-elements#add-dynamic-text-based-on-your-data)

        . Sigma includes basic information about the sender and workbook in the message body by default. For more information on formatting a message, such as tagging users, see 

        [Format a slack message](/docs/format-a-slack-message)

        .
      </td>
    </tr>

    <tr>
      <td>
        **Link to workbook**
      </td>

      <td>
        \[optional] On by default. Turn on the 

        **Link to workbook**

         toggle to include a link to the workbook in the message. When the toggle is turned on, you can select whether to link to the entire workbook (top of page 1), a specific page (top of specified page), or a specific element.
      </td>
    </tr>

    <tr>
      <td>
        **Attachment**
      </td>

      <td>
        To send a Slack notification without an attachment, turn off the 

        **Attachment**

         toggle. To export workbook data to Slack, turn on the 

        **Attachment**

         toggle. Select the workbook content to export, and choose a file type.
      </td>
    </tr>

    <tr>
      <td>
        **Pass control values**
      </td>

      <td>
        To pass a value to a control when the user opens the workbook from Slack, click 

        <img src="https://sigma-docs-screenshots.s3.us-west-2.amazonaws.com/Icons/add.svg" alt="" />

         to add a rule. In the rule, identify the control to update, as well as the value to pass. You can set the control using a static value, a value from a column, or a value from a formula.
      </td>
    </tr>

    <tr>
      <td>
        **More options**
      </td>

      <td>
        \[optional] If your workbook contains a pivot table and you're exporting to Excel or CSV, select 

        **Repeat header labels**

         to repeat the header labels so that each pivot table row and column header appears in its own cell.
      </td>
    </tr>
  </tbody>
</table>

When sending to Slack channels, Sigma recommends using channel-IDs rather than channel names. For more information, see [Format a slack message](/docs/format-a-slack-message).

## Send notifications or export data to Microsoft Teams

Create an action that sends a Microsoft Teams notification to selected recipients. Optionally, you can include an attachment, allowing you to export an entire workbook, a specific page, or an individual element to Microsoft Teams.

To create a Teams notification action, the [Microsoft integration](/docs/manage-microsoft-integration) must be enabled for your organization. To send notifications to a channel, you must also add Sigma to the first named channel. See [Add the Sigma Notifications app to Teams](/docs/manage-microsoft-integration#add-the-sigma-notifications-app-to-teams).

This action can only be configured and triggered by users assigned an account type with the **Export to Microsoft Teams and SharePoint** permission enabled.

1. Open the draft, a custom view, or a saved view of a workbook. If you open a saved view, go to the workbook header and click <img src="https://sigma-docs-screenshots.s3.us-west-2.amazonaws.com/Icons/custom-view.svg" alt="" /> **Customize this view** to enable changes.

2. Select the trigger element (the element users must interact with to initiate the action).

   If the trigger element is a plugin, select the name of the plugin configuration object under **Custom plugin**. In your code editor, refresh your plugin, then test the action in the workbook. For more information, see [Configure plugins to use as trigger elements](/docs/configure-plugins-to-work-with-actions#configure-plugins-to-use-as-trigger-elements).

3. In the editor panel, open the **Actions** tab.

4. [Create a new sequence](/docs/create-and-manage-action-sequences), or locate an existing sequence that you want to modify.

5. Select the default action (if creating a new sequence), or click <img src="https://sigma-docs-screenshots.s3.us-west-2.amazonaws.com/Icons/button-add.svg" alt="" /> **Add action** to add a new action to the sequence.

6. In the modal, configure the required fields to define the response:

<table>
  <tbody>
    <tr>
      <td>
        **Action**
      </td>

      <td>
        Select 

        **Notify and export**

        .
      </td>
    </tr>

    <tr>
      <td>
        **Destination**
      </td>

      <td>
        Select 

        **Microsoft Teams**

        .
      </td>
    </tr>

    <tr>
      <td>
        **To**
      </td>

      <td>
        For 

        **Specific channel(s)**

        , Enter one or more URLs for the Microsoft Teams channels you want to notify. Use the format:

        <br />

        `https://teams.microsoft.com/l/channel/><channel-ID-and-name>?groupId=<group-ID>&tenantId=\<tenant-ID>`

        <br />

        <br />

        For 

        **Dynamic recipients**

        , provide a list of channels, based on dynamic information from a control or formula. If your action is configured on a table element, repeated container, or single row container, you can also provide a column that contains a list of channel URLs.
      </td>
    </tr>

    <tr>
      <td>
        **Message**
      </td>

      <td>
        \[optional] Enter a message to include in the notification. For dynamic text, press 

        **=**

         on your keyboard to open the formula bar and 

        [configure dynamic text](/docs/text-elements#add-dynamic-text-based-on-your-data)

        . Sigma includes basic information about the sender and workbook in the message body by default. For more information on formatting a Teams message, such as supported Markdown syntax, see 

        [Format a Microsoft Teams message](/docs/format-a-microsoft-teams-message)

        .
      </td>
    </tr>

    <tr>
      <td>
        **Attachment**
      </td>

      <td>
        To send a Teams notification without an attachment, turn off the 

        **Attachment**

         toggle. To export workbook data to Teams, turn on the 

        **Attachment**

         toggle. Select the workbook content to export, and choose a file type.
      </td>
    </tr>

    <tr>
      <td>
        **Pass control values**
      </td>

      <td>
        To pass a value to a control when the user opens the workbook from Microsoft Teams, click 

        <img src="https://sigma-docs-screenshots.s3.us-west-2.amazonaws.com/Icons/add.svg" alt="" />

         to add a rule. In the rule, identify the control to update, as well as the value to pass. You can set the control using a static value, a value from a column, or a value from a formula.
      </td>
    </tr>

    <tr>
      <td>
        **More options**
      </td>

      <td>
        \[optional] If your workbook contains a pivot table and you're exporting to Excel, select 

        **Repeat header labels**

         to repeat the header labels so that each pivot table row and column header appears in its own cell.
      </td>
    </tr>
  </tbody>
</table>

## Download a workbook

Create an action that downloads an entire workbook, a specific page, or an individual element directly to the interacting user’s device.

This action can only be configured and triggered by users assigned an account type with the **Download** permission enabled.

1. Open the draft, a custom view, or a saved view of a workbook. If you open a saved view, go to the workbook header and click <img src="https://sigma-docs-screenshots.s3.us-west-2.amazonaws.com/Icons/custom-view.svg" alt="" /> **Customize this view** to enable changes.

2. Select the trigger element (the element users must interact with to initiate the action).

   If the trigger element is a plugin, select the name of the plugin configuration object under **Custom plugin**. In your code editor, refresh your plugin, then test the action in the workbook. For more information, see [Configure plugins to use as trigger elements](/docs/configure-plugins-to-work-with-actions#configure-plugins-to-use-as-trigger-elements).

3. In the editor panel, open the **Actions** tab.

4. [Create a new sequence](/docs/create-and-manage-action-sequences), or locate an existing sequence that you want to modify.

5. Select the default action (if creating a new sequence), or click <img src="https://sigma-docs-screenshots.s3.us-west-2.amazonaws.com/Icons/button-add.svg" alt="" /> **Add action** to add a new action to the sequence.

6. In the modal, configure the required fields to define the response:

<table>
  <tbody>
    <tr>
      <td>
        **Action**
      </td>

      <td>
        Select 

        **Notify and export**

        .
      </td>
    </tr>

    <tr>
      <td>
        **Destination**
      </td>

      <td>
        Select 

        **Download**

        .
      </td>
    </tr>

    <tr>
      <td>
        **Attachment**
      </td>

      <td>
        Select 

        **Current document**

        . Select the workbook content (e.g. page, element) to download, then choose a file format.
      </td>
    </tr>

    <tr>
      <td>
        **More options**
      </td>

      <td>
        \[optional] If your workbook contains a pivot table and you're exporting to Excel, select 

        **Repeat header labels**

         to repeat the header labels so that each pivot table row and column header appears in its own cell.

        <br />

        <br />

        \[optional] If you're exporting to Excel and your workbook contains a table, you can select 

        **Include metadata**

         to include additional metadata with the export, such as the date and time of the export and the user performing the export.
      </td>
    </tr>
  </tbody>
</table>

## Download a report

Create a workbook action that downloads an entire [report](/docs/reports-overview).

The following additional permissions are required:

* This action can only be configured and triggered by users assigned an account type with the **Download** permission enabled.
* You must have the **View reports** or **Create, edit, and publish reports** permission enabled on your account type.
* You must be the report owner or be granted **Can view** access to the report.

1. Open the draft, a custom view, or a saved view of a workbook. If you open a saved view, go to the workbook header and click <img src="https://sigma-docs-screenshots.s3.us-west-2.amazonaws.com/Icons/custom-view.svg" alt="" /> **Customize this view** to enable changes.

2. Select the trigger element (the element users must interact with to initiate the action).

   If the trigger element is a plugin, select the name of the plugin configuration object under **Custom plugin**. In your code editor, refresh your plugin, then test the action in the workbook. For more information, see [Configure plugins to use as trigger elements](/docs/configure-plugins-to-work-with-actions#configure-plugins-to-use-as-trigger-elements).

3. In the editor panel, open the **Actions** tab.

4. [Create a new sequence](/docs/create-and-manage-action-sequences), or locate an existing sequence that you want to modify.

5. Select the default action (if creating a new sequence), or click <img src="https://sigma-docs-screenshots.s3.us-west-2.amazonaws.com/Icons/button-add.svg" alt="" /> **Add action** to add a new action to the sequence.

6. In the modal, configure the required fields to define the response:

<table>
  <tbody>
    <tr>
      <td>
        **Action**
      </td>

      <td>
        Select 

        **Notify and export**

        .
      </td>
    </tr>

    <tr>
      <td>
        **Destination**
      </td>

      <td>
        Select 

        **Download**

        .
      </td>
    </tr>

    <tr>
      <td>
        **Attachment**
      </td>

      <td>
        Select 

        **External report**

        , then select the report to download. Reports are downloaded as PDF files. The latest published version of the report is downloaded.
      </td>
    </tr>

    <tr>
      <td>
        **Pass control values**
      </td>

      <td>
        \[optional] To pass a value to a control in the report, click 

        <img src="https://sigma-docs-screenshots.s3.us-west-2.amazonaws.com/Icons/add.svg" alt="" />

         to add a rule. In the rule, identify the control to update, as well as the value to pass. You can set the control using a static value, a value from a column, or a value from a formula.
      </td>
    </tr>
  </tbody>
</table>

## Export to SharePoint

Create an action that exports an entire workbook, a specific page, or an individual element to Microsoft SharePoint.

To create a SharePoint export action, the [Microsoft integration](/docs/manage-microsoft-integration) must be enabled for your organization.

This action can only be configured and triggered by users assigned an account type with the **Export to Microsoft Teams and Sharepoint** permission enabled.

1. Open the draft, a custom view, or a saved view of a workbook. If you open a saved view, go to the workbook header and click <img src="https://sigma-docs-screenshots.s3.us-west-2.amazonaws.com/Icons/custom-view.svg" alt="" /> **Customize this view** to enable changes.

2. Select the trigger element (the element users must interact with to initiate the action).

   If the trigger element is a plugin, select the name of the plugin configuration object under **Custom plugin**. In your code editor, refresh your plugin, then test the action in the workbook. For more information, see [Configure plugins to use as trigger elements](/docs/configure-plugins-to-work-with-actions#configure-plugins-to-use-as-trigger-elements).

3. In the editor panel, open the **Actions** tab.

4. [Create a new sequence](/docs/create-and-manage-action-sequences), or locate an existing sequence that you want to modify.

5. Select the default action (if creating a new sequence), or click <img src="https://sigma-docs-screenshots.s3.us-west-2.amazonaws.com/Icons/button-add.svg" alt="" /> **Add action** to add a new action to the sequence.

6. In the modal, configure the required fields to define the response:

<table>
  <tbody>
    <tr>
      <td>
        **Action**
      </td>

      <td>
        Select 

        **Notify and export**

        .
      </td>
    </tr>

    <tr>
      <td>
        **Destination**
      </td>

      <td>
        Select 

        **SharePoint**

        .
      </td>
    </tr>

    <tr>
      <td>
        **Folder URL**
      </td>

      <td>
        Enter the URL for the SharePoint folder. For example:

        <br />

        <br />

        `https://<organization>.sharepoint.com/:f:/s/<site-name>/<folder-id>`
      </td>
    </tr>

    <tr>
      <td>
        **Attachment**
      </td>

      <td>
        Select the workbook content to export, then choose a file type and layout.
      </td>
    </tr>

    <tr>
      <td>
        **More options**
      </td>

      <td>
        \[optional] If your workbook contains a pivot table and you're exporting to Excel, select 

        **Repeat header labels**

         to repeat the header labels so that each pivot table row and column header appears in its own cell.
      </td>
    </tr>
  </tbody>
</table>

## Export to a webhook

Create an action that exports an individual element’s data to another application with a webhook.

This action can only be configured and triggered by users assigned an account type with the **Export to webhook** permission enabled.

1. Open the draft, a custom view, or a saved view of a workbook. If you open a saved view, go to the workbook header and click <img src="https://sigma-docs-screenshots.s3.us-west-2.amazonaws.com/Icons/custom-view.svg" alt="" /> **Customize this view** to enable changes.

2. Select the trigger element (the element users must interact with to initiate the action).

   If the trigger element is a plugin, select the name of the plugin configuration object under **Custom plugin**. In your code editor, refresh your plugin, then test the action in the workbook. For more information, see [Configure plugins to use as trigger elements](/docs/configure-plugins-to-work-with-actions#configure-plugins-to-use-as-trigger-elements).

3. In the editor panel, open the **Actions** tab.

4. [Create a new sequence](/docs/create-and-manage-action-sequences), or locate an existing sequence that you want to modify.

5. Select the default action (if creating a new sequence), or click <img src="https://sigma-docs-screenshots.s3.us-west-2.amazonaws.com/Icons/button-add.svg" alt="" /> **Add action** to add a new action to the sequence.

6. In the modal, configure the required fields to define the response:

<table>
  <tbody>
    <tr>
      <td>
        **Action**
      </td>

      <td>
        Select 

        **Notify and export**

        .
      </td>
    </tr>

    <tr>
      <td>
        **Destination**
      </td>

      <td>
        Select 

        **Webhook**

        .
      </td>
    </tr>

    <tr>
      <td>
        **Endpoint**
      </td>

      <td>
        Enter the receiving application’s endpoint.
      </td>
    </tr>

    <tr>
      <td>
        **Attachment**
      </td>

      <td>
        Select an element to export, then choose a data format.
      </td>
    </tr>

    <tr>
      <td>
        **More options**
      </td>

      <td>
        \[optional] If your workbook contains a pivot table and you're exporting to CSV, select 

        **Repeat header labels**

         to repeat the header labels so that each pivot table row and column header appears in its own cell.
      </td>
    </tr>
  </tbody>
</table>

## Export to cloud storage

Create an action that exports an individual element’s data to cloud storage.

This action can only be configured and triggered by users assigned an account type with the **Export to cloud** permission enabled.

Exporting to cloud storage is only supported for workbooks that use a Snowflake or Redshift connection as a data source. For more information, see [Export to cloud storage](/docs/export-to-cloud-storage).

1. Open the draft, a custom view, or a saved view of a workbook. If you open a saved view, go to the workbook header and click <img src="https://sigma-docs-screenshots.s3.us-west-2.amazonaws.com/Icons/custom-view.svg" alt="" /> **Customize this view** to enable changes.

2. Select the trigger element (the element users must interact with to initiate the action).

   If the trigger element is a plugin, select the name of the plugin configuration object under **Custom plugin**. In your code editor, refresh your plugin, then test the action in the workbook. For more information, see [Configure plugins to use as trigger elements](/docs/configure-plugins-to-work-with-actions#configure-plugins-to-use-as-trigger-elements).

3. In the editor panel, open the **Actions** tab.

4. [Create a new sequence](/docs/create-and-manage-action-sequences), or locate an existing sequence that you want to modify.

5. Select the default action (if creating a new sequence), or click <img src="https://sigma-docs-screenshots.s3.us-west-2.amazonaws.com/Icons/button-add.svg" alt="" /> **Add action** to add a new action to the sequence.

6. In the modal, configure the required fields to define the response:

<table>
  <tbody>
    <tr>
      <td>
        **Action**
      </td>

      <td>
        Select 

        **Notify and export**

        .
      </td>
    </tr>

    <tr>
      <td>
        **Destination**
      </td>

      <td>
        Select 

        **Cloud Storage**

        .
      </td>
    </tr>

    <tr>
      <td>
        **Storage integration**
      </td>

      <td>
        Enter an integration name.
      </td>
    </tr>

    <tr>
      <td>
        **Cloud Storage URI**
      </td>

      <td>
        Enter a file path for the export destination.
      </td>
    </tr>

    <tr>
      <td>
        **Element**
      </td>

      <td>
        Select an element to export, then choose a file format.
      </td>
    </tr>

    <tr>
      <td>
        **More options**
      </td>

      <td>
        \[optional] Select the 

        **Prefix file name with current date and time**

         checkbox to include the export date and time (in ISO format) in the file name.
      </td>
    </tr>
  </tbody>
</table>

## Example: Slack notification workflow for new project tasks

You can configure workbook actions that send notifications to users about changes to a workbook, such as new data entry or changes to existing data.

In this example, imagine you're interacting with a project tracker app. Users can add new projects, tasks, and statuses.

![A gif shows a user demonstrating a project tracker application, adding a task to a project.](https://files.buildwithfern.com/sigma.docs.buildwithfern.com/2b1bec9a053be41a2a7f642788872cd2f9ebfa14d261d59e04044fde6c812060/assets/docs-images/0c3888e79db402e74697fdbf6bcfbc309dea0ff2661fe55f21fe5be16c4d33ce-Schedule_Weekly_Recap_Clip.gif)

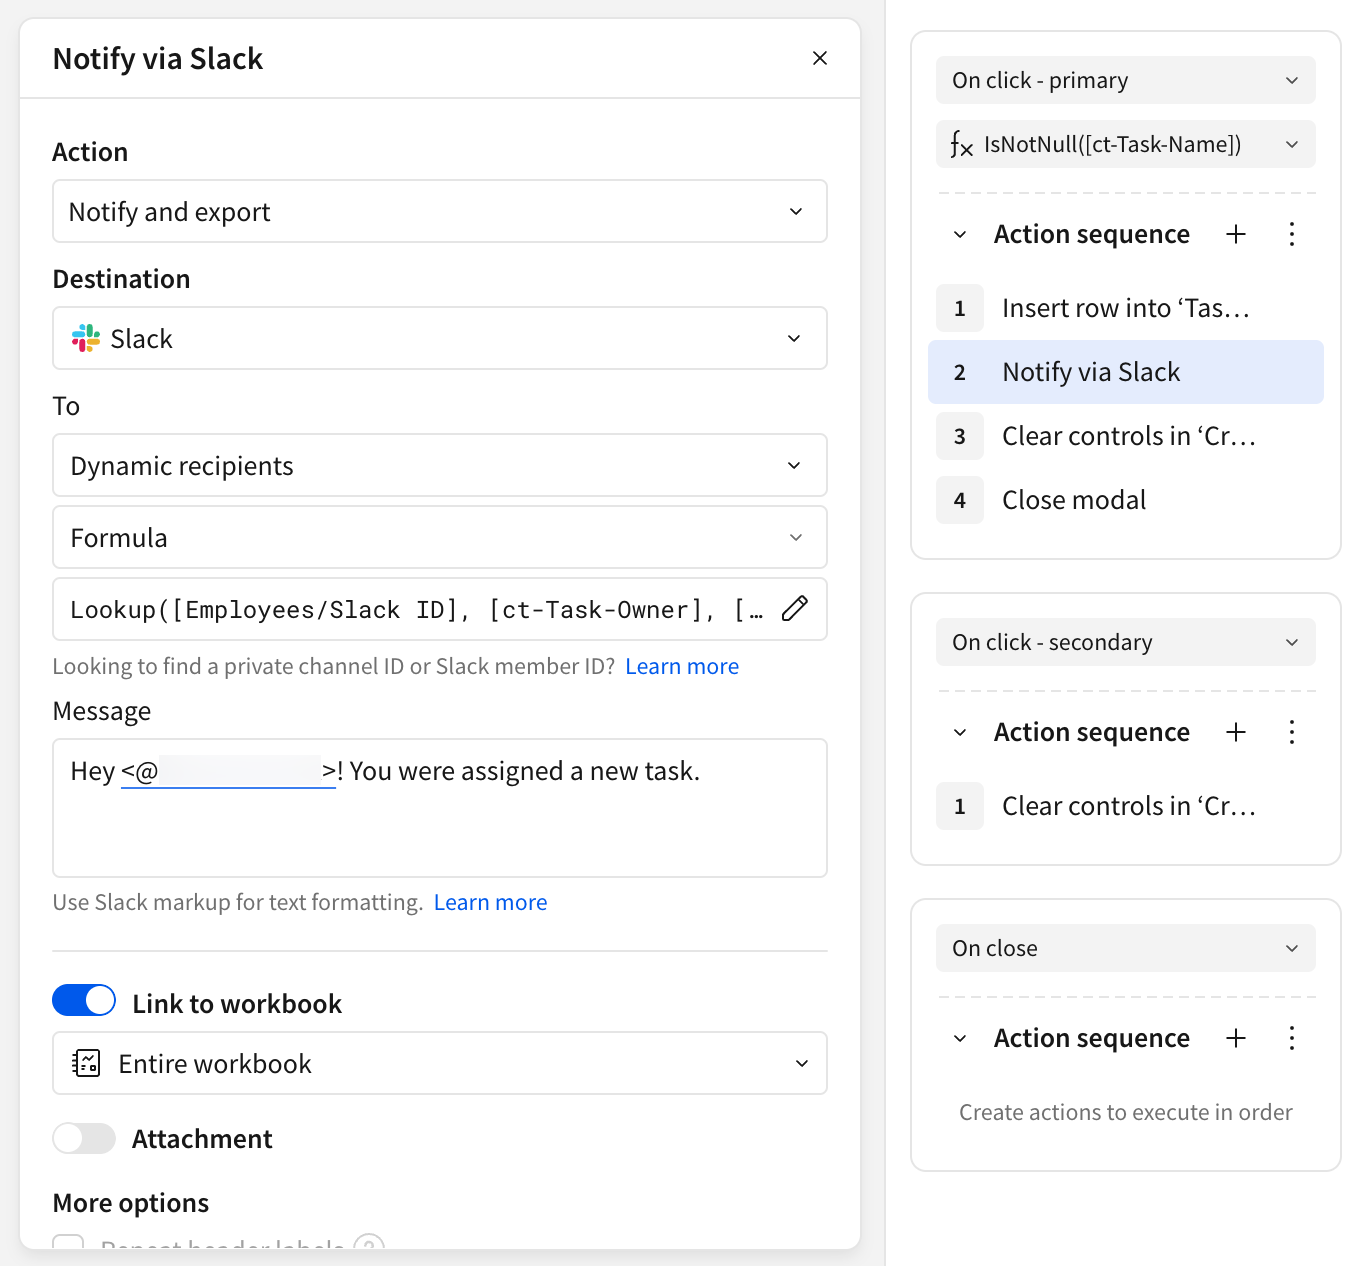
You decide to configure a workbook action to send a notification whenever a user assigns a new task. Currently, users add tasks by selecting **Add Task**, entering information into the provided modal, and clicking the **Create Task** button to add the task to an input table.

Using the **Notify and export** action, you can send a notification by Slack whenever someone clicks the **Create Task** button, so that users are always up to date when a task is assigned to them.

1. Navigate to the **Create Task** modal, and open the **Actions** panel.
2. Add an action to the **On click - primary** action sequence.
3. In the **Action** modal, configure the action:

<table>
  <tbody>
    <tr>
      <td>
        **Action**
      </td>

      <td>
        Select 

        **Notify and export**

        .
      </td>
    </tr>

    <tr>
      <td>
        **Destination**
      </td>

      <td>
        Select 

        **Slack**

        .
      </td>
    </tr>

    <tr>
      <td>
        **To**
      </td>

      <td>
        Select 

        **Dynamic recipients**

         and 

        **Formula**

        .

        <br />

        <br />

        In the formula bar, enter the following formula:

        <br />

        `Lookup([Employees/Slack ID], [ct-Task-Owner], [Employees/Name])`

        <br />

        <br />

        In the context of this workbook, this formula uses a Lookup to return a Slack ID based on the name of the user currently selected in the Task Owner control.
      </td>
    </tr>

    <tr>
      <td>
        **Message**
      </td>

      <td>
        Enter a message to be sent to the user with the assigned task.

        <br />

        <br />

        To tag them, press 

        **=**

         on your keyboard to open the formula bar. In the formula bar, enter the following formula:

        <br />

        `"<@" & Lookup([Employees/Slack ID], [ct-Task-Owner], [Employees/Name]) & ">"`

        <br />

        <br />

        In the context of this workbook, this concatenates the user's Slack ID with the characters required to tag the user in Slack. For more information on this, see 

        [Format a slack message](/docs/format-a-slack-message)

        .
      </td>
    </tr>

    <tr>
      <td>
        **Link to workbook**
      </td>

      <td>
        Turn on the

        **Link to workbook**

         toggle to include a link to the workbook in the message. Select 

        **Entire workbook**

        .
      </td>
    </tr>

    <tr>
      <td>
        **Attachment**
      </td>

      <td>
        Turn off the 

        **Attachment**

         toggle.
      </td>
    </tr>
  </tbody>
</table>

4. \[optional] Click <img src="https://sigma-docs-screenshots.s3.us-west-2.amazonaws.com/Icons/more.svg" alt="" /> **More** to add a condition to the **Action sequence**. In the example below, the condition `IsNotNull([ct-Task-Name])` prevents tasks from being published with a blank name.
![A screenshot of the Sigma UI shows a notification action configured according to this tutorial](https://files.buildwithfern.com/sigma.docs.buildwithfern.com/a2c3e8c1e98d1eabdd4b369dabb1370b0191adce7b4fccfc202ed696e2331872/assets/docs-images/9dffc044f677f25541ffa8b47d3fa3e0e2eec06269afd716ae1915c8a97bff8e-notification_actions_image_update.png)
