 **Add parameter**.
2. For the query parameter, configure the following fields:
| Field | Description |
| :-------- | :---------------------------------------------------------------------------------------------------------------------------------------------------- |
| **Key** | The key for the query parameter. |
| **Mode** | Select **Static** to set a static value, or **Dynamic** to set the value based on a selection in the workbook when configuring a **Call API** action. |
| **Value** | The value for that query parameter. If **Mode** is set to **Static**, enter the value. |
To identify valid arguments you can use as query parameters, review the documentation for the API as you configure the connector.
3. After configuring the remaining fields in the **New API connector** screen, click **Save**.
For **Static** parameter values, you can set a key and value for the query parameter, which appear in the endpoint in the following way:
```
https://api.example.com/endpoint/?key=value
```
For example, if you configure a **Static** query parameter with the **key** `limit` and the **value** `100`, the endpoint is constructed in the following way:
```
https://api.example.com/endpoint/?limit=100
```
For **Dynamic** parameter values, you can set a key for the query parameter, which appears in the endpoint preview like the following:
```
https://api.example.com/endpoint/?key={{key}}
```
The dynamic value `{{key}}` is populated by the user that creates a **Call API** action with this connector. Any user with access to this connector, as well as an account type with the **Create API actions** permission enabled, can use it in a workbook with any valid value for the query parameter.
### Configure a request body for an API connector
When creating an API connector in Sigma, you can optionally configure a request body in the **Request details** section of the **New API connector** screen.
#### Configure a request body as form-data
To configure the request body as a series of key-value pairs:
1. Under **Request body**, select **form-data**.
2. For **form-data**, configure the following fields:
| Field | Description |
| :-------- | :---------------------------------------------------------------------------------------------------------------------------------------------------- |
| **Key** | The key for this object in the request body. |
| **Mode** | Select **Static** to set a static value, or **Dynamic** to configure a dynamic value when using the connector in a **Call API** action in a workbook. |
| **Value** | The value for that key in the request body. If **Mode** is set to **Static**, enter the value. |
3. (Optional) To configure additional keys for the request body, click **Add key** and configure the fields as described in step 2.
4. After configuring the remaining fields in the **New API connector** screen, click **Save**.
#### Configure a request body as raw JSON, Text, or XML
To configure the request body as **JSON**, **Text**, or **XML**:
1. Under **Request body**, select **raw**.
2. In the dropdown, select **JSON**, **Text**, or **XML**.
3. In the text area, configure the request body for the connector.
* If you configured any dynamic values in the request body, configure their types. For more information, see [Configure dynamic values and types in a request body](#configure-dynamic-values-and-types-in-a-request-body).
When configuring a request body as **JSON**, you can select **Beautify** to automatically format the JSON in the text area, making it easier to read, edit, and organize nested objects.
4. After configuring the remaining fields in the **New API connector** screen, click **Save**.
#### Configure dynamic values and types in a request body
When configuring a **raw** request body, you can add a dynamic value using the following syntax:
```
{{dynamic-value}}
```
When using the connector in a **Call API** action in a workbook, users can populate the dynamic values with a **Static** value, **Control** value, or **Formula**.
You can also apply types to dynamic values in the request body to enforce the data type of that value when users create a **Call API** action in a workbook. After entering a dynamic value in the request body, open the **Type** dropdown and select one of the following types:
* Text
* Number
* Logical
* Variant
* Array
When configuring a dynamic value with the **Array** type, you must set a type for the array's contents. If you set the type of the array to **Object**, you must also set types for the properties of that object.
For example, to configure a connector that sends a request with a list of users, you can set a dynamic value with the type **Array**, set the type of that array's contents to **Object**, and then set the types of each property in that object (e.g. `user_id` with type **Number**).
When users create a **Call API** action and populate a dynamic value with **Static values**, Sigma automatically applies the selected type. For example, if you configure a dynamic value with the type **Text**, Sigma automatically converts **Static values** to text when entered. If a user enters a number (e.g. `123`), it is converted to a string (e.g. `"123"`).
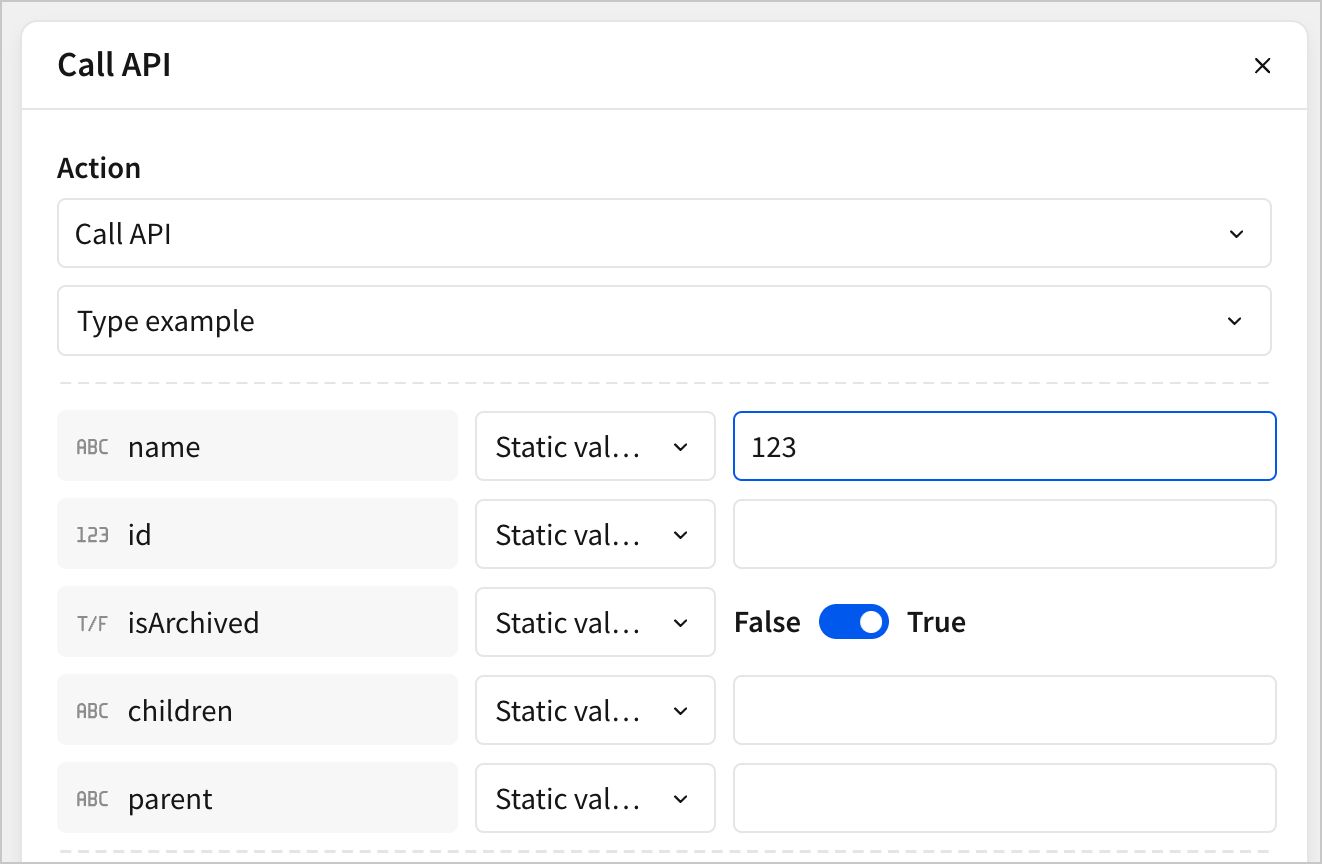
When users create a **Call API** action and populate a dynamic value with a **Control** value or **Formula**, Sigma performs validation for the selected type. For example, if you configure a dynamic value with the type **Text**, Sigma validates inputs from a **Formula** to ensure they are text data. If a user enters a number (e.g. `123`) in the formula bar, Sigma shows an **Invalid type** error.

Controls are only shown in the **Call API** action if the type of the control matches the type of the dynamic value. For example, if you configure a dynamic value with the type **Text**, only controls with a **Text** type are shown.
### Create custom action variables for an API connector
When creating an API connector in Sigma, you can parse the response to create custom action variables.
These action variables are then available to use in workbook action sequences that use the API connector in a **Call API** action. For example, you can parse a response body, and then use that parsed response value in a **Set control value** action after calling the API to set the control based on the response from the API.
To add custom action variables while editing or creating an API connector:
1. Under **Response output**, click **Add**.
2. For the new action variable, configure the following fields:
| Field | Description |
| :---------- | :---------------------------------------------------------------------------------------------------------------------------------------------------------------------------------------- |
| **Name** | The name of the action variable as it appears in action sequences. |
| **Type** | The data type of the action variable in the workbook. |
| **Formula** | Define a formula to parse the response from the API connector. For example, `[response].key[0]` returns the first value of the `key` field from a response with the **Object** data type. |
Consider the data type of the response and the desired data type of the response variable when configuring the **Type** and **Formula**. For example, if you receive an array from the API connector, and want to return the first value of a field in the array to a **Text** control, select **Text** as the **Type**, and use a formula like `[response][0].key`.
3. Click **Save**.
The custom action variable is available to use in workbook action sequences that use the API connector in a **Call API** action. For more information on using the action variable in an action sequence, see [Use variables in actions](/docs/use-variables-in-actions).
### Configure governance settings for an API connector
When creating an API connector in Sigma, you can configure advanced settings to control timeouts, retries, redirects, and rate limiting.
To manage these settings, configure the following fields while editing or creating an API connector:
| Field | Description |
| :------------------------------ | :------------------------------------------------------------------------------------------------------------------------------------------- |
| **Request timeout (seconds)** | The maximum time, in seconds, before requests from this connector fail due to timeout. Set to `30` by default. |
| **Maximum retries** | The maximum number of retries made per request for this connector on any **Retryable status codes**. Set to `0` by default. |
| **Retryable status codes** | A comma-separated list of response status codes that trigger a retry, up to the **Maximum retries**. Set to `429, 502, 503, 504` by default. |
| **Maximum redirects** | The maximum number of redirects before a request from this connector fails. Set to `0` by default. Only supports HTTPS redirects. |
| **Maximum requests per minute** | The maximum number of requests that can be made per minute using this connector. Set to `60` by default. |
To enhance data security, or meet the requirements of a particular platform, you can add mutual authentication to a connector. For more information, see [Configure mutual transport layer security (mTLS) in Sigma](/docs/configure-mutual-transport-layer-security-for-api-connectors-in-sigma).
### Test an API connector
When creating an API connector in Sigma, you can test the connector to ensure it is configured correctly and returns the expected response.
1. After following the steps to [create a new API connector in Sigma](#create-a-new-api-connector-in-sigma), but before clicking **Save**, click **Test connector**.
2. In the **Test connector** modal, enter values for any dynamic parameters in **Request headers**, **Query parameters**, **Path parameters**, or the **Request body**.
3. (Optional) Turn on the **Dry run** toggle to compile and review the request without sending it.
4. Click **Test**.
5. Review the response in the **Test results** section.
6. Click **Close**.
When the **Dry run** toggle is on, Sigma shows you the compiled request that Sigma sends to the API endpoint without sending it. This can be used to review the method, URL, headers, and body of the request without incurring any costs associated with sending an actual request. To test the request and receive a response from the API endpoint, turn off the **Dry run** toggle.
## Grant access to API credentials and connectors
To grant users and teams access to use API credentials and connectors:
1. Go to **Administration** > **API connectors**.
1. From the Sigma header, click your user avatar to open the user menu.
2. Select **Administration** to open the **Administration** portal.
3. From the side panel, select **API connectors**.
2. Select the **Credentials** or **Connectors** tab.
3. Select the credentials or connectors you want to manage.
4. Click
**Add parameter**.
2. For the query parameter, configure the following fields:
| Field | Description |
| :-------- | :---------------------------------------------------------------------------------------------------------------------------------------------------- |
| **Key** | The key for the query parameter. |
| **Mode** | Select **Static** to set a static value, or **Dynamic** to set the value based on a selection in the workbook when configuring a **Call API** action. |
| **Value** | The value for that query parameter. If **Mode** is set to **Static**, enter the value. |
To identify valid arguments you can use as query parameters, review the documentation for the API as you configure the connector.
3. After configuring the remaining fields in the **New API connector** screen, click **Save**.
For **Static** parameter values, you can set a key and value for the query parameter, which appear in the endpoint in the following way:
```
https://api.example.com/endpoint/?key=value
```
For example, if you configure a **Static** query parameter with the **key** `limit` and the **value** `100`, the endpoint is constructed in the following way:
```
https://api.example.com/endpoint/?limit=100
```
For **Dynamic** parameter values, you can set a key for the query parameter, which appears in the endpoint preview like the following:
```
https://api.example.com/endpoint/?key={{key}}
```
The dynamic value `{{key}}` is populated by the user that creates a **Call API** action with this connector. Any user with access to this connector, as well as an account type with the **Create API actions** permission enabled, can use it in a workbook with any valid value for the query parameter.
### Configure a request body for an API connector
When creating an API connector in Sigma, you can optionally configure a request body in the **Request details** section of the **New API connector** screen.
#### Configure a request body as form-data
To configure the request body as a series of key-value pairs:
1. Under **Request body**, select **form-data**.
2. For **form-data**, configure the following fields:
| Field | Description |
| :-------- | :---------------------------------------------------------------------------------------------------------------------------------------------------- |
| **Key** | The key for this object in the request body. |
| **Mode** | Select **Static** to set a static value, or **Dynamic** to configure a dynamic value when using the connector in a **Call API** action in a workbook. |
| **Value** | The value for that key in the request body. If **Mode** is set to **Static**, enter the value. |
3. (Optional) To configure additional keys for the request body, click **Add key** and configure the fields as described in step 2.
4. After configuring the remaining fields in the **New API connector** screen, click **Save**.
#### Configure a request body as raw JSON, Text, or XML
To configure the request body as **JSON**, **Text**, or **XML**:
1. Under **Request body**, select **raw**.
2. In the dropdown, select **JSON**, **Text**, or **XML**.
3. In the text area, configure the request body for the connector.
* If you configured any dynamic values in the request body, configure their types. For more information, see [Configure dynamic values and types in a request body](#configure-dynamic-values-and-types-in-a-request-body).
When configuring a request body as **JSON**, you can select **Beautify** to automatically format the JSON in the text area, making it easier to read, edit, and organize nested objects.
4. After configuring the remaining fields in the **New API connector** screen, click **Save**.
#### Configure dynamic values and types in a request body
When configuring a **raw** request body, you can add a dynamic value using the following syntax:
```
{{dynamic-value}}
```
When using the connector in a **Call API** action in a workbook, users can populate the dynamic values with a **Static** value, **Control** value, or **Formula**.
You can also apply types to dynamic values in the request body to enforce the data type of that value when users create a **Call API** action in a workbook. After entering a dynamic value in the request body, open the **Type** dropdown and select one of the following types:
* Text
* Number
* Logical
* Variant
* Array
When configuring a dynamic value with the **Array** type, you must set a type for the array's contents. If you set the type of the array to **Object**, you must also set types for the properties of that object.
For example, to configure a connector that sends a request with a list of users, you can set a dynamic value with the type **Array**, set the type of that array's contents to **Object**, and then set the types of each property in that object (e.g. `user_id` with type **Number**).
When users create a **Call API** action and populate a dynamic value with **Static values**, Sigma automatically applies the selected type. For example, if you configure a dynamic value with the type **Text**, Sigma automatically converts **Static values** to text when entered. If a user enters a number (e.g. `123`), it is converted to a string (e.g. `"123"`).

When users create a **Call API** action and populate a dynamic value with a **Control** value or **Formula**, Sigma performs validation for the selected type. For example, if you configure a dynamic value with the type **Text**, Sigma validates inputs from a **Formula** to ensure they are text data. If a user enters a number (e.g. `123`) in the formula bar, Sigma shows an **Invalid type** error.

Controls are only shown in the **Call API** action if the type of the control matches the type of the dynamic value. For example, if you configure a dynamic value with the type **Text**, only controls with a **Text** type are shown.
### Create custom action variables for an API connector
When creating an API connector in Sigma, you can parse the response to create custom action variables.
These action variables are then available to use in workbook action sequences that use the API connector in a **Call API** action. For example, you can parse a response body, and then use that parsed response value in a **Set control value** action after calling the API to set the control based on the response from the API.
To add custom action variables while editing or creating an API connector:
1. Under **Response output**, click **Add**.
2. For the new action variable, configure the following fields:
| Field | Description |
| :---------- | :---------------------------------------------------------------------------------------------------------------------------------------------------------------------------------------- |
| **Name** | The name of the action variable as it appears in action sequences. |
| **Type** | The data type of the action variable in the workbook. |
| **Formula** | Define a formula to parse the response from the API connector. For example, `[response].key[0]` returns the first value of the `key` field from a response with the **Object** data type. |
Consider the data type of the response and the desired data type of the response variable when configuring the **Type** and **Formula**. For example, if you receive an array from the API connector, and want to return the first value of a field in the array to a **Text** control, select **Text** as the **Type**, and use a formula like `[response][0].key`.
3. Click **Save**.
The custom action variable is available to use in workbook action sequences that use the API connector in a **Call API** action. For more information on using the action variable in an action sequence, see [Use variables in actions](/docs/use-variables-in-actions).
### Configure governance settings for an API connector
When creating an API connector in Sigma, you can configure advanced settings to control timeouts, retries, redirects, and rate limiting.
To manage these settings, configure the following fields while editing or creating an API connector:
| Field | Description |
| :------------------------------ | :------------------------------------------------------------------------------------------------------------------------------------------- |
| **Request timeout (seconds)** | The maximum time, in seconds, before requests from this connector fail due to timeout. Set to `30` by default. |
| **Maximum retries** | The maximum number of retries made per request for this connector on any **Retryable status codes**. Set to `0` by default. |
| **Retryable status codes** | A comma-separated list of response status codes that trigger a retry, up to the **Maximum retries**. Set to `429, 502, 503, 504` by default. |
| **Maximum redirects** | The maximum number of redirects before a request from this connector fails. Set to `0` by default. Only supports HTTPS redirects. |
| **Maximum requests per minute** | The maximum number of requests that can be made per minute using this connector. Set to `60` by default. |
To enhance data security, or meet the requirements of a particular platform, you can add mutual authentication to a connector. For more information, see [Configure mutual transport layer security (mTLS) in Sigma](/docs/configure-mutual-transport-layer-security-for-api-connectors-in-sigma).
### Test an API connector
When creating an API connector in Sigma, you can test the connector to ensure it is configured correctly and returns the expected response.
1. After following the steps to [create a new API connector in Sigma](#create-a-new-api-connector-in-sigma), but before clicking **Save**, click **Test connector**.
2. In the **Test connector** modal, enter values for any dynamic parameters in **Request headers**, **Query parameters**, **Path parameters**, or the **Request body**.
3. (Optional) Turn on the **Dry run** toggle to compile and review the request without sending it.
4. Click **Test**.
5. Review the response in the **Test results** section.
6. Click **Close**.
When the **Dry run** toggle is on, Sigma shows you the compiled request that Sigma sends to the API endpoint without sending it. This can be used to review the method, URL, headers, and body of the request without incurring any costs associated with sending an actual request. To test the request and receive a response from the API endpoint, turn off the **Dry run** toggle.
## Grant access to API credentials and connectors
To grant users and teams access to use API credentials and connectors:
1. Go to **Administration** > **API connectors**.
1. From the Sigma header, click your user avatar to open the user menu.
2. Select **Administration** to open the **Administration** portal.
3. From the side panel, select **API connectors**.
2. Select the **Credentials** or **Connectors** tab.
3. Select the credentials or connectors you want to manage.
4. Click  **Permissions**
5. In the **Grant access to** modal, search for and select the users or teams to grant access to.
6. Under **Access**, select the access to grant to each user or team.
7. (Optional) To notify users when granting access, select the **Send email** checkbox.
8. (Optional) If you checked the **Send email** checkbox, enter a message in the **Add a message** field.
9. Click **Share**.
### API connector and credential permissions matrix
The following table details the minimum document, account, connector, and credential permissions required for several common use cases involving API actions. For example, to trigger an action sequence with a **Call API** action, a user must have **Can view** access to the workbook with the action sequence, an account type with the **Trigger API actions** permission enabled, and **Can use** access to the connector.
**Permissions**
5. In the **Grant access to** modal, search for and select the users or teams to grant access to.
6. Under **Access**, select the access to grant to each user or team.
7. (Optional) To notify users when granting access, select the **Send email** checkbox.
8. (Optional) If you checked the **Send email** checkbox, enter a message in the **Add a message** field.
9. Click **Share**.
### API connector and credential permissions matrix
The following table details the minimum document, account, connector, and credential permissions required for several common use cases involving API actions. For example, to trigger an action sequence with a **Call API** action, a user must have **Can view** access to the workbook with the action sequence, an account type with the **Trigger API actions** permission enabled, and **Can use** access to the connector.
| Use case | Document permission | Account permission | Connector permission | Credential permission |
|---|---|---|---|---|
|
Trigger an action sequence with a Call API action |
Can view | Trigger API actions | Can use | None |
|
Edit a Call API action |
Can explore | Create API actions | Can use | None |
|
Create a Call API action |
Can explore | Create API actions | Can use | None |
|
View details of an API credential |
None | Manage API connectors | None | Can view |
|
View details of an API connector |
None | Manage API connectors | Can use | None |
|
Edit an API connector |
None | Manage API connectors | Can edit | Can view 1 |
|
Edit an API credential |
None | Manage API connectors | None | Can edit |
|
Create a new API connector |
None | Manage API connectors | None | Can view 1 |
|
Create a new API credential |
None | Manage API connectors | None | None |
1 **Can view** access to the credential is only required to manage the use of the credential in a connector. They are not required to edit other details of a connector.
## Examples For step-by-step tutorials on how to configure API credentials and connectors, see the following: * [Tutorial: Configure API credentials, connectors, and actions for the Sigma REST API](/docs/tutorial-configure-api-credentials-connectors-and-actions-for-the-sigma-rest-api) * [Tutorial: Configure API credentials, connectors, and actions for the NYC Open Data API](/docs/tutorial-configure-api-credentials-connectors-and-actions-for-the-nyc-open-data-api) ## Related resources * [Create actions that call API endpoints](/docs/create-actions-that-call-api-endpoints) * [Configure mutual transport layer security (mTLS) in Sigma](/docs/configure-mutual-transport-layer-security-in-sigma) * [Tutorial: Configure API credentials, connectors, and actions for the NYC Open Data API](/docs/tutorial-configure-api-credentials-connectors-and-actions-for-the-nyc-open-data-api) * [Tutorial: Configure API credentials, connectors, and actions for the Sigma REST API](/docs/tutorial-configure-api-credentials-connectors-and-actions-for-the-sigma-rest-api)