> For clean Markdown of any page, append .md to the page URL.
> For a complete documentation index, see https://help.sigmacomputing.com/llms.txt.
> For AI client integration (Claude Code, Cursor, etc.), connect to the MCP server at https://help.sigmacomputing.com/_mcp/server.
# Configure additional options for exports
> When you export workbook or report data from Sigma, you can configure additional options to control the appearance and content that gets exported.
When you export workbook or report data from Sigma, you can configure additional options to control the appearance and content that gets exported.
The additional options that are available depend on the export destination you select, as well as the document type being exported. Options that are not applicable based on your export configurations will appear greyed out. For more information on supported destinations for workbooks, see [Send or schedule workbook exports](/docs/send-or-schedule-workbook-exports). For more information on supported destinations for reports, see [Share and export reports](/docs/share-and-export-reports#send-or-schedule-report-exports).
## User requirements
To configure export options, you must be assigned an [account type](/docs/account-type-and-license-overview) with relevant export permissions.
## Set up a custom delivery schedule
When you configure a scheduled export, if the default delivery options do not work for your needs, you can set up a custom cron schedule to define the delivery time.
* On the **Schedule Exports** dialog, for the **Frequency**, choose **Custom** and enter a cron expression.
Use cron syntax to specify the minute, hour, day (month), month and day (week). For assistance writing cron expressions, see [crontab guru](https://crontab.guru/).
For example, to send a report at 1:30 AM on the first of every month, enter:
`30 1 1 * *`
This is read as, "run at 30 minutes after 1 AM on the 1st day of the month every month, regardless of the day of the week."
For example, to send a report at 1:05 AM on the first Monday of every quarter, enter:
`5 1 * 1/3 1#1`
This is read as, "run at 5 minutes after 1 AM regardless of the day of the month, every third month from January through December if it is the first Monday of the month."
If you don't have the option to set a custom frequency, export frequency might be restricted for your organization. For more details, see [Restrict export recipients and frequency](/docs/restrict-export-recipients).
## Filter by control values
If your workbook or report uses controls to filter the data on a page or for a given element, you can also choose to filter the exported data by the values of one or more controls.
You can only set this option for scheduled exports.
1. On the **Schedule Exports** dialog, in the **More Options** section, select the checkbox for **Customize control values**.
2. In the **Controls** section that appears, search for and select a control ID in the search box.
3. Select the control value for the control and set it to the value that you want to use for the export.
4. Search to add another control, or click **Create** to save the scheduled export.
## Merge PDF or Excel files
If you export multiple PDF or Excel files, you can combine the attachments into one file:
* Multiple workbook pages or data elements as PDF attachments into one PDF file.
* Multiple data elements as Excel attachments into one Excel file.
To combine attachments into one file, do the following:
* On the **Export** or **Schedule Exports** dialog, in the **More Options** section, select the checkbox for **Combine attachments**.
If you don't see the checkbox, make sure that you selected a file type of **Excel** or **PDF** for at least 2 attachments.
You cannot combine attachments when performing a direct download.
## Compress attachments to a .zip file
If you export one or more attachments that result in a large file size, you can choose to compress the attachments into a ZIP file.
* On the **Export** or **Schedule Exports** dialog, in the **More Options** section, select the checkbox for **Send as .zip file**.
Your attachments appear in one zip file named `merged-report.zip`.
## Repeat header labels
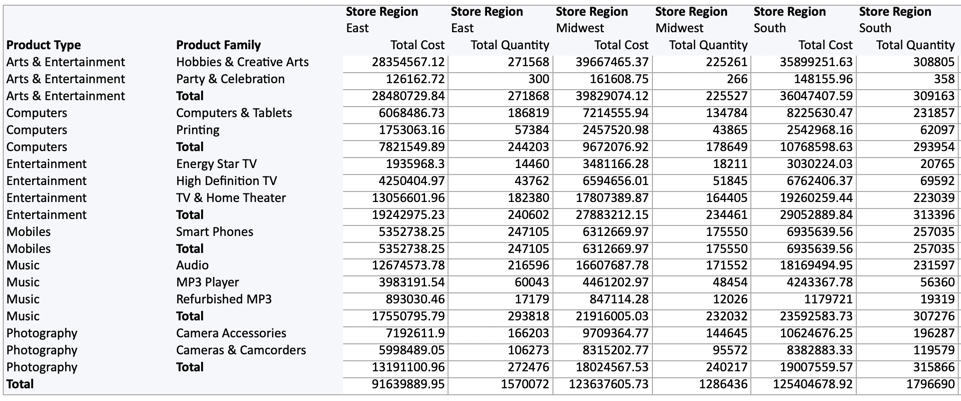
If you export a pivot table to Excel or CSV, you can repeat the header labels so that each pivot table row and column header appears in its own cell:
* On the **Export** or **Schedule Exports** dialog, in the **More Options** section, select the checkbox to **Repeat header labels**.
If you don't see the checkbox, make sure that the file format is Excel or CSV and that you are exporting a pivot table element or a page or workbook with a pivot table element.
For example, for a pivot table like the following:
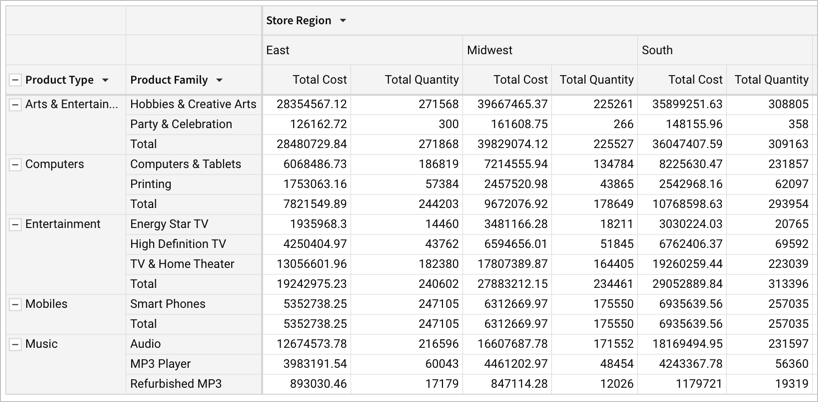
When you export the pivot table element, the headers show up for each pivot table row and column:
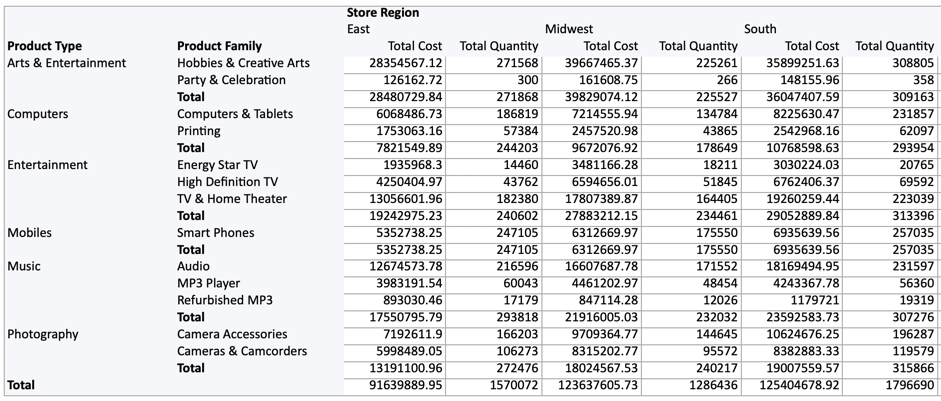
If you don't configure this setting, the pivot table row and column headers only show up once:
To configure this setting in the pivot table itself, see [Repeat row labels](/docs/working-with-pivot-tables#repeat-row-labels).
## Download Excel files with metadata
If you want to include additional metadata with Excel files, such as the date and time of the export and the name of the user downloading the Excel file, do the following:
1. For a workbook or workbook page, select the ( ) to open the menu, then select **Export...**. For a workbook element, select **More**
  > **Export**, then under **Send**, select **Export**.
2. On the **Export** dialog, leave the default **Direct Download** option selected.
3. For the file type, select **Excel**.
4. In the **More Options** section, select the checkbox for **Include metadata**.
5. Select **Export**.
## Format PDF export page layout
When exporting PDF files from Sigma, you can configure several different options to improve the format of the exported report:
* Set a custom page width to match your desired PDF page width. Use 1050 pixels for letter-sized portrait PDF exports, or 1380 pixels for letter-sized landscape PDF exports. Use other pixel widths for other PDF page sizes. See [Layout style settings](/docs/workbook-settings-overview#layout-style-settings).
* Show up to 1000 rows of data in a table in your PDF. See [Show additional rows](#show-additional-rows).
* Add a page break element to control where elements are pushed to the next page of the PDF export. See [Add a page break](#add-a-page-break).
### Show additional rows
If you want to export up to 1,000 rows of a table or pivot table, do the following:
If you want to export an entire workbook or a page of the workbook, the table must be on its own row, without elements next to it, and cannot be in a container.
1. Open the document in **Edit** mode.
2. In your document, locate the element that you want to show up to 1,000 rows of data for.
3. Select **More** > **Export formatting**, then click **Expand table to first 1k rows**. If this option has already been set, a checkmark is visible. 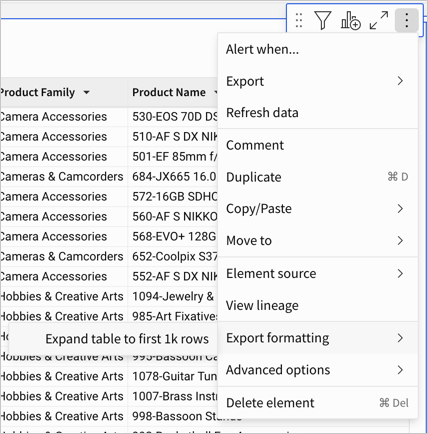
4. Publish the document.
5. Export the document to PDF to make sure the output looks as desired.
6. Make any necessary changes, then set up a scheduled export to your preferred destination.
### Add a page break
In a workbook, if you want to specify where to break a PDF export of the workbook into separate pages, or if workbook elements get cut off or don't display as expected in a PDF export, add one or more page break elements to your workbook pages.
To add a page break:
1. Open the workbook in **Edit** mode.
2. Select
> **Export**, then under **Send**, select **Export**.
2. On the **Export** dialog, leave the default **Direct Download** option selected.
3. For the file type, select **Excel**.
4. In the **More Options** section, select the checkbox for **Include metadata**.
5. Select **Export**.
## Format PDF export page layout
When exporting PDF files from Sigma, you can configure several different options to improve the format of the exported report:
* Set a custom page width to match your desired PDF page width. Use 1050 pixels for letter-sized portrait PDF exports, or 1380 pixels for letter-sized landscape PDF exports. Use other pixel widths for other PDF page sizes. See [Layout style settings](/docs/workbook-settings-overview#layout-style-settings).
* Show up to 1000 rows of data in a table in your PDF. See [Show additional rows](#show-additional-rows).
* Add a page break element to control where elements are pushed to the next page of the PDF export. See [Add a page break](#add-a-page-break).
### Show additional rows
If you want to export up to 1,000 rows of a table or pivot table, do the following:
If you want to export an entire workbook or a page of the workbook, the table must be on its own row, without elements next to it, and cannot be in a container.
1. Open the document in **Edit** mode.
2. In your document, locate the element that you want to show up to 1,000 rows of data for.
3. Select **More** > **Export formatting**, then click **Expand table to first 1k rows**. If this option has already been set, a checkmark is visible. 
4. Publish the document.
5. Export the document to PDF to make sure the output looks as desired.
6. Make any necessary changes, then set up a scheduled export to your preferred destination.
### Add a page break
In a workbook, if you want to specify where to break a PDF export of the workbook into separate pages, or if workbook elements get cut off or don't display as expected in a PDF export, add one or more page break elements to your workbook pages.
To add a page break:
1. Open the workbook in **Edit** mode.
2. Select  to open the workbook's **Add New Element** panel.
3. In the **PDF export elements** section, select a **Page break** element and drag it onto the workbook canvas.
4. Publish the workbook.
5. Export the workbook to PDF to make sure the output looks as desired.
6. Make any necessary changes, then set up a scheduled export to your preferred destination.
### Example PDF layout configurations
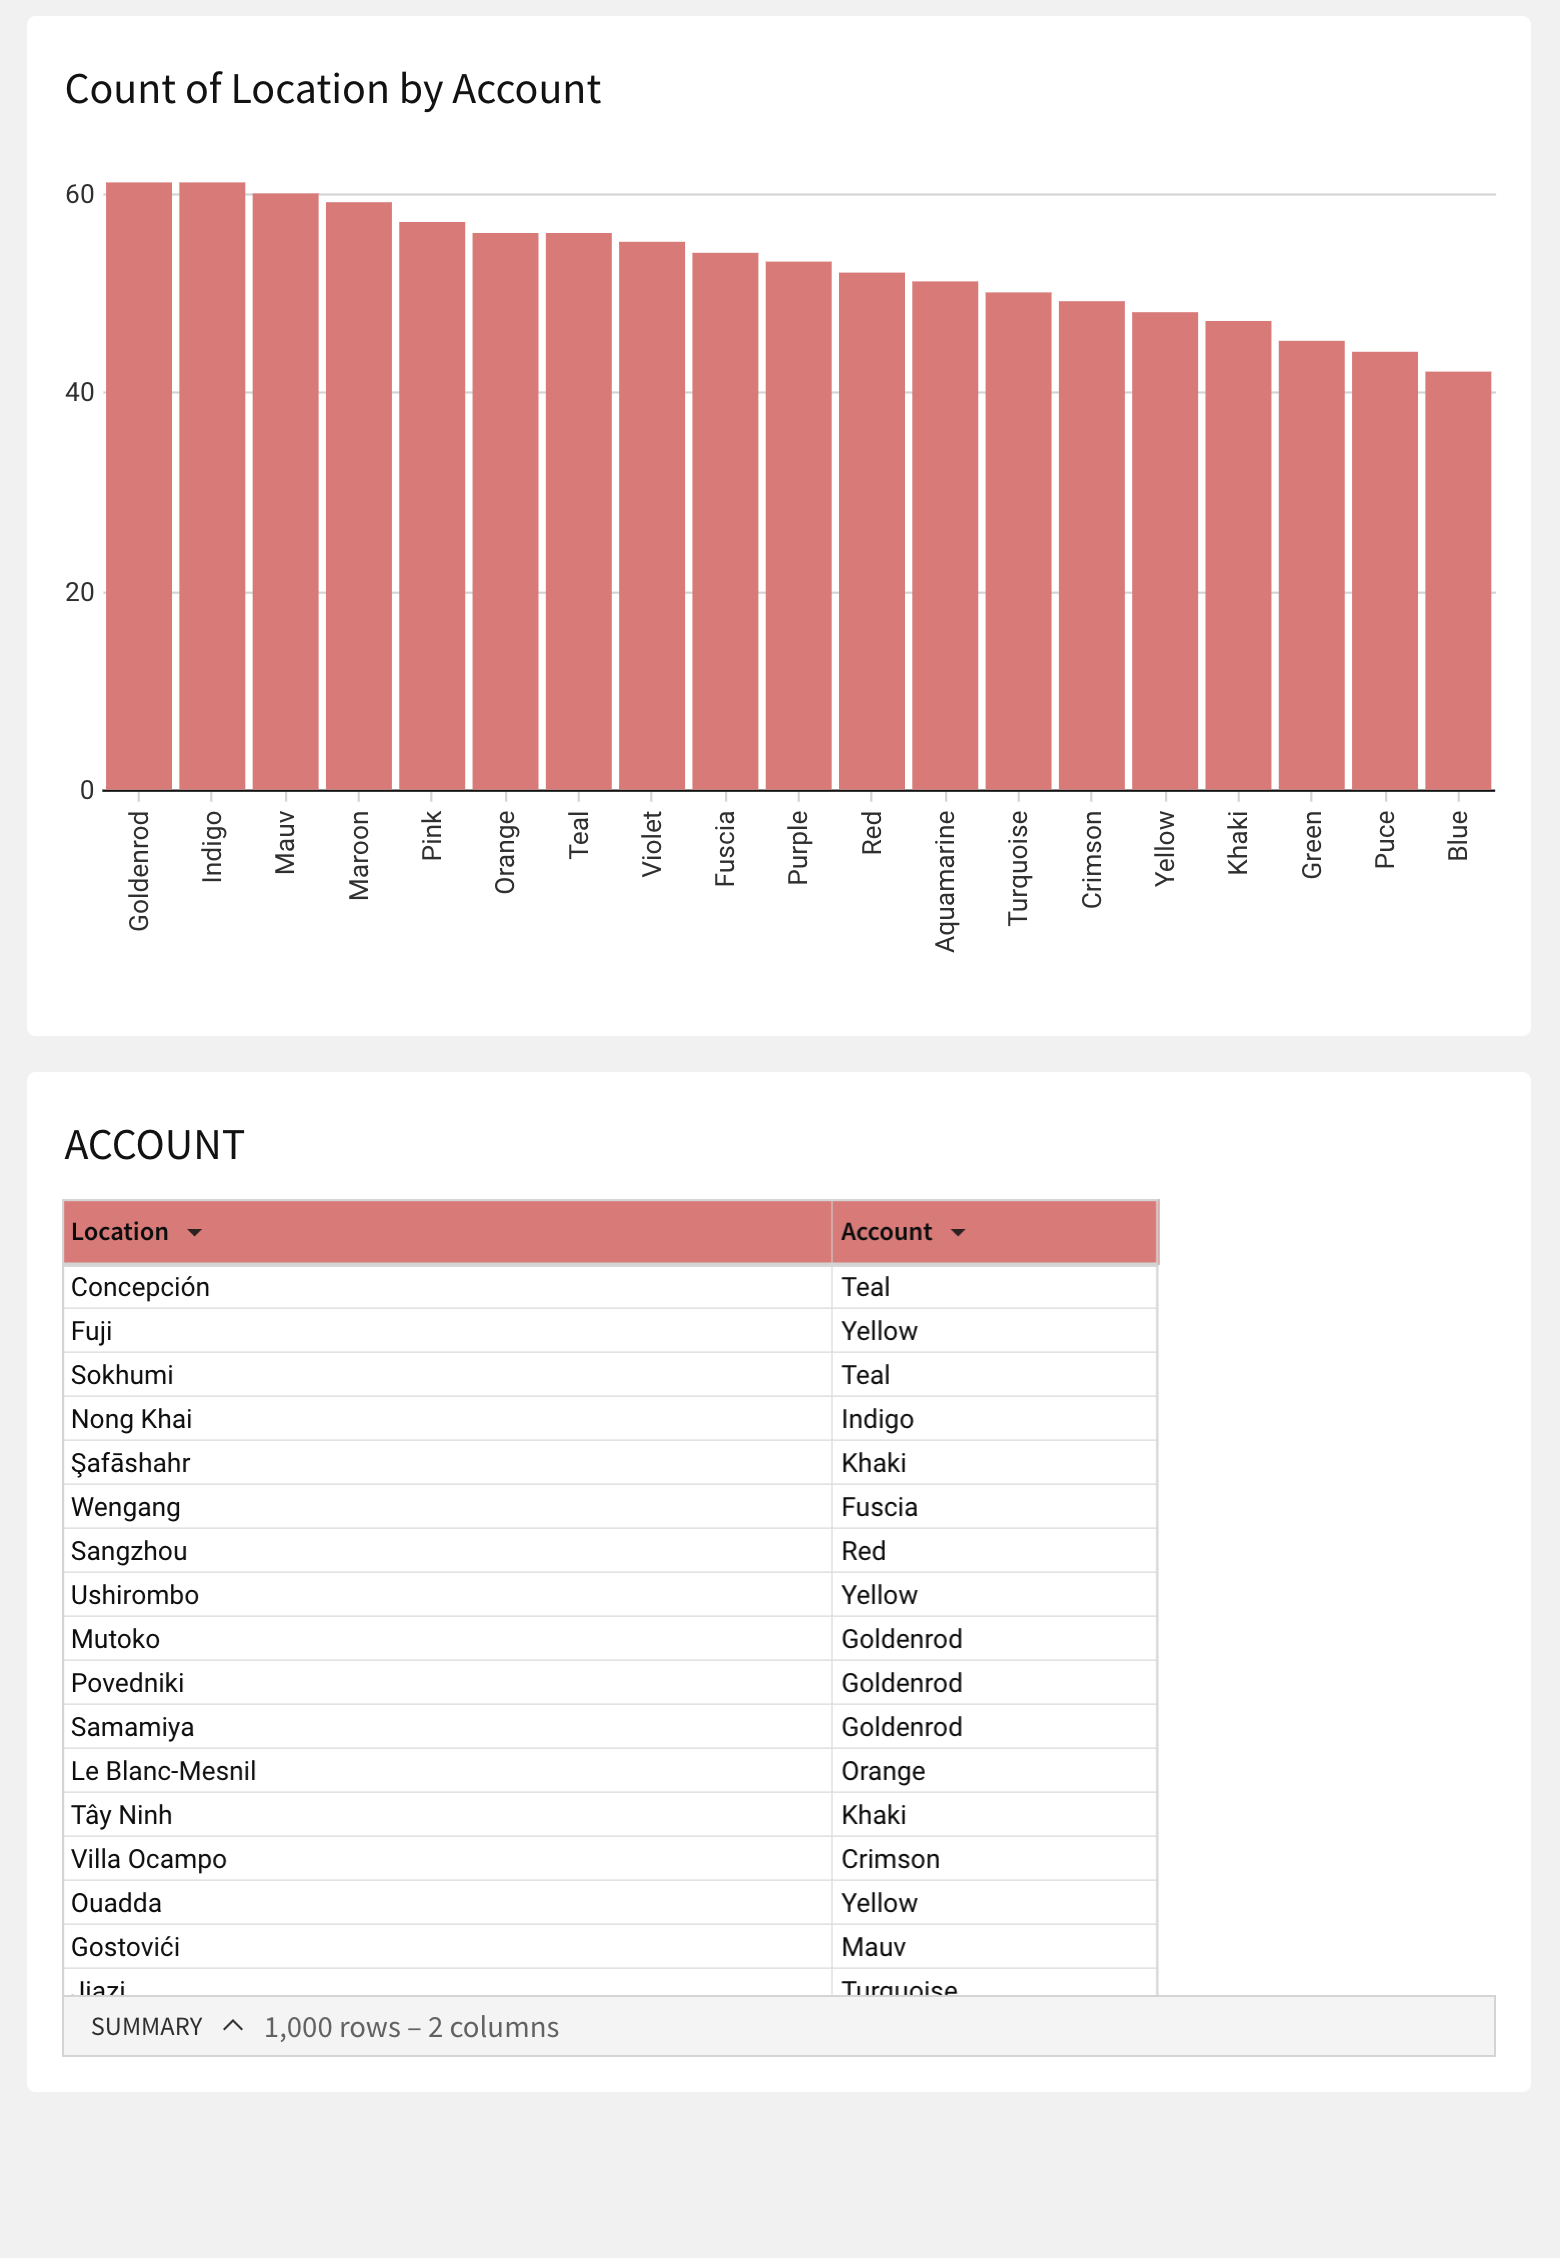
In this example, no configuration changes have been made and a PDF export in portrait orientation exports a table with the same number as rows that are visible in the workbook:
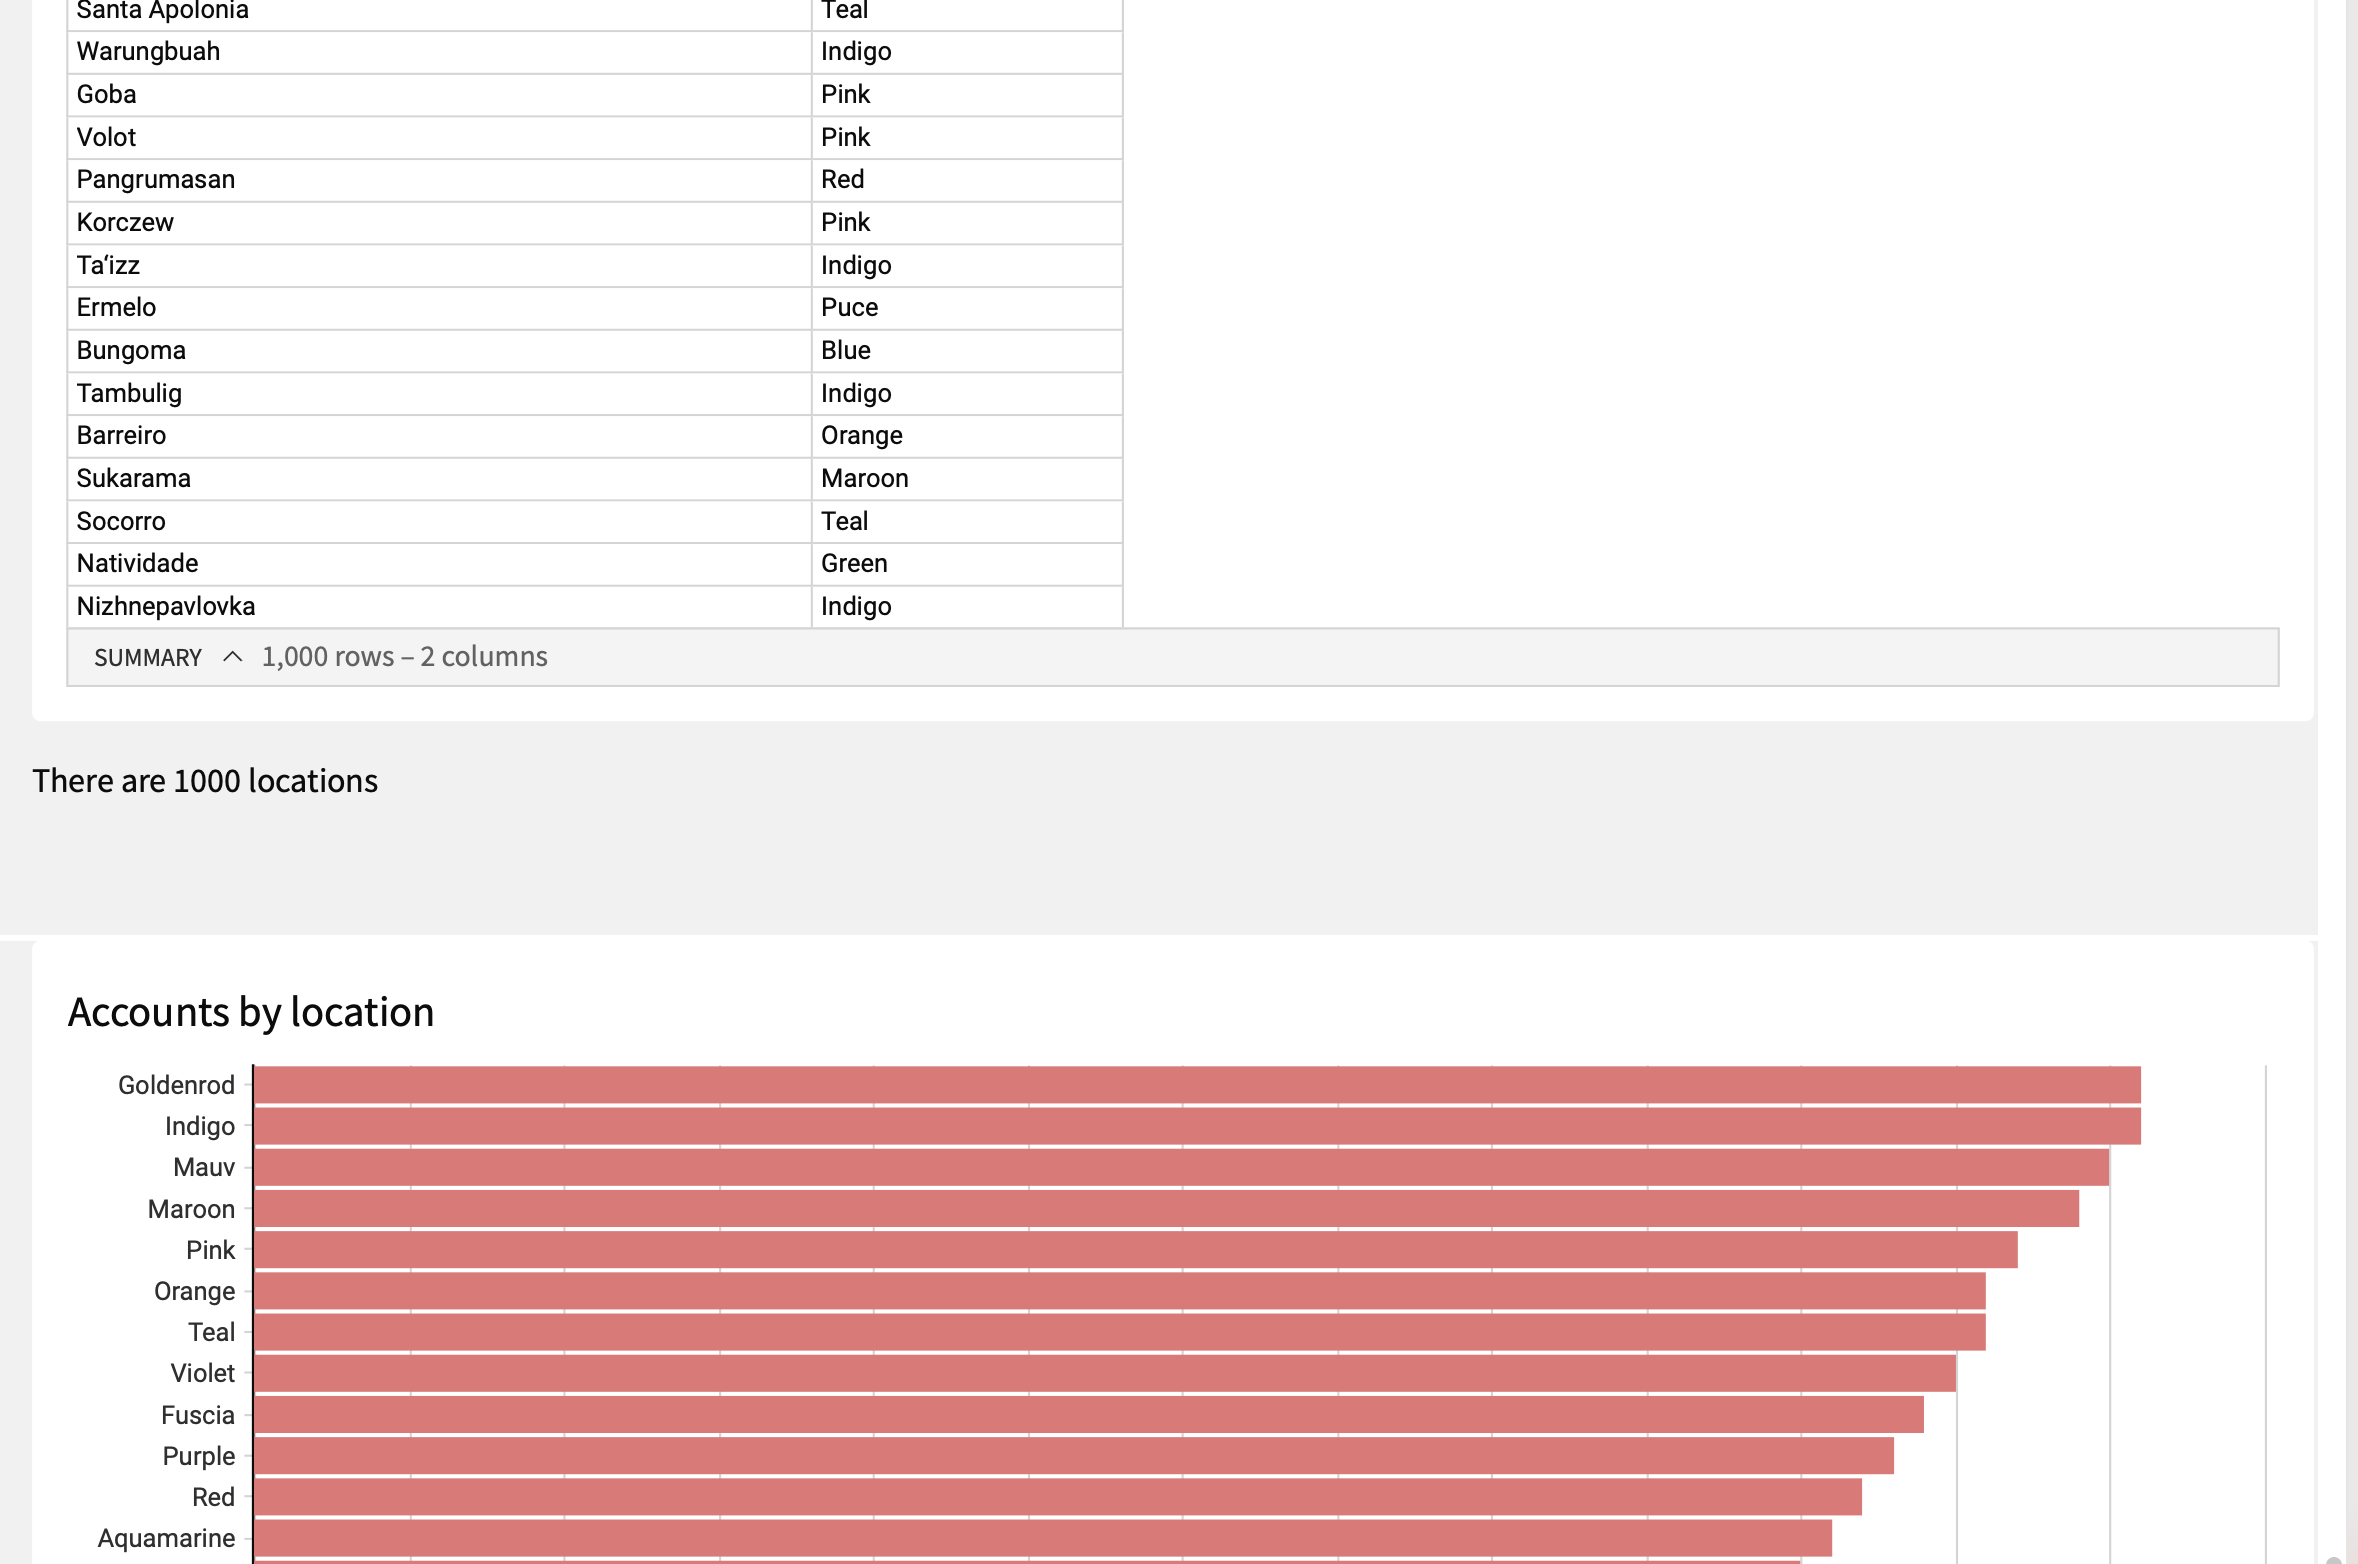
In this example, the option to show up to 1,000 rows of data for a table has been selected, but no page break element is used on the workbook page. Choosing a PDF export in portrait orientation exports a table of up to 1000 rows, and at the end of the 1000 row table, a text element is visible on the same page. On the next page, another data element is visible:
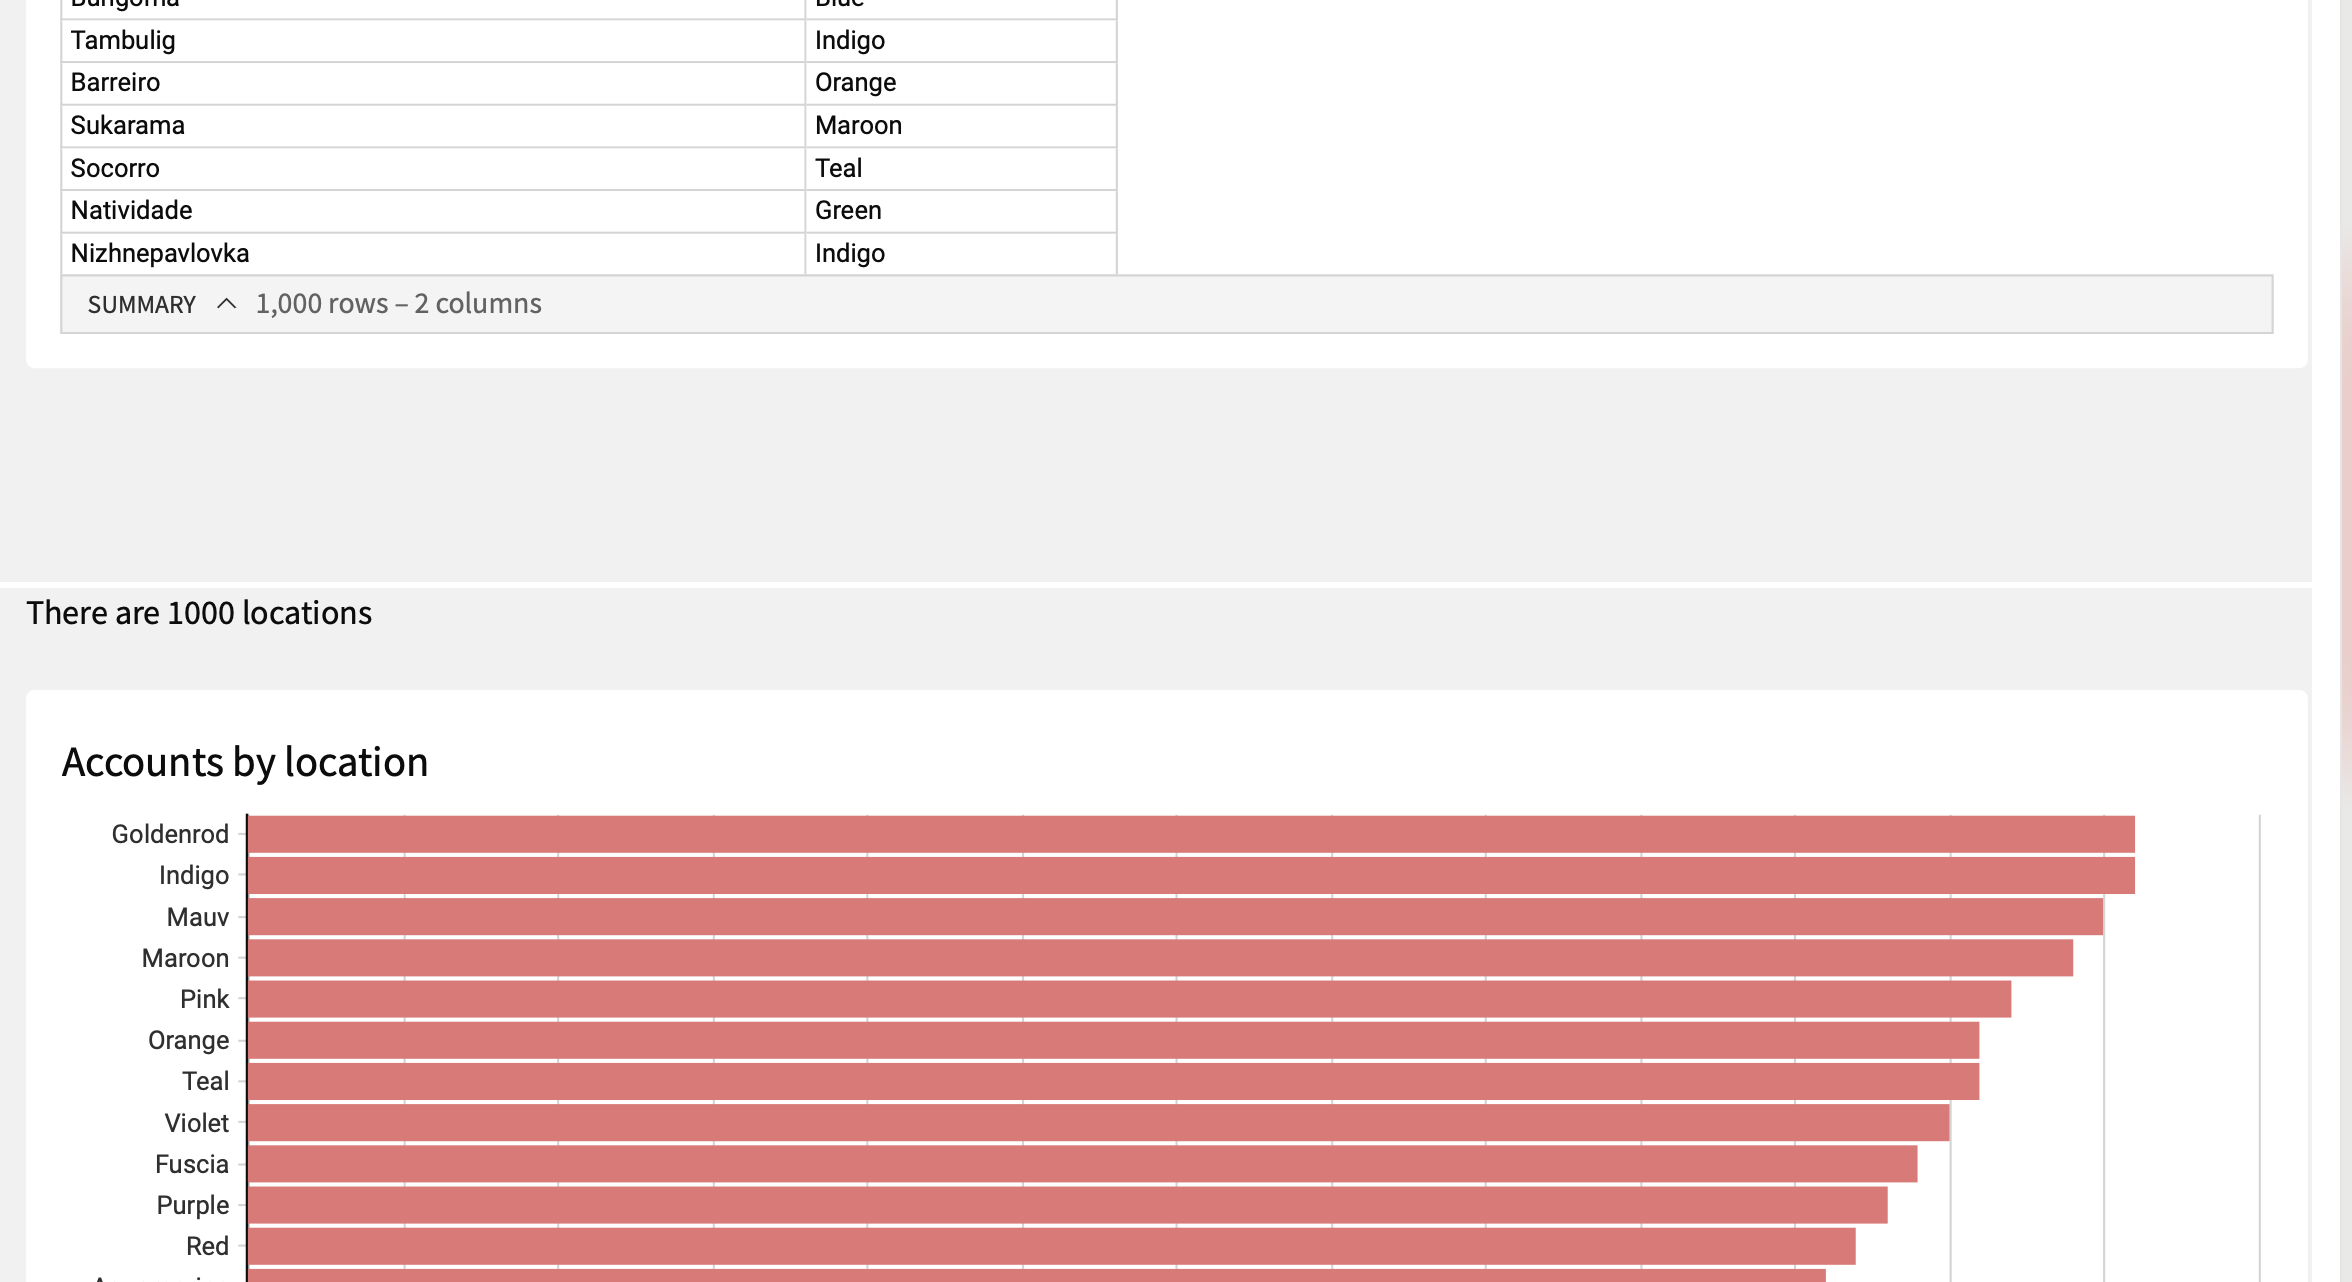
In this example, the option to show up to 1,000 rows of data for a table has been selected and a page break element is used on the workbook page before a text element and a second data element. Choosing a PDF export in portrait orientation exports a table of up to 1000 rows, and at the end of the 1000 row table, there is a page break. On the next page, a text element is visible, followed by another data element:
to open the workbook's **Add New Element** panel.
3. In the **PDF export elements** section, select a **Page break** element and drag it onto the workbook canvas.
4. Publish the workbook.
5. Export the workbook to PDF to make sure the output looks as desired.
6. Make any necessary changes, then set up a scheduled export to your preferred destination.
### Example PDF layout configurations
In this example, no configuration changes have been made and a PDF export in portrait orientation exports a table with the same number as rows that are visible in the workbook:

In this example, the option to show up to 1,000 rows of data for a table has been selected, but no page break element is used on the workbook page. Choosing a PDF export in portrait orientation exports a table of up to 1000 rows, and at the end of the 1000 row table, a text element is visible on the same page. On the next page, another data element is visible:

In this example, the option to show up to 1,000 rows of data for a table has been selected and a page break element is used on the workbook page before a text element and a second data element. Choosing a PDF export in portrait orientation exports a table of up to 1000 rows, and at the end of the 1000 row table, there is a page break. On the next page, a text element is visible, followed by another data element:
